
搜索到
7
篇与
的结果
-
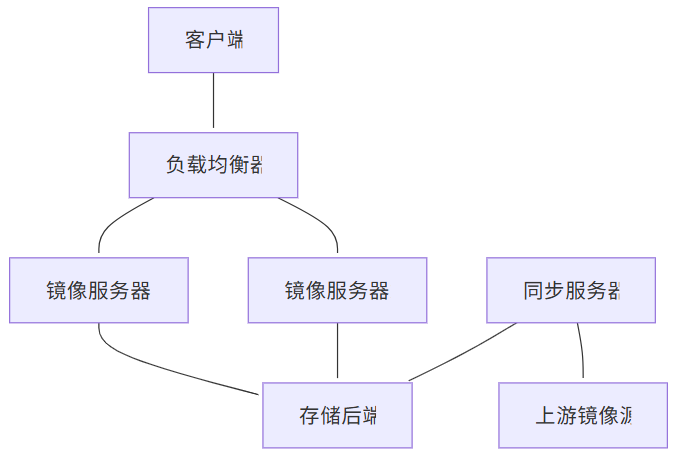
 搭建私有 Linux 镜像仓库:从零到生产的完整指南(ubuntu,centos,docker) 概述为什么需要私有镜像仓库?在企业环境中,搭建私有Linux镜像仓库具有以下优势:网络优化:减少外网带宽消耗,提升下载速度安全控制:内网环境下的安全软件分发版本管理:统一管理软件包版本,确保环境一致性离线部署:支持无外网环境的软件安装成本节约:减少重复下载,节省带宽成本架构设计环境准备硬件要求组件最低配置推荐配置生产环境CPU2核4核8核+内存4GB8GB16GB+存储500GB2TB10TB+网络100Mbps1Gbps10Gbps软件环境# 操作系统:Ubuntu 22.04 LTS 或 CentOS 8 # Web服务器:Nginx # 同步工具:rsync, apt-mirror, reposync # 监控:Prometheus + Grafana目录规划# 创建目录结构 sudomkdir -p /data/mirrors/{ubuntu,centos,docker,alpine} sudomkdir -p /data/mirrors/logs sudomkdir -p /data/mirrors/scripts sudomkdir -p /etc/mirrors搭建APT私有镜像源安装apt-mirror# Ubuntu/Debian系统 sudo apt update sudo apt install -y apt-mirror nginx # 创建镜像用户 sudo useradd -r -s /bin/false -d /data/mirrors aptmirror sudochown -R aptmirror:aptmirror /data/mirrors配置apt-mirror# 编辑配置文件 sudo nano /etc/apt/mirror.list# /etc/apt/mirror.list ############# config ################## set base_path /data/mirrors/ubuntu set mirror_path $base_path/mirror set skel_path $base_path/skel set var_path $base_path/var set cleanscript $var_path/clean.sh set defaultarch amd64 set postmirror_script $var_path/postmirror.sh set run_postmirror 0 set nthreads 20 set _tilde 0 ############# end config ############## # Ubuntu 22.04 LTS (Jammy) deb http://archive.ubuntu.com/ubuntu jammy main restricted universe multiverse deb http://archive.ubuntu.com/ubuntu jammy-updates main restricted universe multiverse deb http://archive.ubuntu.com/ubuntu jammy-backports main restricted universe multiverse deb http://security.ubuntu.com/ubuntu jammy-security main restricted universe multiverse # Ubuntu 20.04 LTS (Focal) deb http://archive.ubuntu.com/ubuntu focal main restricted universe multiverse deb http://archive.ubuntu.com/ubuntu focal-updates main restricted universe multiverse deb http://archive.ubuntu.com/ubuntu focal-backports main restricted universe multiverse deb http://security.ubuntu.com/ubuntu focal-security main restricted universe multiverse # 源码包(可选) # deb-src http://archive.ubuntu.com/ubuntu jammy main restricted universe multiverse # 清理脚本 clean http://archive.ubuntu.com/ubuntu clean http://security.ubuntu.com/ubuntu创建同步脚本# 创建同步脚本 sudo nano /data/mirrors/scripts/sync-ubuntu.sh#!/bin/bash # Ubuntu镜像同步脚本 set -e LOGFILE="/data/mirrors/logs/ubuntu-sync-$(date +%Y%m%d-%H%M%S).log" LOCKFILE="/var/run/ubuntu-mirror.lock" # 检查锁文件 if [ -f "$LOCKFILE" ]; then echo"同步进程已在运行,退出..." exit 1 fi # 创建锁文件 echo $$ > "$LOCKFILE" # 清理函数 cleanup() { rm -f "$LOCKFILE" } trap cleanup EXIT echo"开始Ubuntu镜像同步: $(date)" | tee -a "$LOGFILE" # 执行同步 sudo -u aptmirror apt-mirror /etc/apt/mirror.list 2>&1 | tee -a "$LOGFILE" # 更新时间戳 echo"$(date)" > /data/mirrors/ubuntu/last_update echo"Ubuntu镜像同步完成: $(date)" | tee -a "$LOGFILE" # 清理旧日志(保留30天) find /data/mirrors/logs -name "ubuntu-sync-*.log" -mtime +30 -delete # 发送通知(可选) # curl -X POST -H 'Content-type: application/json' \ # --data '{"text":"Ubuntu镜像同步完成"}' \ # YOUR_WEBHOOK_URL# 设置执行权限 sudochmod +x /data/mirrors/scripts/sync-ubuntu.sh配置Nginx# 创建Nginx配置 sudo nano /etc/nginx/sites-available/ubuntu-mirrorserver { listen80; server_name ubuntu-mirror.example.com; root /data/mirrors/ubuntu/mirror; index index.html; # 访问日志 access_log /var/log/nginx/ubuntu-mirror.access.log; error_log /var/log/nginx/ubuntu-mirror.error.log; # 基本配置 location / { autoindexon; autoindex_exact_sizeoff; autoindex_localtimeon; # 缓存配置 expires1d; add_header Cache-Control "public, immutable"; # 安全头 add_header X-Frame-Options "SAMEORIGIN"; add_header X-Content-Type-Options "nosniff"; } # 包文件缓存 location~* \.(deb|udeb|tar\.gz|tar\.xz|tar\.bz2)$ { expires7d; add_header Cache-Control "public, immutable"; } # 元数据文件 location~* (Release|Packages|Sources)$ { expires1h; add_header Cache-Control "public, must-revalidate"; } # 状态页面 location /status { alias /data/mirrors/ubuntu/; try_files /last_update =404; add_header Content-Type text/plain; } # 禁止访问隐藏文件 location~ /\. { deny all; } }# 启用站点 sudoln -s /etc/nginx/sites-available/ubuntu-mirror /etc/nginx/sites-enabled/ sudo nginx -t sudo systemctl reload nginx搭建YUM私有镜像源安装reposync# CentOS/RHEL系统 sudo yum install -y yum-utils createrepo nginx # 或者在Ubuntu上安装 sudo apt install -y yum-utils createrepo-c nginx配置YUM仓库同步# 创建CentOS 8同步脚本 sudo nano /data/mirrors/scripts/sync-centos.sh#!/bin/bash # CentOS镜像同步脚本 set -e MIRROR_BASE="/data/mirrors/centos" LOGFILE="/data/mirrors/logs/centos-sync-$(date +%Y%m%d-%H%M%S).log" LOCKFILE="/var/run/centos-mirror.lock" # 检查锁文件 if [ -f "$LOCKFILE" ]; then echo"同步进程已在运行,退出..." exit 1 fi echo $$ > "$LOCKFILE" cleanup() { rm -f "$LOCKFILE" } trap cleanup EXIT echo"开始CentOS镜像同步: $(date)" | tee -a "$LOGFILE" # 同步CentOS 8 Stream sync_centos_stream() { local version=$1 local repo_dir="$MIRROR_BASE/$version" mkdir -p "$repo_dir" # 同步各个仓库 for repo in baseos appstream extras powertools; do echo"同步 CentOS $version$repo..." | tee -a "$LOGFILE" reposync \ --download-path="$repo_dir" \ --repo="$repo" \ --arch=x86_64 \ --newest-only \ --delete \ 2>&1 | tee -a "$LOGFILE" # 创建仓库元数据 createrepo_c "$repo_dir/$repo/" 2>&1 | tee -a "$LOGFILE" done } # 同步不同版本 sync_centos_stream "8-stream" sync_centos_stream "9-stream" # 更新时间戳 echo"$(date)" > "$MIRROR_BASE/last_update" echo"CentOS镜像同步完成: $(date)" | tee -a "$LOGFILE" # 清理旧日志 find /data/mirrors/logs -name "centos-sync-*.log" -mtime +30 -delete配置YUM仓库文件# 创建仓库配置模板 sudo nano /data/mirrors/centos/centos8-stream.repo[baseos] name=CentOS Stream $releasever - BaseOS baseurl=http://your-mirror.example.com/centos/8-stream/baseos/ gpgcheck=1 enabled=1 gpgkey=file:///etc/pki/rpm-gpg/RPM-GPG-KEY-centosofficial [appstream] name=CentOS Stream $releasever - AppStream baseurl=http://your-mirror.example.com/centos/8-stream/appstream/ gpgcheck=1 enabled=1 gpgkey=file:///etc/pki/rpm-gpg/RPM-GPG-KEY-centosofficial [extras] name=CentOS Stream $releasever - Extras baseurl=http://your-mirror.example.com/centos/8-stream/extras/ gpgcheck=1 enabled=1 gpgkey=file:///etc/pki/rpm-gpg/RPM-GPG-KEY-centosofficial [powertools] name=CentOS Stream $releasever - PowerTools baseurl=http://your-mirror.example.com/centos/8-stream/powertools/ gpgcheck=1 enabled=0 gpgkey=file:///etc/pki/rpm-gpg/RPM-GPG-KEY-centosofficialNginx配置(CentOS)server { listen80; server_name centos-mirror.example.com; root /data/mirrors/centos; index index.html; access_log /var/log/nginx/centos-mirror.access.log; error_log /var/log/nginx/centos-mirror.error.log; location / { autoindexon; autoindex_exact_sizeoff; autoindex_localtimeon; expires1d; add_header Cache-Control "public, immutable"; } # RPM包缓存 location~* \.rpm$ { expires7d; add_header Cache-Control "public, immutable"; } # 元数据缓存 location~* (repomd\.xml|primary\.xml|filelists\.xml|other\.xml)$ { expires1h; add_header Cache-Control "public, must-revalidate"; } # 仓库配置文件下载 location /repo-files/ { alias /data/mirrors/centos/; try_files$uri$uri.repo =404; add_header Content-Type text/plain; } }搭建Docker私有镜像仓库安装Docker Registry# 安装Docker curl -fsSL https://get.docker.com | sh sudo usermod -aG docker $USER # 创建Registry目录 sudomkdir -p /data/mirrors/docker/{registry,auth,certs}配置Registry# 创建Registry配置文件 sudo nano /data/mirrors/docker/config.ymlversion:0.1 log: accesslog: disabled:false level:info formatter:text fields: service:registry storage: cache: blobdescriptor:inmemory filesystem: rootdirectory:/var/lib/registry delete: enabled:true http: addr::5000 headers: X-Content-Type-Options: [nosniff] Access-Control-Allow-Origin: ['*'] Access-Control-Allow-Methods: ['HEAD', 'GET', 'OPTIONS', 'DELETE'] Access-Control-Allow-Headers: ['Authorization', 'Accept', 'Cache-Control'] health: storagedriver: enabled:true interval:10s threshold:3 proxy: remoteurl:https://registry-1.docker.io username:your-dockerhub-username password:your-dockerhub-password启动Registry服务# 创建docker-compose文件 sudo nano /data/mirrors/docker/docker-compose.ymlversion:'3.8' services: registry: image:registry:2.8 container_name:docker-registry restart:unless-stopped ports: -"5000:5000" environment: REGISTRY_CONFIG_PATH:/etc/docker/registry/config.yml REGISTRY_STORAGE_FILESYSTEM_ROOTDIRECTORY:/var/lib/registry volumes: -/data/mirrors/docker/registry:/var/lib/registry -/data/mirrors/docker/config.yml:/etc/docker/registry/config.yml:ro networks: -registry-net registry-ui: image:joxit/docker-registry-ui:latest container_name:registry-ui restart:unless-stopped ports: -"8080:80" environment: REGISTRY_TITLE:"Private Docker Registry" REGISTRY_URL:http://registry:5000 DELETE_IMAGES:"true" SHOW_CONTENT_DIGEST:"true" depends_on: -registry networks: -registry-net networks: registry-net: driver:bridge# 启动服务 cd /data/mirrors/docker sudo docker-compose up -d配置Registry代理# Docker Registry Nginx配置 server { listen80; server_name docker-registry.example.com; client_max_body_size0; chunked_transfer_encodingon; location /v2/ { proxy_pass http://localhost:5000; proxy_set_header Host $http_host; proxy_set_header X-Real-IP $remote_addr; proxy_set_header X-Forwarded-For $proxy_add_x_forwarded_for; proxy_set_header X-Forwarded-Proto $scheme; proxy_read_timeout900; } location / { proxy_pass http://localhost:8080; proxy_set_header Host $http_host; proxy_set_header X-Real-IP $remote_addr; proxy_set_header X-Forwarded-For $proxy_add_x_forwarded_for; proxy_set_header X-Forwarded-Proto $scheme; } }自动化同步与更新创建统一同步脚本# 创建主同步脚本 sudo nano /data/mirrors/scripts/sync-all.sh#!/bin/bash # 统一镜像同步脚本 set -e SCRIPT_DIR="/data/mirrors/scripts" LOG_DIR="/data/mirrors/logs" NOTIFICATION_URL="${WEBHOOK_URL:-}" # 日志函数 log() { echo"[$(date '+%Y-%m-%d %H:%M:%S')] $1" | tee -a "$LOG_DIR/sync-all.log" } # 通知函数 notify() { local message="$1" local status="$2" log"$message" if [ -n "$NOTIFICATION_URL" ]; then curl -X POST -H 'Content-type: application/json' \ --data "{\"text\":\"$message\", \"status\":\"$status\"}" \ "$NOTIFICATION_URL" || true fi } # 执行同步任务 run_sync() { local script="$1" local name="$2" if [ -f "$script" ]; then log"开始同步 $name" if"$script"; then notify "$name 同步成功""success" else notify "$name 同步失败""error" return 1 fi else log"同步脚本不存在: $script" return 1 fi } # 主执行流程 main() { log"开始镜像同步任务" local failed=0 # 同步Ubuntu run_sync "$SCRIPT_DIR/sync-ubuntu.sh""Ubuntu" || ((failed++)) # 同步CentOS run_sync "$SCRIPT_DIR/sync-centos.sh""CentOS" || ((failed++)) # 清理旧日志 find "$LOG_DIR" -name "*.log" -mtime +30 -delete if [ $failed -eq 0 ]; then notify "所有镜像同步完成""success" else notify "有 $failed 个镜像同步失败""warning" fi log"镜像同步任务结束" } main "$@"配置定时任务# 编辑crontab sudo crontab -e # 添加定时任务 # 每天凌晨2点同步 0 2 * * * /data/mirrors/scripts/sync-all.sh # 每周日凌晨1点清理Docker Registry 0 1 * * 0 /data/mirrors/scripts/cleanup-docker.sh # 每小时检查服务状态 0 * * * * /data/mirrors/scripts/health-check.sh健康检查脚本# 创建健康检查脚本 sudo nano /data/mirrors/scripts/health-check.sh#!/bin/bash # 服务健康检查脚本 SERVICES=("nginx""docker") LOG_FILE="/data/mirrors/logs/health-check.log" log() { echo"[$(date '+%Y-%m-%d %H:%M:%S')] $1" >> "$LOG_FILE" } check_service() { local service="$1" if systemctl is-active --quiet "$service"; then log"$service 服务正常运行" return 0 else log"$service 服务异常,尝试重启" systemctl restart "$service" sleep 5 if systemctl is-active --quiet "$service"; then log"$service 服务重启成功" return 0 else log"$service 服务重启失败" return 1 fi fi } check_disk_space() { local usage=$(df /data/mirrors | awk 'NR==2 {print $5}' | sed 's/%//') if [ "$usage" -gt 85 ]; then log"磁盘空间不足: ${usage}%" # 发送告警 return 1 else log"磁盘空间正常: ${usage}%" return 0 fi } # 主检查流程 main() { local failed=0 # 检查服务状态 for service in"${SERVICES[@]}"; do check_service "$service" || ((failed++)) done # 检查磁盘空间 check_disk_space || ((failed++)) # 检查网络连通性 if ! curl -s --max-time 10 http://localhost/status > /dev/null; then log"Web服务访问异常" ((failed++)) fi if [ $failed -eq 0 ]; then log"所有检查项正常" else log"发现 $failed 个异常项" fi } main "$@"高可用与负载均衡配置HAProxy负载均衡# 安装HAProxy sudo apt install -y haproxy # 配置HAProxy sudo nano /etc/haproxy/haproxy.cfgglobal daemon chroot /var/lib/haproxy stats socket /run/haproxy/admin.sock mode 660 level admin stats timeout 30s user haproxy group haproxy defaults mode http timeout connect 5000ms timeout client 50000ms timeout server 50000ms option httplog option dontlognull errorfile 400 /etc/haproxy/errors/400.http errorfile 403 /etc/haproxy/errors/403.http errorfile 408 /etc/haproxy/errors/408.http errorfile 500 /etc/haproxy/errors/500.http errorfile 502 /etc/haproxy/errors/502.http errorfile 503 /etc/haproxy/errors/503.http errorfile 504 /etc/haproxy/errors/504.http frontend mirror_frontend bind *:80 bind *:443 ssl crt /etc/ssl/certs/mirror.pem redirect scheme https if !{ ssl_fc } # 根据域名分发 acl is_ubuntu hdr(host) -i ubuntu-mirror.example.com acl is_centos hdr(host) -i centos-mirror.example.com acl is_docker hdr(host) -i docker-registry.example.com use_backend ubuntu_backend if is_ubuntu use_backend centos_backend if is_centos use_backend docker_backend if is_docker default_backend ubuntu_backend backend ubuntu_backend balance roundrobin option httpchk GET /status server ubuntu1 192.168.1.10:80 check server ubuntu2 192.168.1.11:80 check backup backend centos_backend balance roundrobin option httpchk GET /status server centos1 192.168.1.10:80 check server centos2 192.168.1.11:80 check backup backend docker_backend balance roundrobin option httpchk GET /v2/ server docker1 192.168.1.10:5000 check server docker2 192.168.1.11:5000 check backup listen stats bind *:8404 stats enable stats uri /stats stats refresh 30s stats admin if TRUE配置Keepalived高可用# 安装Keepalived sudo apt install -y keepalived # 主节点配置 sudo nano /etc/keepalived/keepalived.conf# 主节点配置 vrrp_script chk_haproxy { script "/bin/kill -0 `cat /var/run/haproxy.pid`" interval 2 weight 2 fall 3 rise 2 } vrrp_instance VI_1 { state MASTER interface eth0 virtual_router_id 51 priority 101 advert_int 1 authentication { auth_type PASS auth_pass 1111 } virtual_ipaddress { 192.168.1.100 } track_script { chk_haproxy } }监控与维护配置Prometheus监控# 创建Prometheus配置 sudo nano /etc/prometheus/prometheus.ymlglobal: scrape_interval:15s evaluation_interval:15s rule_files: -"mirror_rules.yml" scrape_configs: -job_name:'prometheus' static_configs: -targets: ['localhost:9090'] -job_name:'node-exporter' static_configs: -targets: ['localhost:9100'] -job_name:'nginx' static_configs: -targets: ['localhost:9113'] -job_name:'haproxy' static_configs: -targets: ['localhost:8404'] alerting: alertmanagers: -static_configs: -targets: -alertmanager:9093创建告警规则# 创建告警规则 sudo nano /etc/prometheus/mirror_rules.ymlgroups: -name:mirror_alerts rules: -alert:HighDiskUsage expr:(node_filesystem_size_bytes{mountpoint="/data"}-node_filesystem_free_bytes{mountpoint="/data"})/node_filesystem_size_bytes{mountpoint="/data"}*100>85 for:5m labels: severity:warning annotations: summary:"磁盘使用率过高" description:"镜像存储磁盘使用率超过85%" -alert:ServiceDown expr:up==0 for:2m labels: severity:critical annotations: summary:"服务不可用" description:"{{ $labels.instance }} 服务已停止" -alert:HighMemoryUsage expr:(1-(node_memory_MemAvailable_bytes/node_memory_MemTotal_bytes))*100>90 for:5m labels: severity:warning annotations: summary:"内存使用率过高" description:"内存使用率超过90%" -alert:SyncJobFailed expr:increase(sync_job_failures_total[1h])>0 for:0m labels: severity:critical annotations: summary:"镜像同步失败" description:"镜像同步任务执行失败"Grafana仪表板{ "dashboard":{ "id":null, "title":"Linux Mirror Repository Dashboard", "tags":["mirror","linux"], "timezone":"browser", "panels":[ { "title":"磁盘使用率", "type":"stat", "targets":[ { "expr":"(node_filesystem_size_bytes{mountpoint=\"/data\"} - node_filesystem_free_bytes{mountpoint=\"/data\"}) / node_filesystem_size_bytes{mountpoint=\"/data\"} * 100", "legendFormat":"磁盘使用率" } ], "fieldConfig":{ "defaults":{ "unit":"percent", "thresholds":{ "steps":[ {"color":"green","value":null}, {"color":"yellow","value":70}, {"color":"red","value":85} ] } } } }, { "title":"网络流量", "type":"graph", "targets":[ { "expr":"rate(node_network_receive_bytes_total{device=\"eth0\"}[5m])", "legendFormat":"接收" }, { "expr":"rate(node_network_transmit_bytes_total{device=\"eth0\"}[5m])", "legendFormat":"发送" } ] }, { "title":"同步状态", "type":"table", "targets":[ { "expr":"sync_last_success_timestamp_seconds", "legendFormat":"最后同步时间" } ] } ], "time":{ "from":"now-1h", "to":"now" }, "refresh":"30s" } }安全配置SSL/TLS配置# 生成SSL证书 sudo openssl req -x509 -nodes -days 365 -newkey rsa:2048 \ -keyout /etc/ssl/private/mirror.key \ -out /etc/ssl/certs/mirror.crt \ -subj "/C=CN/ST=Beijing/L=Beijing/O=Company/CN=mirror.example.com" # 合并证书文件(HAProxy使用) sudocat /etc/ssl/certs/mirror.crt /etc/ssl/private/mirror.key > /etc/ssl/certs/mirror.pem访问控制# IP白名单配置 geo$allowed_ip { default0; 192.168.0.0/16 1; 10.0.0.0/8 1; 172.16.0.0/12 1; } server { listen80; server_name mirror.example.com; # IP访问控制 if ($allowed_ip = 0) { return403; } # 限制连接数 limit_conn_zone$binary_remote_addr zone=conn_limit_per_ip:10m; limit_conn conn_limit_per_ip 10; # 限制请求频率 limit_req_zone$binary_remote_addr zone=req_limit_per_ip:10m rate=10r/s; limit_req zone=req_limit_per_ip burst=20 nodelay; location / { # 基本认证(可选) auth_basic"Private Mirror"; auth_basic_user_file /etc/nginx/.htpasswd; # 其他配置... } }防火墙配置# UFW防火墙配置 sudo ufw default deny incoming sudo ufw default allow outgoing # 允许SSH sudo ufw allow ssh # 允许HTTP/HTTPS sudo ufw allow 80/tcp sudo ufw allow 443/tcp # 允许内网访问 sudo ufw allow from 192.168.0.0/16 to any port 80 sudo ufw allow from 10.0.0.0/8 to any port 80 # 启用防火墙 sudo ufw enable故障排除常见问题诊断1. 同步失败问题# 检查网络连通性 curl -I http://archive.ubuntu.com/ubuntu/ # 检查磁盘空间 df -h /data/mirrors # 检查权限 ls -la /data/mirrors/ # 查看同步日志 tail -f /data/mirrors/logs/ubuntu-sync-*.log2. 服务访问问题# 检查Nginx状态 sudo systemctl status nginx sudo nginx -t # 检查端口监听 sudo netstat -tlnp | grep :80 # 检查防火墙 sudo ufw status # 测试本地访问 curl -I http://localhost/3. 性能问题# 检查系统负载 top htop iotop # 检查网络流量 iftop nethogs # 检查磁盘IO iostat -x 1故障恢复脚本# 创建故障恢复脚本 sudo nano /data/mirrors/scripts/recovery.sh#!/bin/bash # 故障恢复脚本 SERVICES=("nginx""docker""haproxy") BACKUP_DIR="/data/backup" # 服务恢复 recover_services() { for service in"${SERVICES[@]}"; do if ! systemctl is-active --quiet "$service"; then echo"恢复服务: $service" systemctl restart "$service" sleep 5 if systemctl is-active --quiet "$service"; then echo"$service 恢复成功" else echo"$service 恢复失败" fi fi done } # 配置文件恢复 recover_configs() { if [ -d "$BACKUP_DIR" ]; then echo"恢复配置文件..." # 恢复Nginx配置 if [ -f "$BACKUP_DIR/nginx.conf" ]; then cp"$BACKUP_DIR/nginx.conf" /etc/nginx/nginx.conf nginx -t && systemctl reload nginx fi # 恢复HAProxy配置 if [ -f "$BACKUP_DIR/haproxy.cfg" ]; then cp"$BACKUP_DIR/haproxy.cfg" /etc/haproxy/haproxy.cfg systemctl reload haproxy fi fi } # 数据完整性检查 check_data_integrity() { echo"检查数据完整性..." # 检查Ubuntu镜像 if [ -f "/data/mirrors/ubuntu/mirror/dists/jammy/Release" ]; then echo"Ubuntu镜像完整" else echo"Ubuntu镜像损坏,需要重新同步" /data/mirrors/scripts/sync-ubuntu.sh fi # 检查CentOS镜像 if [ -f "/data/mirrors/centos/8-stream/baseos/repodata/repomd.xml" ]; then echo"CentOS镜像完整" else echo"CentOS镜像损坏,需要重新同步" /data/mirrors/scripts/sync-centos.sh fi } # 主恢复流程 main() { echo"开始故障恢复..." recover_services recover_configs check_data_integrity echo"故障恢复完成" } main "$@"监控脚本# 创建监控脚本 sudo nano /data/mirrors/scripts/monitor.sh#!/bin/bash # 实时监控脚本 ALERT_EMAIL="admin@example.com" WEBHOOK_URL="https://hooks.slack.com/services/YOUR/WEBHOOK/URL" send_alert() { local message="$1" local severity="$2" echo"[$(date)] ALERT [$severity]: $message" # 发送邮件告警 echo"$message" | mail -s "Mirror Alert [$severity]""$ALERT_EMAIL" # 发送Webhook通知 curl -X POST -H 'Content-type: application/json' \ --data "{\"text\":\"$message\", \"severity\":\"$severity\"}" \ "$WEBHOOK_URL" } # 检查磁盘空间 check_disk() { local usage=$(df /data/mirrors | awk 'NR==2 {print $5}' | sed 's/%//') if [ "$usage" -gt 90 ]; then send_alert "磁盘空间严重不足: ${usage}%""CRITICAL" elif [ "$usage" -gt 80 ]; then send_alert "磁盘空间不足: ${usage}%""WARNING" fi } # 检查同步状态 check_sync() { local last_sync=$(stat -c %Y /data/mirrors/ubuntu/last_update 2>/dev/null || echo 0) local current_time=$(date +%s) local diff=$((current_time - last_sync)) # 如果超过24小时未同步 if [ $diff -gt 86400 ]; then send_alert "Ubuntu镜像同步超时: $((diff/3600))小时""WARNING" fi } # 检查服务状态 check_services() { local services=("nginx""docker") for service in"${services[@]}"; do if ! systemctl is-active --quiet "$service"; then send_alert "$service 服务异常""CRITICAL" fi done } # 主监控循环 main() { whiletrue; do check_disk check_sync check_services sleep 300 # 5分钟检查一次 done } main "$@"总结通过本文的详细指南,我们成功搭建了一个完整的私有 Linux 镜像仓库系统,包括:核心功能• 多发行版支持:Ubuntu、CentOS、Docker镜像• 自动化同步:定时同步上游镜像源• 负载均衡:HAProxy + Keepalived高可用方案• 监控告警:Prometheus + Grafana监控体系运维特性• 安全加固:SSL/TLS、访问控制、防火墙配置• 故障恢复:自动化故障检测和恢复机制• 性能优化:缓存策略、并发控制• 日志管理:完整的日志记录和轮转最佳实践定期备份:配置文件和关键数据的定期备份容量规划:根据使用情况合理规划存储容量网络优化:配置适当的缓存和CDN策略安全更新:及时更新系统和软件包这套方案可以满足企业级的私有镜像仓库需求,提供稳定、高效、安全的软件包分发服务。
 -
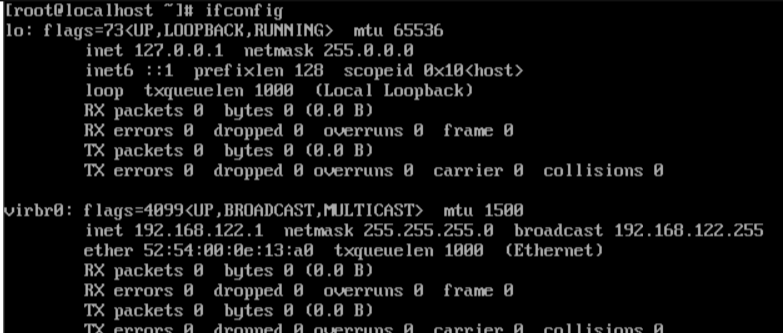
CentOS 7 ens33获取不到ip地址和启动网卡报错的解决方法 当我们启动虚拟机输入 ifconfig 查看 IP 地址时出现下图这样的情况,发现没有 ens33 移动到 /etc/sysconfig/network-scripts 编辑 ifcfg-ens33cd /etc/sysconfig/network-scripts vim ifcfg-ens33将 ONBOOT=NO 改成 ONBOOT=yes 输入 i 进行编辑;将最后 ONBOOT=no 改为 yes 即可;单击 esc 键,然后输入 :wq 保存退出。这样就开启了 ens33 ;接着重启网络服务就可以看到 ip 地址。重启网络服务service network restart 出现下图表示已经重启成功输入 ifconfig ens33 有了 ip 地址。出现 异常# 关闭NetworkManager服务 systemctl stop NetworkManager systemctl restart network.service service network restart # 问题解决
-
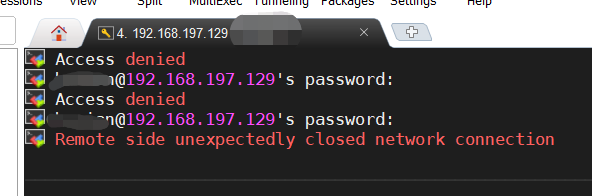
Linux SSH Access denied(拒绝访问)解决方案 新安装的 CentOS 7 使用 SSH 连接出现 Access denied,记录一下这个坑。详细问题如下(见图):解决方案查了下资料,Linux 系统默认就是禁止远程登录的。那就打开权限就行了。因为需要修改系统设置,普通用户会出现没有权限,所以在超级管理员下操作!编辑配置文件:vim /etc/ssh/sshd_config修改 PermitRootLogin 为 yes退出编辑:按下 'Esc' 键,输入 ':wq',回车保存即可。重启 SSH:systemctl restart sshd大功告成,可以使用 ssh 链接了~~
-
centos 安装golang 1.18 # 下载安装 cd /usr/local/src wget https://golang.google.cn/dl/go1.18.linux-amd64.tar.gz tar -zxvf go1.18.linux-amd64.tar.gz -C /usr/local/ # 增加配置文件 vim /etc/profile export GOROOT=/usr/local/go export PATH=$PATH:$GOROOT/bin export GOPATH=/opt/go export PATH=$PATH:$GOPATH/BIN export GO111MODULE=on export GOPROXY=https://goproxy.cn # 应用改变 source /etc/profile # 查看版本 go version - go version go1.18 linux/amd64
-
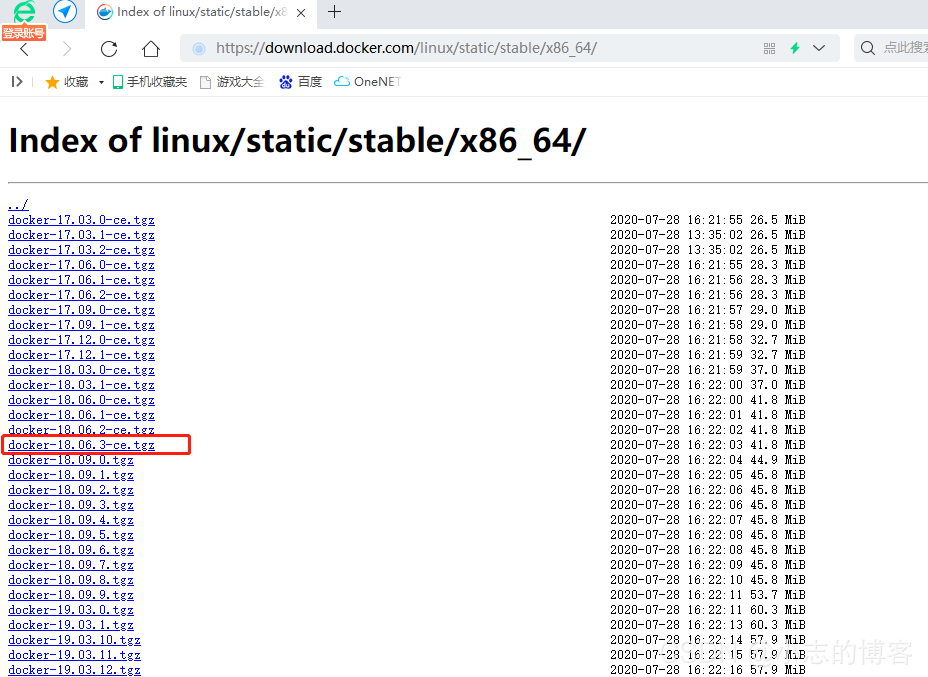
CentOS7离线安装Docker和卸载Docker步骤(亲测有效) 一、CentOS7离线安装 Docker 步骤1、docker 安装包下载地址https://download.docker.com/linux/static/stable/x86_64/2、将下载的 docker-18.06.3-ce.tgz 文件上传到 Centos7 服务器上(如上传到 /home/docker 目录下),并执行 tar 命令解压,如下图:tar -zxvf docker-18.06.3-ce.tgz3、将/home/docker 目录下解压出来的所有 docker 文件复制到 /usr/bin/ 目录下cp docker/* /usr/bin/4、将 docker 注册为 service,进入/etc/systemd/system/目录,并创建 docker.service 文件cd /etc/systemd/system/touch docker.service5、编辑 docker.service 文件,将以下内容复制到 docker.service 文件中注:以下内容中 --insecure-registry=192.168.3.10 此处改为你自己服务器 ipvim docker.service[Unit] Description=Docker Application Container Engine Documentation=https://docs.docker.com After=network-online.target firewalld.service Wants=network-online.target [Service] Type=notify # the default is not to use systemd for cgroups because the delegate issues still # exists and systemd currently does not support the cgroup feature set required # for containers run by docker ExecStart=/usr/bin/dockerd --selinux-enabled=false --insecure-registry=192.168.3.10 ExecReload=/bin/kill -s HUP $MAINPID # Having non-zero Limit*s causes performance problems due to accounting overhead # in the kernel. We recommend using cgroups to do container-local accounting. LimitNOFILE=infinity LimitNPROC=infinity LimitCORE=infinity # Uncomment TasksMax if your systemd version supports it. # Only systemd 226 and above support this version. #TasksMax=infinity TimeoutStartSec=0 # set delegate yes so that systemd does not reset the cgroups of docker containers Delegate=yes # kill only the docker process, not all processes in the cgroup KillMode=process # restart the docker process if it exits prematurely Restart=on-failure StartLimitBurst=3 StartLimitInterval=60s [Install] WantedBy=multi-user.target6、给 docker.service 文件添加执行权限chmod 777 /etc/systemd/system/docker.service7、重新加载配置文件注:每次修改 docker.service 这个文件时都要重新加载下。systemctl daemon-reload8、启动 Docker 服务systemctl start docker9、设置开机启动 Docker 服务systemctl enable docker.service10、验证 docker 是否启动成功查看 Docker 状态,显示 active(running)表示启动成功systemctl status docker查看 Docker 版本docker -v11、配置镜像加速器,默认是到国外拉取镜像速度慢,如下图:编辑 /etc/docker/目录下的 daemon.json 文件,将以下内容复制到 daemon.json 文件中vim /etc/docker/daemon.json{"registry-mirrors": ["http://hub-mirror.c.163.com"]}重启 docker,使其 daemon.json 文件配置生效service docker restart二、CentOS7 离线卸载Docker步骤1、删除服务取消开机自启systemctl disable docker取消注册文件rm -rf /etc/systemd/system/docker.service2、删除命令rm -rf /usr/bin/containerd rm -rf /usr/bin/containerd-shim rm -rf /usr/bin/ctr rm -rf /usr/bin/runc rm -rf /usr/bin/docker*3、删除配置rm -rf /etc/docker/4、删除镜像或容器rm -rf /var/lib/docker
-
CentOS-Shell-监控公网IP-变化邮件报警 Shell监控公网IP-变化邮件报警公司用的动态公网IP,但是有时IP会改变,导致部分业务有问题,我们又不能及时发现,会造成一定的影响。现在使用shell监控公网的IP,如发生变化,立即邮件报警。CentOS邮件报警可以参考这个,默认是mailx安装邮件服务yum -y install mailx配置 mailx 文件进入qq邮箱首页,点击设置>账户,然后找到下图截取的地方(需要设置的,如图)设置完之后呢,就要把生成的授权码作为邮箱的password配置/etc/mail.rc文件【下面的配置qq是假的,别用】#设置发件人名称 set from=1832025651@qq.com #设置邮件服务器 set smtp=smtp.qq.com #填写自己邮箱地址 set smtp-auth-user=1832025651@qq.com #输入邮箱验证码 set smtp-auth-password=pfljngafoqaxecff #smtp的认证方式,默认是login set smtp-auth=login测试发送邮件echo "admin ,文件内容" | mail -s "标题" 你的qq@qq.com编写Shell脚本#!/bin/bash dirfile='/home/ip_change' new_ip=`curl icanhazip.com` #获取新公网ip mail_user=1794@qq.com #接收收邮件邮箱 mail_subject="IP已经发生变化,及时处理" #邮件主题 log="/var/log/tool.log" datetime=`date '+%Y-%m-%d %H:%M:%S'` #判断文件是否存在 if [ ! -f "$dirfile" ]; then touch "$file" echo "1.1.1.1" > $dirfile fi #判断new_ip是否获取 if [ ! -n "$new_ip" ]; then echo "$datetime 公网IP获取失败,检查'curl icanhazip.com' " >> $log exit 1 fi old_ip=`cat $dirfile` #查看旧ip # 判断两个IP是否相等 发邮件 if [ "$new_ip" = "$old_ip" ]; then echo "$datetime IP正常 - true " >> $log else echo $new_ip > $dirfile echo "IP已经发生变化, 新IP: $new_ip 旧IP: $old_ip !!! " | mail -s "$mail_subject" "$mail_user" echo "$datetime IP已经发生变化 - error 新IP :$new_ip 旧IP: $old_ip" >> $log fi然后设置定时任务执行,如下:crontab -e*/10 * * * * /data/shell/getIp/getIp.sh至此,每隔10分钟,自动获取最新公网ip,如果有更新,发送到目标邮箱。
-
Centos7防火墙配置详细 一、条件防火墙是开启的 systemctl start firewalld 1、查看防火墙的配置 firewall-cmd --state firewall-cmd --list-all 2、开放80端口 firewall-cmd --permanent --add-port=80/tcp firewall-cmd --reload #重新加载防火墙配置才会起作用 3、移除以上规则 firewall-cmd --permanent --remove-port=80/tcp firewall-cmd --reload 4、放通某个端口段 firewall-cmd --permanent --zone=public --add-port=1000-2000/tcp firewall-cmd --reload 5、放通某个IP访问,默认允许 firewall-cmd --permanent --add-rich-rule='rule family=ipv4 source address=192.168.1.169 accept' firewall-cmd --reload 6、禁止某个IP访问 firewall-cmd --permanent --add-rich-rule='rule family=ipv4 source address=10.0.0.42 drop' firewall-cmd --reload 7、放通某个IP访问某个端口 firewall-cmd --permanent --add-rich-rule='rule family=ipv4 source address=192.168.1.169 port protocol=tcp port=6379 accept' firewall-cmd --reload 8、移除以上规则 firewall-cmd --permanent --remove-rich-rule='rule family="ipv4" source address="192.168.1.169" port port="6379" protocol="tcp" accept' firewall-cmd --reload 9、放通某个IP段访问 firewall-cmd --permanent --add-rich-rule='rule family=ipv4 source address=10.0.0.0/24 accept' 以下有图片效果 以下有图片效果 以下有图片效果 一、条件防火墙是开启的 systemctl start firewalld 1、查看防火墙的配置 firewall-cmd --state 2、开放80端口 firewall-cmd --permanent --add-port=80/tcp firewall-cmd --reload #重新加载防火墙配置才会起作用 3、移除以上规则 firewall-cmd --permanent --remove-port=80/tcp firewall-cmd --reload 4、放通某个端口段 firewall-cmd --permanent --zone=public --add-port=1000-2000/tcp firewall-cmd --reload 5、放通某个IP访问,默认允许 firewall-cmd --permanent --add-rich-rule='rule family=ipv4 source address=192.168.1.169 accept' firewall-cmd --reload 6、禁止某个IP访问 firewall-cmd --permanent --add-rich-rule='rule family=ipv4 source address=10.0.0.42 drop' firewall-cmd --reload 7、放通某个IP访问某个端口 firewall-cmd --permanent --add-rich-rule='rule family=ipv4 source address=192.168.1.169 port protocol=tcp port=6379 accept' firewall-cmd --reload #禁止指定IP访问本机8080端口 firewall-cmd --permanent --add-rich-rule='rule family="ipv4" source address="192.168.1.1" port protocol="tcp" port="8080" reject' 8、移除以上规则 firewall-cmd --permanent --remove-rich-rule='rule family="ipv4" source address="192.168.1.169" port port="6379" protocol="tcp" accept' firewall-cmd --reload