
搜索到
43
篇与
的结果
-
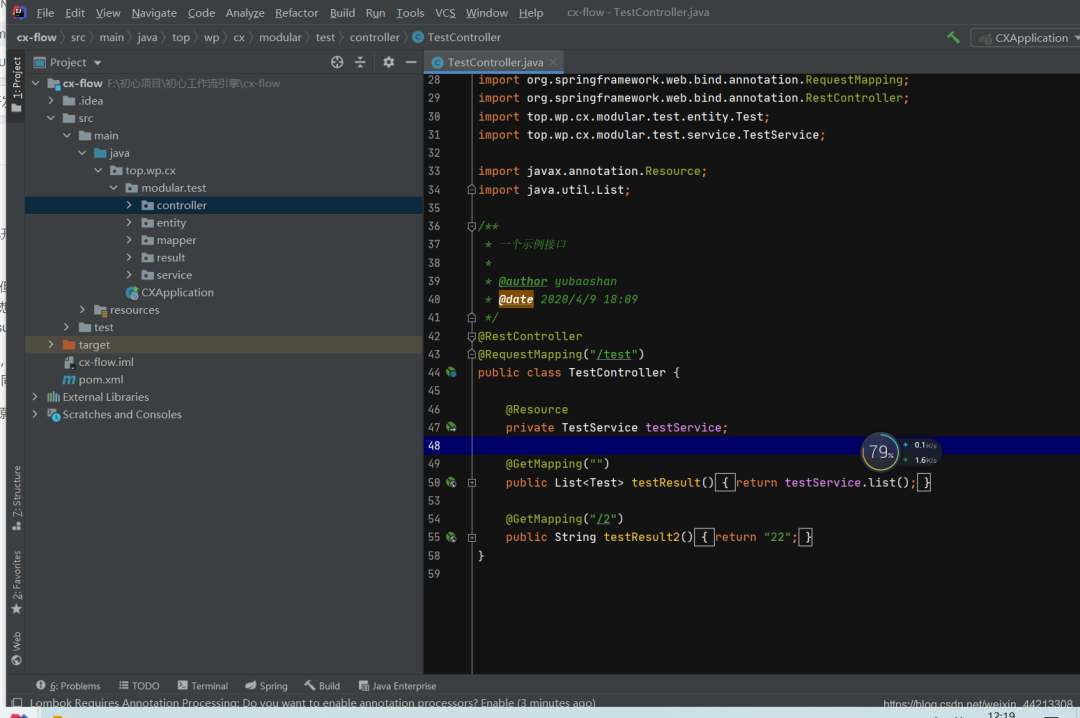
 SpringBoot 业务组件化开发,维护起来很香~ 1、背景首先,谈一谈什么是“springBoot业务组件化开发”,最近一直在开发一直面临这一个问题,就是相同的业务场景场景在一个项目中使用了,又需要再另外一个项目中复用,一遍又一遍的复制代码,然后想将该业务的代码在不同的项目中维护起来真的很难。最开始想用微服务的方式来解决这个问题,但是觉得一套完整的微服务太重,而且目前微服务还处于振荡期(去年的微服务解决方案,今年国内直接都换成了阿里的技术解决方案),此外很多时候我们接私活,就是个单体的springboot项目,用不上微服务这种级别的项目,所以想来想去这条路不是很满足我的需求;再后来,想到单体的聚合架构,但是聚合架构的项目,个人觉得有时候也不是很好,一般的聚合项目就是基于某个具体实例架构下才能使用,换一个架构自己写的业务model就不能用了(比如你在suoyi框架下开发的模块业务包,在guns下可能就直接不能使用了)。最后,想了一下,能不能单独开发一个项目,这个项目可以自己独立运行(微服务架构下用),也可以在单体项目中直接通过pom引入的方式,然后简单的配置一下,然后直接使用多好;查了一下网上没有现成的技术解决方案,问了同事,他说我这种思想属于SOA的一种实现,同时有第三包和聚合项目的影子在里面。也许有什么更好的技术解决方案,也希望各位能够不吝赐教。补充一句,之所以说“业务组件化”开发,来源于Vue的思想,希望Java后端开发的业务也可像vue的组件一样去使用,这样多好2、DEMO2-1 项目准备建一个Java项目项目,结构如下图:pom文件如下:<?xml version="1.0" encoding="UTF-8"?> <project xmlns="http://maven.apache.org/POM/4.0.0" xmlns:xsi="http://www.w3.org/2001/XMLSchema-instance" xsi:schemaLocation="http://maven.apache.org/POM/4.0.0 http://maven.apache.org/xsd/maven-4.0.0.xsd"> <modelVersion>4.0.0</modelVersion> <parent> <groupId>org.springframework.boot</groupId> <artifactId>spring-boot-starter-parent</artifactId> <version>2.3.1.RELEASE</version> </parent> <groupId>top.wp</groupId> <artifactId>cx-flow</artifactId> <version>1.0-SNAPSHOT</version> <properties> <project.build.sourceEncoding>UTF-8</project.build.sourceEncoding> <project.reporting.outputEncoding>UTF-8</project.reporting.outputEncoding> <mysql-connector-java.version>8.0.17</mysql-connector-java.version> <druid.version>1.1.21</druid.version> <mp.version>3.3.2</mp.version> <fastjson.version>1.2.70</fastjson.version> <jwt.version>0.9.1</jwt.version> <hutool.version>5.3.7</hutool.version> <lombok.versin>1.18.12</lombok.versin> <swagger.version>2.9.2</swagger.version> <swagger.bootstrap.ui.version>1.9.6</swagger.bootstrap.ui.version> <easypoi.version>4.2.0</easypoi.version> <jodconverter.version>4.2.0</jodconverter.version> <libreoffice.version>6.4.3</libreoffice.version> <justauth.version>1.15.6</justauth.version> <aliyun.oss.version>3.8.0</aliyun.oss.version> <qcloud.oss.version>5.6.23</qcloud.oss.version> <aliyun.sms.sdk.version>4.4.6</aliyun.sms.sdk.version> <aliyun.sms.esc.version>4.17.6</aliyun.sms.esc.version> <qcloud.sms.sdk.version>3.1.57</qcloud.sms.sdk.version> </properties> <dependencies> <!-- web --> <dependency> <groupId>org.springframework.boot</groupId> <artifactId>spring-boot-starter-web</artifactId> </dependency> <!--mybatis-plus--> <dependency> <groupId>com.baomidou</groupId> <artifactId>mybatis-plus-boot-starter</artifactId> <version>${mp.version}</version> </dependency> <!--数据库驱动--> <dependency> <groupId>mysql</groupId> <artifactId>mysql-connector-java</artifactId> <version>${mysql-connector-java.version}</version> </dependency> <!--数据库连接池--> <dependency> <groupId>com.alibaba</groupId> <artifactId>druid</artifactId> <version>${druid.version}</version> </dependency> <!--hutool--> <dependency> <groupId>cn.hutool</groupId> <artifactId>hutool-all</artifactId> <version>${hutool.version}</version> </dependency> <!--lombok--> <dependency> <groupId>org.projectlombok</groupId> <artifactId>lombok</artifactId> <version>${lombok.versin}</version> </dependency> </dependencies> <build> <resources> <resource> <directory>src/main/resources</directory> <!-- <excludes> <exclude>**/*.properties</exclude> <exclude>**/*.xml</exclude> </excludes> --> <includes> <include>**/*.properties</include> <include>**/*.xml</include> <include>**/*.yml</include> </includes> <filtering>false</filtering> </resource> <resource> <directory>src/main/java</directory> <includes> <include>**/*.xml</include> </includes> <filtering>false</filtering> </resource> </resources> </build> </project>配置文件如下:主要是数据库和mybaits-plus的配置(其实可以不用这个配置文件,在这只是为了项目能够独立运行起来)#服务配置 server: port: 8080 #spring相关配置 spring: datasource: driver-class-name: com.mysql.cj.jdbc.Driver url: jdbc:mysql://localhost:3306/cx-xn?autoReconnect=true&useUnicode=true&characterEncoding=utf8&zeroDateTimeBehavior=CONVERT_TO_NULL&useSSL=false&serverTimezone=CTT&nullCatalogMeansCurrent=true username: 数据库账户 password: 数据库密码 servlet: multipart: max-request-size: 100MB max-file-size: 100MB jackson: time-zone: GMT+8 date-format: yyyy-MM-dd HH:mm:ss.SSS locale: zh_CN serialization: # 格式化输出 indent_output: false #mybaits相关配置 mybatis-plus: mapper-locations: classpath*:top/wp/cx/**/mapping/*.xml, classpath:/META-INF/modeler-mybatis-mappings/*.xml configuration: map-underscore-to-camel-case: true cache-enabled: true lazy-loading-enabled: true multiple-result-sets-enabled: true log-impl: org.apache.ibatis.logging.stdout.StdOutImpl global-config: banner: false db-config: id-type: assign_id table-underline: true enable-sql-runner: true configuration-properties: prefix: blobType: BLOB boolValue: TRUE启动入口(可以不用写,启动入口存在目的是让项目可以自己跑起来)package top.wp.cx; import cn.hutool.log.StaticLog; import org.springframework.boot.SpringApplication; import org.springframework.boot.autoconfigure.SpringBootApplication; @SpringBootApplication public class CXApplication { public static void main(String[] args) { SpringApplication.run(CXApplication.class, args); StaticLog.info(">>> " + CXApplication.class.getSimpleName() + " 启动成功!"); } }测试:entity、resultpackage top.wp.cx.modular.test.entity; import com.baomidou.mybatisplus.annotation.IdType; import com.baomidou.mybatisplus.annotation.TableId; import com.baomidou.mybatisplus.annotation.TableName; import lombok.Data; @Data @TableName("test") public class Test { /** * 主键 */ @TableId(type = IdType.ASSIGN_ID) private Integer id; /** * 账号 */ private String name; } package top.wp.cx.modular.test.result; import lombok.Data; @Data public class TestResult { private Integer id; private String name; }测试mapper、xml、service和controllerpackage top.wp.cx.modular.test.mapper; import com.baomidou.mybatisplus.core.mapper.BaseMapper; import top.wp.cx.modular.test.entity.Test; /** * 系统用户数据范围mapper接口 * * @author xuyuxiang * @date 2020/3/13 15:46 */ //@Mapper public interface TestMapper extends BaseMapper<Test> { } <?xml version="1.0" encoding="UTF-8"?> <!DOCTYPE mapper PUBLIC "-//mybatis.org//DTD Mapper 3.0//EN" "http://mybatis.org/dtd/mybatis-3-mapper.dtd"> <mapper namespace="top.wp.cx.modular.test.mapper.TestMapper"> </mapper> package top.wp.cx.modular.test.service; import com.baomidou.mybatisplus.extension.service.impl.ServiceImpl; import org.springframework.stereotype.Service; import top.wp.cx.modular.test.entity.Test; import top.wp.cx.modular.test.mapper.TestMapper; /** * 一个service实现 * * @author yubaoshan * @date 2020/4/9 18:11 */ @Service public class TestService extends ServiceImpl<TestMapper, Test> { } package top.wp.cx.modular.test.controller; import org.springframework.web.bind.annotation.GetMapping; import org.springframework.web.bind.annotation.RequestMapping; import org.springframework.web.bind.annotation.RestController; import top.wp.cx.modular.test.entity.Test; import top.wp.cx.modular.test.service.TestService; import javax.annotation.Resource; import java.util.List; /** * 一个示例接口 * * @author yubaoshan * @date 2020/4/9 18:09 */ @RestController @RequestMapping("/test") public class TestController { @Resource private TestService testService; @GetMapping("") public List<Test> testResult(){ return testService.list(); } @GetMapping("/2") public String testResult2(){ return "22"; } }至此项目准备完成,其实就是简单见了一个测试项目,此时如果你按照上面的步骤,写了启动类和配置项信息,项目是可以独立运行的。2-2 项目打包、引入、运行将2-1中的测试项目进行打包:install右键第一个选项此时你的本地maven仓库会出现刚才的项目(当然前提是你的idea配置过本地的maven)新建另外一个项目cx-mainpom文件如下:注意将你刚才的准备测试的项目引入进来<?xml version="1.0" encoding="UTF-8"?> <project xmlns="http://maven.apache.org/POM/4.0.0" xmlns:xsi="http://www.w3.org/2001/XMLSchema-instance" xsi:schemaLocation="http://maven.apache.org/POM/4.0.0 http://maven.apache.org/xsd/maven-4.0.0.xsd"> <modelVersion>4.0.0</modelVersion> <parent> <groupId>org.springframework.boot</groupId> <artifactId>spring-boot-starter-parent</artifactId> <version>2.3.1.RELEASE</version> </parent> <groupId>top.wp.cx</groupId> <artifactId>cx-main</artifactId> <version>1.0-SNAPSHOT</version> <properties> <project.build.sourceEncoding>UTF-8</project.build.sourceEncoding> <project.reporting.outputEncoding>UTF-8</project.reporting.outputEncoding> <mysql-connector-java.version>8.0.17</mysql-connector-java.version> <druid.version>1.1.21</druid.version> <mp.version>3.3.2</mp.version> <fastjson.version>1.2.70</fastjson.version> <jwt.version>0.9.1</jwt.version> <hutool.version>5.3.7</hutool.version> <lombok.versin>1.18.12</lombok.versin> <swagger.version>2.9.2</swagger.version> <swagger.bootstrap.ui.version>1.9.6</swagger.bootstrap.ui.version> <easypoi.version>4.2.0</easypoi.version> <jodconverter.version>4.2.0</jodconverter.version> <libreoffice.version>6.4.3</libreoffice.version> <justauth.version>1.15.6</justauth.version> <aliyun.oss.version>3.8.0</aliyun.oss.version> <qcloud.oss.version>5.6.23</qcloud.oss.version> <aliyun.sms.sdk.version>4.4.6</aliyun.sms.sdk.version> <aliyun.sms.esc.version>4.17.6</aliyun.sms.esc.version> <qcloud.sms.sdk.version>3.1.57</qcloud.sms.sdk.version> </properties> <dependencies> <dependency> <groupId>top.wp</groupId> <artifactId>cx-flow</artifactId> <version>1.0-SNAPSHOT</version> </dependency> <!-- web --> <dependency> <groupId>org.springframework.boot</groupId> <artifactId>spring-boot-starter-web</artifactId> </dependency> <!--mybatis-plus--> <dependency> <groupId>com.baomidou</groupId> <artifactId>mybatis-plus-boot-starter</artifactId> <version>${mp.version}</version> </dependency> <!--数据库驱动--> <dependency> <groupId>mysql</groupId> <artifactId>mysql-connector-java</artifactId> <version>${mysql-connector-java.version}</version> </dependency> <!--数据库连接池--> <dependency> <groupId>com.alibaba</groupId> <artifactId>druid</artifactId> <version>${druid.version}</version> </dependency> <!--hutool--> <dependency> <groupId>cn.hutool</groupId> <artifactId>hutool-all</artifactId> <version>${hutool.version}</version> </dependency> <!--lombok--> <dependency> <groupId>org.projectlombok</groupId> <artifactId>lombok</artifactId> <version>${lombok.versin}</version> </dependency> </dependencies> <!--xml打包排除--> <build> <resources> <resource> <directory>src/main/resources</directory> <!-- <excludes> <exclude>**/*.properties</exclude> <exclude>**/*.xml</exclude> </excludes> --> <includes> <include>**/*.properties</include> <include>**/*.xml</include> <include>**/*.yml</include> </includes> <filtering>false</filtering> </resource> <resource> <directory>src/main/java</directory> <includes> <include>**/*.xml</include> </includes> <filtering>false</filtering> </resource> </resources> </build> </project>application.yml配置文件 注意xml的扫描#服务配置 server: port: 8081 #spring相关配置 spring: datasource: driver-class-name: com.mysql.cj.jdbc.Driver url: jdbc:mysql://localhost:3306/cx-xn?autoReconnect=true&useUnicode=true&characterEncoding=utf8&zeroDateTimeBehavior=CONVERT_TO_NULL&useSSL=false&serverTimezone=CTT&nullCatalogMeansCurrent=true username: root password: root servlet: multipart: max-request-size: 100MB max-file-size: 100MB jackson: time-zone: GMT+8 date-format: yyyy-MM-dd HH:mm:ss.SSS locale: zh_CN serialization: # 格式化输出 indent_output: false #mybaits相关配置 mybatis-plus: #xml文件扫描 mapper-locations: classpath*:top/wp/cx/**/mapping/*.xml, classpath:/META-INF/modeler-mybatis-mappings/*.xml configuration: map-underscore-to-camel-case: true cache-enabled: true lazy-loading-enabled: true multiple-result-sets-enabled: true log-impl: org.apache.ibatis.logging.stdout.StdOutImpl global-config: banner: false db-config: id-type: assign_id table-underline: true enable-sql-runner: true configuration-properties: prefix: blobType: BLOB boolValue: TRUE启动入口,注意spring和mapper扫描package top.wp.cx.main; import cn.hutool.log.StaticLog; import org.mybatis.spring.annotation.MapperScan; import org.springframework.boot.SpringApplication; import org.springframework.boot.autoconfigure.SpringBootApplication; import org.springframework.context.annotation.ComponentScan; @SpringBootApplication @ComponentScan(basePackages = {"top.wp.cx.modular.test"}) // spring扫描 @MapperScan(basePackages = {"top.wp.cx.modular.test.**.mapper"}) // mybatis扫描mapper public class CXApplication { public static void main(String[] args) { SpringApplication.run(CXApplication.class, args); StaticLog.info(">>> " + CXApplication.class.getSimpleName() + " 启动成功!"); } }此时启动cx-main的项目,访问2-1的测试controller能访问成功证明配置正确。
 -
博客系统,简单易部署,精致主题贴心服务,专为程序员设计! 📚 项目介绍🔥本项目系统是一款基于 Java 的菠萝博客系统,简单易部署,精致主题,贴心服务,专为程序员设计。Bolo菠萝博客 专为程序员设计的精致Java博客系统 | 🎸基于Solo深度定制 | 本地登录 | 免登录评论 | 动态邮件提醒 | 自定义图床 | 一键隐藏交互式模块,备案必备 | ✨精致主题持续更新 | 备份一键导出导入 | 内置防火墙 | 评论过滤 | 独立分类 | 文章同步/备份到黑客派 | 离线博客 | ✅安装太轻松!WAR包、Tomcat、Docker、JAR部署支持 | 🚚支持从Solo轻松迁移。为什么选择 Bolo完整的教程文档,完善的交流答疑精美皮肤常更新支持将文章自动备份至 GitHub 仓库超酷的数据统计表本地登录、评论,支持备案模式(隐藏登录、评论及搜索入口)支持 Tomcat、Docker 快速部署邮件提醒功能,不怕错过博客中的新评论,回复他人评论也会发邮件提醒他人强大的 Vditor 编辑器,支持 所见即所得、即时渲染、分屏预览 三种模式,额外支持通过 Lute_HTTP 渲染支持自定义图床(阿里云、又拍云、七牛云、腾讯云)轻型防火墙功能,阻止恶意访问,保证博客正常运行强大的 Markdown 编辑器(使用 Vditor)支持大纲、数学公式、脑图、图表、流程图、甘特图、时序图、五线谱、多媒体、语音阅读、标题锚点、代码高亮及复制、graphviz 渲染支持黑暗模式,随系统设置自动切换,保护视力看板娘+,在线更新海量看板娘资源如果你是 Solo 用户,还可将 Solo 的数据一键迁移到 Bolo;如果你对 Bolo 不满意,还可以一键迁回至 SoloServer 酱推送功能,在微信上接收你的博客动态自动生成“我在 GitHub 上的开源项目”文章功能,让博客的访客更好地了解你的 GitHub 履历✨ 全新主题,支持黑暗模式📈 后台管理,酷炫统计表,完整黑暗模式支持🔍 搜索界面,一搜即达📸 登录界面,定期自动更新主题美图地址项目地址:https://gitee.com/AdlerED/bolo-solo安装教程:https://doc.stackoverflow.wiki/web/#/7?page_id=46
-
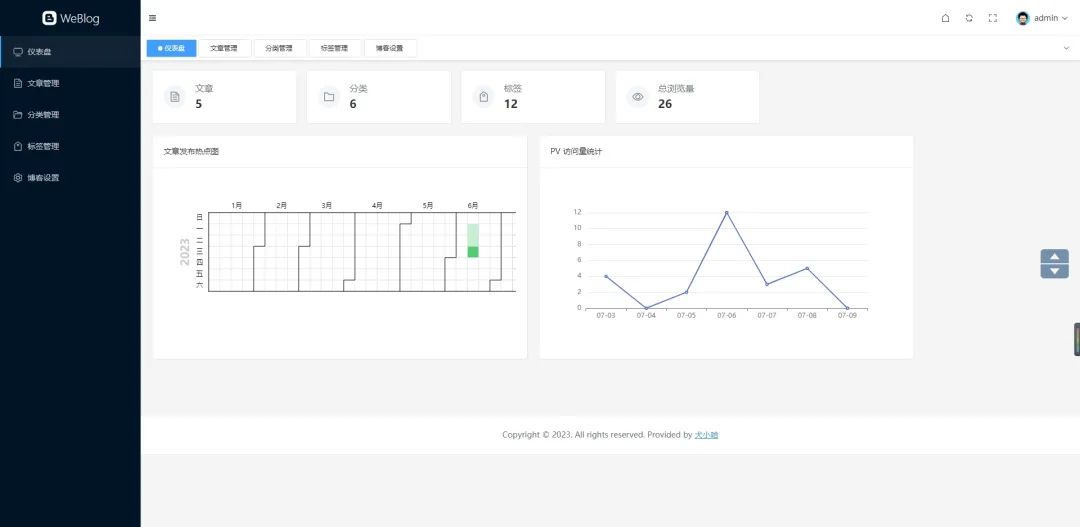
前后端分离,开源的 Spring Boot + Vue 3.2 的博客,泰裤辣! WeBlog简介一款由 Spring Boot + Vue 3.2 开发的前后端分离博客。{mtitle title="Weblog 后台仪"/}后端采用 Spring Boot 、Mybatis Plus 、MySQL 、Spring Sericuty、JWT、Minio、Guava 等;后台管理采用 Vue 3.2 + Element Plus 纯手写的管理后台,未采用任何 Admin 框架;支持博客 Markdown 格式发布与编辑、文章分类、文章标签的管理;支持博客基本信息的设置,以及社交主页的跳转;支持仪表盘数据统计,Echarts 文章发布热图统计、PV 访问量统计;相关地址GitHub 地址:https://github.com/weiwosuoai/WeBlogGitee 地址:https://gitee.com/AllenJiang/WeBlog演示地址:http://118.31.41.16:8081/游客账号:test游客密码:test演示截图登录页仪表盘文章管理写博客前台首页博客详情功能前台功能是否完成首页✅分类列表✅标签标签✅博客详情✅站内搜索TODO知识库 WikiTODO博客评论TODO后台功能是否完成后台登录页✅仪表盘✅文章管理✅分类管理✅标签管理✅博客设置✅评论管理TODO模块介绍{mtitle title="WeBlog 项目模块一览"/}项目名说明weblog-springboot后端项目weblog-vue3前端项目后端项目模块介绍模块名说明weblog-module-admin博客后台管理模块weblog-module-common通用模块weblog-module-jwtJWT 认证、授权模块weblog-web博客前台(启动入口)技术栈后端框架说明版本号备注JDKJava 开发工具包1.8它是目前企业项目比较主流的版本Spring BootWeb 应用开发框架2.6.3主流框架Maven项目构建工具3.6.3企业主流的构建工具MySQL数据库5.7 Mybatis PlusMybatis 增强版持久层框架3.5.2 HikariCP数据库连接池4.0.3Spring Boot 内置数据库连接池,号称性能最强Spring Security安全框架2.6.3 JWTWeb 应用令牌0.11.2 Lombok消除冗余的样板式代码1.8.22 JacksonJSON 工具库2.13.1 Hibernate Validator参数校验组件6.2.0.Final Logback日志组件1.2.10 GuavaGoogle 开源的工具库18.0 p6spy动态监测框架3.9.1 Minio对象存储8.2.1用于存储博客中相关图片flexmarkMarkdown 解析0.62.2 前端框架说明版本号Vue 3Javascript 渐进式框架3.2.47Vite前端项目构建工具4.3.9Element Plus饿了么基于 Vue 3 开源的组件框架2.3.3vue-routerVue 路由管理器4.1.6vuex状态存储组件4.0.2md-editor-v3Markdown 编辑器组件3.0.1windicssCSS 工具类框架3.5.6axios基于 Promise 的网络请求库1.3.5Echarts百度开源的数据可视化图表库5.4.2
-
推荐一款CMS内容管理系统,完全开源、免费,真正实现“0”代码建站! 正文我今天,推荐一个系统项目。第一次使用就有点上头,爱不释手,必须要推荐给大家。这是我目前见过最好的系统项目。功能完整,代码结构清晰。值得推荐。📚项目介绍🔥本项目系统是一款梦想家内容发布系统采用流行的SpringBoot搭建,支持静态化、标签化建站。不需要专业的后台开发技能,会HTML就能建站,上手超简单;只需使用系统提供的标签就能轻松建设网站。全面支持各类表单字段,真正实现“0”代码建网站。特点免费开源:基于APACHE 2.0开源协议,源代码完全开源;标签建站:不需要专业的后台开发技能,只要使用系统提供的标签,就能轻松建设网站;开发方便:支持在线上传模版包开发方便快捷;零代码量:真正实现“0”代码建站,后台代码一点都不需要动;每月更新:每月进行系统升级,分享更多好用的模版与插件。面向对象政府:可以使用Dreamer CMS来快速构建政府门户;电信:可以使用Dreamer CMS来快速构建电信综合门户;企业:可以使用Dreamer CMS构建信息门户,知识管理平台,也可作为基础技术框架,是企业在创立初期很好的技术选型;个人开发者:可以使用Dreamer CMS承接外包项目;技术框架核心框架:Spring Boot 2安全框架:Apache Shiro 1.9.1工具包:Hutool 5.8.5持久层框架:MyBatis 2.2.2日志管理:Logback模版框架:ThymeleafJS框架:jQuery,BootstrapCSS框架:Bootstrap富文本:Ueditor、editor.md开发环境建议开发者使用以下环境,这样避免版本带来的问题JDK:Jdk8IDE:Spring Tool Suite 4(STS)或 IntelliJ IDEADB:Mysql 5.7,Windows配置安装Mysql5.7,请参考:https://www.iteachyou.cc/article/a1db138b4a89402ab50f3499edeb30c2Redis:3.2+,Windows配置安装Redis教程,请参考:https://www.iteachyou.cc/article/4b0a638f65fa4fb1b9644cf461dba602LomBok 项目需要使用Lombok支持,Lombok安装教程,请参考:https://www.iteachyou.cc/article/55ec2939c29147eca5bebabf19621655系统结构快速入门CMS包括两个部分(代码部分、资源部分)代码不多说。资源就是图片、模版等,该目录在application.yml中web.resource-path配置项目中配置。视频教程:Dreamer CMS后台使用教程:https://www.iteachyou.cc/list-6s3bg7tf/dreamercms/1/10Dreamer CMS模版开发教程:https://www.iteachyou.cc/list-l54xs53b/tempdev/1/10百度网盘下载链接:https://pan.baidu.com/s/16nLVa44OkloL8sTpW6e2QQ 提取码:2c8i 在线观看视频地址:https://space.bilibili.com/482273402克隆项目到本地工作空间导入Eclipse或Sts等开发工具(推荐使用Spring Tools Suite 4),项目需要使用Lombok支持,Lombok安装教程,请参考https://www.iteachyou.cc/article/55ec2939c29147eca5bebabf19621655项目需要Redis,请自行修改application.yml中Redis配置修改项目资源目录,application.yml文件web.resource-path配置项(如D:/dreamer-cms/)导入数据库src/main/resources/db/db.sql,要求Mysql5.7版本,并修改application-(dev|prd).yml中数据配置将项目src/main/resources/db/dreamer-cms.zip文件解压,保证解压后的目录路径的名称和资源目录一致运行项目DreamerCMSApplication.java网站首页:https://localhost:8888 项目管理后台:https://localhost:8888/admin管理后台用户名:wangjn;密码:123456模版标签开发教程请参考:http://doc.iteachyou.cc系统美图地址项目地址:https://gitee.com/iteachyou/dreamer_cms梦想家CMS官网:http://cms.iteachyou.cc梦想家CMS管理后台:http://cms.iteachyou.cc/admin演示账号:demo1演示密码:123456管理员:wangjn管理员密码:123456
-
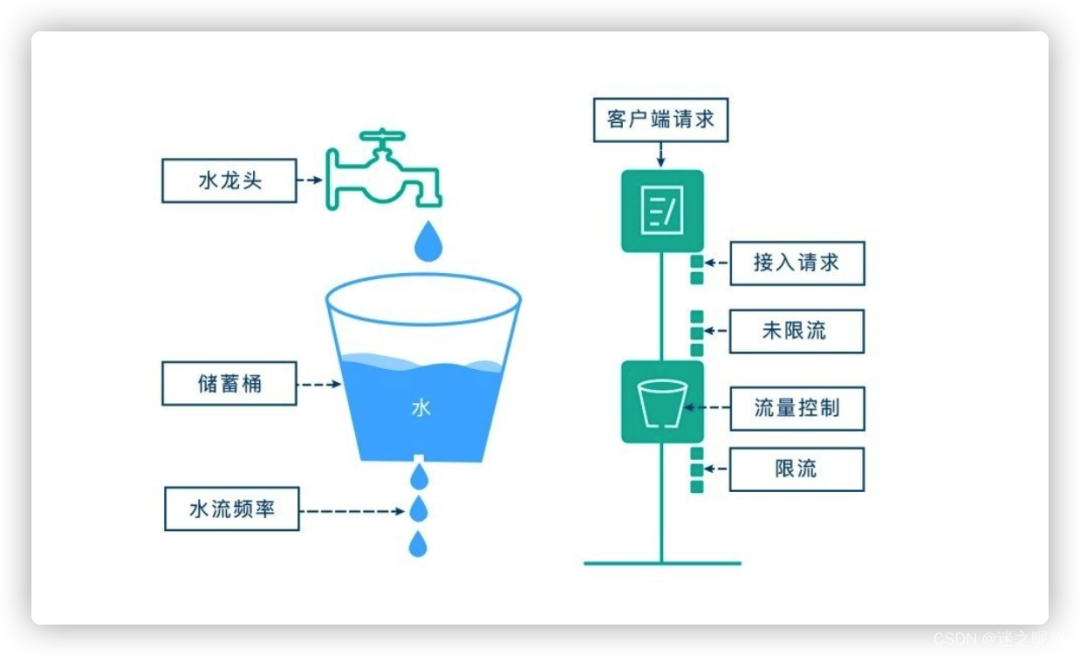
SpringBoot 服务接口限流,搞定! 前言在开发高并发系统时有三把利器用来保护系统: 缓存 、降级 和 限流 。限流 可以认为服务降级的一种,限流通过限制请求的流量以达到保护系统的目的。一般来说,系统的吞吐量是可以计算出一个阈值的,为了保证系统的稳定运行,一旦达到这个阈值,就需要限制流量并采取一些措施以完成限制流量的目的。比如:延迟处理,拒绝处理,或者部分拒绝处理等等。否则,很容易导致服务器的宕机。常见限流算法计数器限流计数器限流算法 是最为简单粗暴的解决方案,主要用来限制总并发数,比如数据库连接池大小、线程池大小、接口访问并发数等都是使用计数器算法。如:使用 AomicInteger 来进行统计当前正在并发执行的次数,如果超过域值就直接拒绝请求,提示系统繁忙。漏桶算法漏桶算法 思路很简单,我们把水比作是 请求,漏桶比作是系统处理能力极限,水先进入到漏桶里,漏桶里的水按一定速率流出,当流出的速率小于流入的速率时,由于漏桶容量有限,后续进入的水直接溢出(拒绝请求),以此实现限流。令牌桶算法令牌桶算法 的原理也比较简单,我们可以理解成医院的挂号看病,只有拿到号以后才可以进行诊病。系统会维护一个令牌(token)桶,以一个恒定的速度往桶里放入令牌(token),这时如果有请求进来想要被处理,则需要先从桶里获取一个令牌(token),当桶里没有令牌(token)可取时,则该请求将被拒绝服务。令牌桶算法通过控制桶的容量、发放令牌的速率,来达到对请求的限制。单机模式Google 开源工具包 Guava 提供了限流工具类 RateLimiter ,该类基于 令牌桶算法 实现流量限制,使用十分方便,而且十分高效引入依赖到 pom.xml<dependency> <groupId>com.google.guava</groupId> <artifactId>guava</artifactId> <version>30.1-jre</version> </dependency>创建注解 Limit package com.example.demo.common.annotation; import java.lang.annotation.*; import java.util.concurrent.TimeUnit; @Retention(RetentionPolicy.RUNTIME) @Target({ElementType.METHOD}) @Documented public @interface Limit { // 资源key String key() default ""; // 最多访问次数 double permitsPerSecond(); // 时间 long timeout(); // 时间类型 TimeUnit timeunit() default TimeUnit.MILLISECONDS; // 提示信息 String msg() default "系统繁忙,请稍后再试"; }注解 AOP 实现package com.example.demo.common.aspect; import com.example.demo.common.annotation.Limit; import com.example.demo.common.dto.R; import com.example.demo.common.exception.LimitException; import com.google.common.collect.Maps; import com.google.common.util.concurrent.RateLimiter; import lombok.extern.slf4j.Slf4j; import org.aspectj.lang.ProceedingJoinPoint; import org.aspectj.lang.annotation.Around; import org.aspectj.lang.annotation.Aspect; import org.aspectj.lang.reflect.MethodSignature; import org.springframework.stereotype.Component; import java.lang.reflect.Method; import java.util.Map; @Slf4j @Aspect @Component public class LimitAspect { private final Map<String, RateLimiter> limitMap = Maps.newConcurrentMap(); @Around("@annotation(com.example.demo.common.annotation.Limit)") public Object around(ProceedingJoinPoint pjp) throws Throwable { MethodSignature signature = (MethodSignature)pjp.getSignature(); Method method = signature.getMethod(); //拿limit的注解 Limit limit = method.getAnnotation(Limit.class); if (limit != null) { //key作用:不同的接口,不同的流量控制 String key=limit.key(); RateLimiter rateLimiter; //验证缓存是否有命中key if (!limitMap.containsKey(key)) { // 创建令牌桶 rateLimiter = RateLimiter.create(limit.permitsPerSecond()); limitMap.put(key, rateLimiter); log.info("新建了令牌桶={},容量={}",key,limit.permitsPerSecond()); } rateLimiter = limitMap.get(key); // 拿令牌 boolean acquire = rateLimiter.tryAcquire(limit.timeout(), limit.timeunit()); // 拿不到命令,直接返回异常提示 if (!acquire) { log.debug("令牌桶={},获取令牌失败",key); throw new LimitException(limit.msg()); } } return pjp.proceed(); } }注解使用permitsPerSecond 代表请求总数量timeout 代表限制时间即 timeout 时间内,只允许有 permitsPerSecond 个请求总数量访问,超过的将被限制不能访问package com.example.demo.module.test; import com.example.demo.common.annotation.Limit; import com.example.demo.common.dto.R; import lombok.extern.slf4j.Slf4j; import org.springframework.web.bind.annotation.GetMapping; import org.springframework.web.bind.annotation.RestController; import java.util.ArrayList; import java.util.List; @Slf4j @RestController public class TestController { @Limit(key = "cachingTest", permitsPerSecond = 1, timeout = 500, msg = "当前排队人数较多,请稍后再试!") @GetMapping("cachingTest") public R cachingTest(){ log.info("------读取本地------"); List<String> list = new ArrayList<>(); list.add("蜡笔小新"); list.add("哆啦A梦"); list.add("四驱兄弟"); return R.ok(list); } }测试启动项目,快读刷新访问 /cachingTest 请求可以看到访问已经有被成功限制该种方式属于 应用级限流 ,假设将应用部署到多台机器,应用级限流方式只是单应用内的请求限流,不能进行全局限流。因此我们需要分布式限流和接入层限流来解决这个问题。分布式模式基于 redis + lua 脚本的 分布式限流 分布式限流 最关键的是要将限流服务做成原子化,而解决方案可以使用 redis + lua 或者 nginx + lua 技术进行实现,通过这两种技术可以实现的 高并发 和 高性能 。首先我们来使用 redis + lua 实现时间窗内某个接口的请求数限流,实现了该功能后可以改造为限流总并发/请求数和限制总资源数。lua 本身就是一种编程语言,也可以使用它实现复杂的令牌桶或漏桶算法。 因操作是在一个 lua 脚本中(相当于原子操作),又因 redis 是单线程模型,因此是线程安全的。相比 redis 事务来说,lua 脚本有以下优点减少网络开销 :不使用 lua 的代码需要向 redis 发送多次请求,而脚本只需一次即可,减少网络传输;原子操作 :redis 将整个脚本作为一个原子执行,无需担心并发,也就无需事务;复用 :脚本会永久保存 redis 中,其他客户端可继续使用。创建注解 RedisLimitpackage com.example.demo.common.annotation; import com.example.demo.common.enums.LimitType; import java.lang.annotation.*; @Target({ElementType.METHOD,ElementType.TYPE}) @Retention(RetentionPolicy.RUNTIME) @Inherited @Documented public @interface RedisLimit { // 资源名称 String name() default ""; // 资源key String key() default ""; // 前缀 String prefix() default ""; // 时间 int period(); // 最多访问次数 int count(); // 类型 LimitType limitType() default LimitType.CUSTOMER; // 提示信息 String msg() default "系统繁忙,请稍后再试"; }注解 AOP 实现package com.example.demo.common.aspect; import com.example.demo.common.annotation.RedisLimit; import com.example.demo.common.enums.LimitType; import com.example.demo.common.exception.LimitException; import com.google.common.collect.ImmutableList; import lombok.extern.slf4j.Slf4j; import org.apache.commons.lang3.StringUtils; import org.aspectj.lang.ProceedingJoinPoint; import org.aspectj.lang.annotation.Around; import org.aspectj.lang.annotation.Aspect; import org.aspectj.lang.reflect.MethodSignature; import org.springframework.context.annotation.Configuration; import org.springframework.data.redis.core.RedisTemplate; import org.springframework.data.redis.core.script.DefaultRedisScript; import org.springframework.web.context.request.RequestContextHolder; import org.springframework.web.context.request.ServletRequestAttributes; import javax.servlet.http.HttpServletRequest; import java.lang.reflect.Method; import java.util.Objects; @Slf4j @Aspect @Configuration public class RedisLimitAspect { private final RedisTemplate<String, Object> redisTemplate; public RedisLimitAspect(RedisTemplate<String, Object> redisTemplate) { this.redisTemplate = redisTemplate; } @Around("@annotation(com.example.demo.common.annotation.RedisLimit)") public Object around(ProceedingJoinPoint pjp){ MethodSignature methodSignature = (MethodSignature)pjp.getSignature(); Method method = methodSignature.getMethod(); RedisLimit annotation = method.getAnnotation(RedisLimit.class); LimitType limitType = annotation.limitType(); String name = annotation.name(); String key; int period = annotation.period(); int count = annotation.count(); switch (limitType){ case IP: key = getIpAddress(); break; case CUSTOMER: key = annotation.key(); break; default: key = StringUtils.upperCase(method.getName()); } ImmutableList<String> keys = ImmutableList.of(StringUtils.join(annotation.prefix(), key)); try { String luaScript = buildLuaScript(); DefaultRedisScript<Number> redisScript = new DefaultRedisScript<>(luaScript, Number.class); Number number = redisTemplate.execute(redisScript, keys, count, period); log.info("Access try count is {} for name = {} and key = {}", number, name, key); if(number != null && number.intValue() == 1){ return pjp.proceed(); } throw new LimitException(annotation.msg()); }catch (Throwable e){ if(e instanceof LimitException){ log.debug("令牌桶={},获取令牌失败",key); throw new LimitException(e.getLocalizedMessage()); } e.printStackTrace(); throw new RuntimeException("服务器异常"); } } public String buildLuaScript(){ return "redis.replicate_commands(); local listLen,time" + "\nlistLen = redis.call('LLEN', KEYS[1])" + // 不超过最大值,则直接写入时间 "\nif listLen and tonumber(listLen) < tonumber(ARGV[1]) then" + "\nlocal a = redis.call('TIME');" + "\nredis.call('LPUSH', KEYS[1], a[1]*1000000+a[2])" + "\nelse" + // 取出现存的最早的那个时间,和当前时间比较,看是小于时间间隔 "\ntime = redis.call('LINDEX', KEYS[1], -1)" + "\nlocal a = redis.call('TIME');" + "\nif a[1]*1000000+a[2] - time < tonumber(ARGV[2])*1000000 then" + // 访问频率超过了限制,返回0表示失败 "\nreturn 0;" + "\nelse" + "\nredis.call('LPUSH', KEYS[1], a[1]*1000000+a[2])" + "\nredis.call('LTRIM', KEYS[1], 0, tonumber(ARGV[1])-1)" + "\nend" + "\nend" + "\nreturn 1;"; } public String getIpAddress(){ HttpServletRequest request = ((ServletRequestAttributes) Objects.requireNonNull(RequestContextHolder.getRequestAttributes())).getRequest(); String ip = request.getHeader("x-forwarded-for"); if(ip == null || ip.length() == 0 || "unknown".equalsIgnoreCase(ip)){ ip = request.getHeader("Proxy-Client-IP"); } if(ip == null || ip.length() == 0 || "unknown".equalsIgnoreCase(ip)){ ip = request.getHeader("WL-Client-IP"); } if(ip == null || ip.length() == 0 || "unknown".equalsIgnoreCase(ip)){ ip = request.getRemoteAddr(); } return ip; } }注解使用count 代表请求总数量period 代表限制时间即 period 时间内,只允许有 count 个请求总数量访问,超过的将被限制不能访问package com.example.demo.module.test; import com.example.demo.common.annotation.Limit; import com.example.demo.common.annotation.RedisLimit; import com.example.demo.common.dto.R; import lombok.extern.slf4j.Slf4j; import org.springframework.web.bind.annotation.GetMapping; import org.springframework.web.bind.annotation.RestController; import java.util.ArrayList; import java.util.List; @Slf4j @RestController public class TestController { @RedisLimit(key = "cachingTest", count = 2, period = 2, msg = "当前排队人数较多,请稍后再试!") // @Limit(key = "cachingTest", permitsPerSecond = 1, timeout = 500, msg = "当前排队人数较多,请稍后再试!") @GetMapping("cachingTest") public R cachingTest(){ log.info("------读取本地------"); List<String> list = new ArrayList<>(); list.add("蜡笔小新"); list.add("哆啦A梦"); list.add("四驱兄弟"); return R.ok(list); } }测试启动项目,快读刷新访问 /cachingTest 请求可以看到访问已经有被成功限制这只是其中一种实现方式,尚有许多实现方案,经供参考。
-
SpringBoot 实现 PDF 添加水印有哪些方案? 简介PDF(Portable Document Format,便携式文档格式) 是一种流行的文件格式,它可以在多个操作系统和应用程序中进行查看和打印。在某些情况下,我们需要对 PDF 文件添加水印,以使其更具有辨识度或者保护其版权。本文将介绍如何使用 Spring Boot 来实现 PDF 添加水印的方式。方式一:使用 Apache PDFBox 库PDFBox 是一个流行的、免费的、用 Java 编写的库,它可以用来创建、修改和提取 PDF内容。 PDFBox 提供了许多 API,包括添加文本水印的功能。{mtitle title="添加 PDFBox "/}首先,在 pom.xml 文件中添加 PDFBox 的依赖:<dependency> <groupId>org.apache.pdfbox</groupId> <artifactId>pdfbox</artifactId> <version>2.0.24</version> </dependency>{mtitle title="添加水印"/}在添加水印之前,需要读取 原始PDF 文件:PDDocument document = PDDocument.load(new File("original.pdf"));然后,遍历 PDF 中的所有页面,并使用 PDPageContentStream 添加水印:// 遍历 PDF 中的所有页面 for (int i = 0; i < document.getNumberOfPages(); i++) { PDPage page = document.getPage(i); PDPageContentStream contentStream = new PDPageContentStream(document, page, PDPageContentStream.AppendMode.APPEND, true, true); // 设置字体和字号 contentStream.setFont(PDType1Font.HELVETICA_BOLD, 36); // 设置透明度 contentStream.setNonStrokingColor(200, 200, 200); // 添加文本水印 contentStream.beginText(); contentStream.newLineAtOffset(100, 100); // 设置水印位置 contentStream.showText("Watermark"); // 设置水印内容 contentStream.endText(); contentStream.close(); }最后,需要保存修改后的 PDF 文件:document.save(new File("output.pdf")); document.close();{mtitle title="完整代码"/}下面是使用 PDFBox 来实现 PDF 添加水印的完整代码:import org.apache.pdfbox.pdmodel.PDDocument; import org.apache.pdfbox.pdmodel.PDPage; import org.apache.pdfbox.pdmodel.PDPageContentStream; import org.apache.pdfbox.pdmodel.font.PDType1Font; import java.io.File; import java.io.IOException; public class PdfBoxWatermark { public static void main(String[] args) throws IOException { // 读取原始 PDF 文件 PDDocument document = PDDocument.load(new File("original.pdf")); // 遍历 PDF 中的所有页面 for (int i = 0; i < document.getNumberOfPages(); i++) { PDPage page = document.getPage(i); PDPageContentStream contentStream = new PDPageContentStream(document, page, PDPageContentStream.AppendMode.APPEND, true, true); // 设置字体和字号 contentStream.setFont(PDType1Font.HELVETICA_BOLD, 36); // 设置透明度 contentStream.setNonStrokingColor(200, 200, 200); // 添加文本水印 contentStream.beginText(); contentStream.newLineAtOffset(100, 100); // 设置水印位置 contentStream.showText("Watermark"); // 设置水印内容 contentStream.endText(); contentStream.close(); } // 保存修改后的 PDF 文件 document.save(new File("output.pdf")); document.close(); } }方式二:使用 iText 库iText 是一款流行的 Java PDF 库,它可以用来创建、读取、修改和提取 PDF 内容。iText提供了许多API,包括添加文本水印的功能。{mtitle title="添加iText依赖"/}在 pom.xml 文件中添加 iText 的依赖:<dependency> <groupId>com.itextpdf</groupId> <artifactId>itextpdf</artifactId> <version>5.5.13</version> </dependency>{mtitle title="添加水印"/}在添加水印之前,需要读取原始 PDF 文件:PdfReader reader = new PdfReader("original.pdf"); PdfStamper stamper = new PdfStamper(reader, new FileOutputStream("output.pdf"));然后,遍历 PDF 中的所有页面,并使用 PdfContentByte 添加水印:// 获取 PDF 中的页数 int pageCount = reader.getNumberOfPages(); // 添加水印 for (int i = 1; i <= pageCount; i++) { PdfContentByte contentByte = stamper.getUnderContent(i); // 或者 getOverContent() contentByte.beginText(); contentByte.setFontAndSize(BaseFont.createFont(), 36f); contentByte.setColorFill(BaseColor.LIGHT_GRAY); contentByte.showTextAligned(Element.ALIGN_CENTER, "Watermark", 300, 400, 45); contentByte.endText(); }最后,需要保存修改后的 PDF 文件并关闭文件流:stamper.close(); reader.close();{mtitle title="完整代码"/}下面是使用 iText 来实现 PDF 添加水印的完整代码:import com.itextpdf.text.*; import com.itextpdf.text.pdf.*; import java.io.FileOutputStream; import java.io.IOException; public class ItextWatermark { public static void main(String[] args) throws IOException, DocumentException { // 读取原始 PDF 文件 PdfReader reader = new PdfReader("original.pdf"); PdfStamper stamper = new PdfStamper(reader, new FileOutputStream("output.pdf")); // 获取 PDF 中的页数 int pageCount = reader.getNumberOfPages(); // 添加水印 for (int i = 1; i <= pageCount; i++) { PdfContentByte contentByte = stamper.getUnderContent(i); // 或者 getOverContent() contentByte.beginText(); contentByte.setFontAndSize(BaseFont.createFont(), 36f); contentByte.setColorFill(BaseColor.LIGHT_GRAY); contentByte.showTextAligned(Element.ALIGN_CENTER, "Watermark", 300, 400, 45); contentByte.endText(); } // 保存修改后的 PDF 文件并关闭文件流 stamper.close(); reader.close(); } }方式三:用 Ghostscript 命令行Ghostscript 是一款流行的、免费的、开源的 PDF 处理程序,它可以用来创建、读取、修改和提取 PDF 内容。 Ghostscript 中提供了命令行参数来添加水印。{mtitle title="Ghostscrip"/}首先需要在本地安装 Ghostscript 程序。可通过以下链接下载安装包:{mtitle title="添加水印"/}可以在终端中使用 Ghostscript 的命令行工具执行以下命令来实现:gs -dBATCH -dNOPAUSE -sDEVICE=pdfwrite -sOutputFile=output.pdf -c "newpath /Helvetica-Bold findfont 36 scalefont setfont 0.5 setgray 200 200 moveto (Watermark) show showpage" original.pdf上述命令中,-sDEVICE=pdfwrite 表示输出为 PDF 文件;-sOutputFile=output.pdf 表示输出文件名为 output.pdf ;最后一个参数 original.pdf 则表示原始 PDF 文件的路径;中间的字符串则表示添加的水印内容。{mtitle title="注意事项"/}使用 Ghostscript 命令行添加水印时,会直接修改原始 PDF 文件,因此建议先备份原始文件。方式四:Free Spire.PDF for Java下面介绍一下使用 Free Spire.PDF for Java 实现 PDF 添加水印的方式。Free Spire.PDF for Java 是一款免费的 Java PDF 库,它提供了一个简单易用的 API,用于创建、读取、修改和提取 PDF 内容。Free Spire.PDF for Java 也支持添加 文本水印 以及 图片水印。{mtitle title="添加 Free Spire.PDF for Java 依赖"/}首先,在 pom.xml 文件中添加 Free Spire.PDF for Java 的依赖:<dependency> <groupId>e-iceblue</groupId> <artifactId>free-spire-pdf-for-java</artifactId> <version>1.9.6</version> </dependency>{mtitle title="添加文本水印"/}在 添加水印 之前,需要读取原始 PDF 文件:PdfDocument pdf = new PdfDocument(); pdf.loadFromFile("original.pdf");然后,遍历 PDF 中的所有页面,并使用 PdfPageBase 添加水印:// 遍历 PDF 中的所有页面 for (int i = 0; i < pdf.getPages().getCount(); i++) { PdfPageBase page = pdf.getPages().get(i); // 添加文本水印 PdfWatermark watermark = new PdfWatermark("Watermark"); watermark.setFont(new PdfFont(PdfFontFamily.Helvetica, 36)); watermark.setOpacity(0.5f); page.getWatermarks().add(watermark); }最后,需要保存修改后的 PDF 文件:pdf.saveToFile("output.pdf"); pdf.close();{mtitle title="添加图片水印"/}添加 图片水印 与 添加文本水印 类似,只需要将 PdfWatermark 的参数修改为图片路径即可。// 添加图片水印 PdfWatermark watermark = new PdfWatermark("watermark.png"); watermark.setOpacity(0.5f); page.getWatermarks().add(watermark);{mtitle title="完整代码"/}下面是使用 Free Spire.PDF for Java 来实现 PDF 添加水印的完整代码:import com.spire.pdf.*; public class FreeSpirePdfWatermark { public static void main(String[] args) { // 读取原始 PDF 文件 PdfDocument pdf = new PdfDocument(); pdf.loadFromFile("original.pdf"); // 遍历 PDF 中的所有页面 for (int i = 0; i < pdf.getPages().getCount(); i++) { PdfPageBase page = pdf.getPages().get(i); // 添加文本水印 PdfWatermark watermark = new PdfWatermark("Watermark"); watermark.setFont(new PdfFont(PdfFontFamily.Helvetica, 36)); watermark.setOpacity(0.5f); page.getWatermarks().add(watermark); // 添加图片水印 // PdfWatermark watermark = new PdfWatermark("watermark.png"); // watermark.setOpacity(0.5f); // page.getWatermarks().add(watermark); } // 保存修改后的 PDF 文件 pdf.saveToFile("output.pdf"); pdf.close(); } }方式五:Aspose.PDF for JavaAspose.PDF for Java 是一个强大的 PDF 处理库,提供了添加水印的功能。结合 Spring Boot 使用 Aspose.PDF for Java 库添加 PDF 水印的方式如下:首先,在 pom.xml 文件中添加 Aspose.PDF for Java 的依赖:<dependency> <groupId>com.aspose</groupId> <artifactId>aspose-pdf</artifactId> <version>21.4</version> </dependency>在 Spring Boot 应用程序中调用 Aspose.PDF for Java 的 API 设置 PDF 水印。{mtitle title="添加文本水印"/}@PostMapping("/addTextWatermark") public ResponseEntity<byte[]> addTextWatermark(@RequestParam("file") MultipartFile file) throws IOException { // 加载 PDF 文件 Document pdfDocument = new Document(file.getInputStream()); TextStamp textStamp = new TextStamp("Watermark"); textStamp.setWordWrap(true); textStamp.setVerticalAlignment(VerticalAlignment.Center); textStamp.setHorizontalAlignment(HorizontalAlignment.Center); pdfDocument.getPages().get_Item(1).addStamp(textStamp); // 保存 PDF 文件 ByteArrayOutputStream outputStream = new ByteArrayOutputStream(); pdfDocument.save(outputStream); return ResponseEntity.ok() .header(HttpHeaders.CONTENT_DISPOSITION, "attachment; filename=\"watermarked.pdf\"") .contentType(MediaType.APPLICATION_PDF) .body(outputStream.toByteArray()); }{mtitle title="添加图片水印"/}@PostMapping("/addImageWatermark") public ResponseEntity<byte[]> addImageWatermark(@RequestParam("file") MultipartFile file) throws IOException { // 加载 PDF 文件 Document pdfDocument = new Document(file.getInputStream()); ImageStamp imageStamp = new ImageStamp("watermark.png"); imageStamp.setWidth(100); imageStamp.setHeight(100); imageStamp.setVerticalAlignment(VerticalAlignment.Center); imageStamp.setHorizontalAlignment(HorizontalAlignment.Center); pdfDocument.getPages().get_Item(1).addStamp(imageStamp); // 保存 PDF 文件 ByteArrayOutputStream outputStream = new ByteArrayOutputStream(); pdfDocument.save(outputStream); return ResponseEntity.ok() .header(HttpHeaders.CONTENT_DISPOSITION, "attachment; filename=\"watermarked.pdf\"") .contentType(MediaType.APPLICATION_PDF) .body(outputStream.toByteArray()); }注意,以上代码中的文件名、宽度、高度等参数需要根据实际情况进行调整。{mtitle title="完整代码"/}完整的 Spring Boot 控制器类代码如下:import com.aspose.pdf.*; import org.springframework.http.HttpHeaders; import org.springframework.http.MediaType; import org.springframework.http.ResponseEntity; import org.springframework.web.bind.annotation.*; import org.springframework.web.multipart.MultipartFile; import java.io.ByteArrayOutputStream; import java.io.IOException; @RestController @RequestMapping("/api/pdf") public class PdfController { @PostMapping("/addTextWatermark") public ResponseEntity<byte[]> addTextWatermark(@RequestParam("file") MultipartFile file) throws IOException { // 加载 PDF 文件 Document pdfDocument = new Document(file.getInputStream()); TextStamp textStamp = new TextStamp("Watermark"); textStamp.setWordWrap(true); textStamp.setVerticalAlignment(VerticalAlignment.Center); textStamp.setHorizontalAlignment(HorizontalAlignment.Center); pdfDocument.getPages().get_Item(1).addStamp(textStamp); // 保存 PDF 文件 ByteArrayOutputStream outputStream = new ByteArrayOutputStream(); pdfDocument.save(outputStream); return ResponseEntity.ok() .header(HttpHeaders.CONTENT_DISPOSITION, "attachment; filename=\"watermarked.pdf\"") .contentType(MediaType.APPLICATION_PDF) .body(outputStream.toByteArray()); } @PostMapping("/addImageWatermark") public ResponseEntity<byte[]> addImageWatermark(@RequestParam("file") MultipartFile file) throws IOException { // 加载 PDF 文件 Document pdfDocument = new Document(file.getInputStream()); ImageStamp imageStamp = new ImageStamp("watermark.png"); imageStamp.setWidth(100); imageStamp.setHeight(100); imageStamp.setVerticalAlignment(VerticalAlignment.Center); imageStamp.setHorizontalAlignment(HorizontalAlignment.Center); pdfDocument.getPages().get_Item(1).addStamp(imageStamp); // 保存 PDF 文件 ByteArrayOutputStream outputStream = new ByteArrayOutputStream(); pdfDocument.save(outputStream); return ResponseEntity.ok() .header(HttpHeaders.CONTENT_DISPOSITION, "attachment; filename=\"watermarked.pdf\"") .contentType(MediaType.APPLICATION_PDF) .body(outputStream.toByteArray()); } }这里使用了两个 RESTful API :/addTextWatermark 和 /addImageWatermark ,分别用于添加 文本水印 和 图片水印 。在请求中通过 file 参数传递 PDF 文件。下面介绍如何使用 Postman 来测试 Spring Boot 应用程序的 API。下载并安装 Postman 。打开 Postman ,选择 POST 请求方法。在 URL 地址栏中输入 http://localhost:8080/api/pdf/addTextWatermark 。在 Headers 标签页中设置 Content-Type 为 multipart/form-data 。在 Body 标签页中选择 form-data 类型,然后设置 key 为 file ,value 选择本地的 PDF 文件。点击 Send 按钮发送请求,等待应答结果。处理结果将会在响应的 Body 中返回,也可以选择浏览器下载或保存到本地磁盘。以上就是使用 Aspose.PDF for Java 库结合 Spring Boot 添加 PDF 水印的方式。结论本文介绍了几种使用 Spring Boot 实现 PDF 添加水印的方式,分别是使用 Apache PDFBox 库、 iText 库以及 Ghostscript 命令行等。选择哪种方式,可以根据项目需求和个人偏好来决定。无论采用哪种方式,都需要注意保护原始 PDF 文件,不要在不必要的情况下直接修改原始文件。欢迎点赞收藏,在你老板安排你干这时,希望你能够及时找到相关的Java工具库,实现这项功能。
-
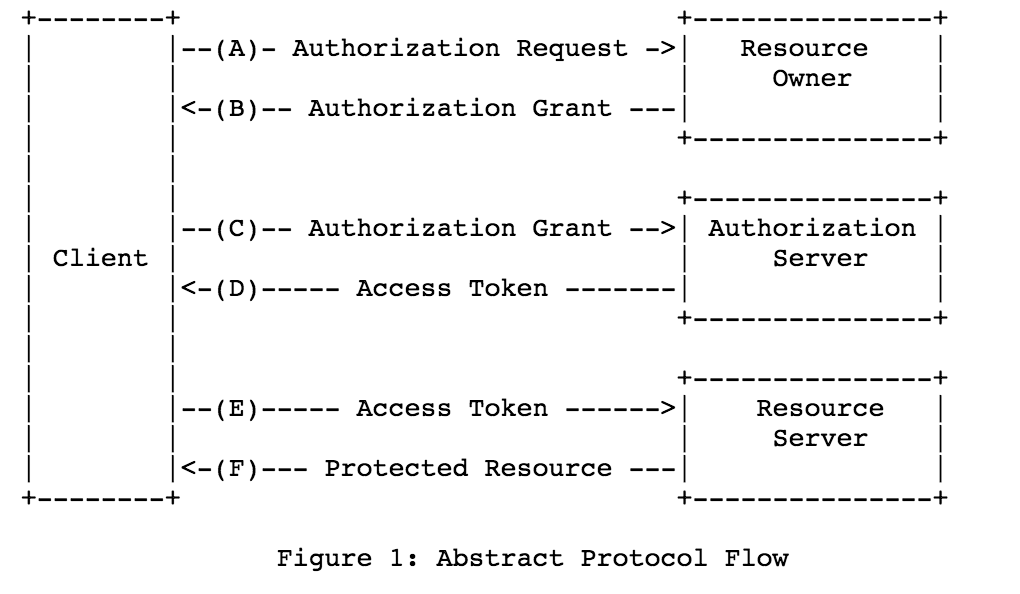
搞定 OAuth 2.0 第三方登录,So Easy ! 一、OAuth简介1、OAuth2.0介绍1.1 介绍OAuth协议:https://www.rfc-editor.org/rfc/rfc6749OAuth(Open Authorization)是一个关于授权(authorization)的开放网络标准,允许用户授权第三方 应用访问他们存储在另外的服务提供者上的信息,而不需要将用户名和密码提供给第三方移动应用或分享他 们数据的所有内容。OAuth在全世界得到广泛应用,目前的版本是2.0版。协议特点简单:不管是OAuth服务提供者还是应用开发者,都很易于理解与使用;安全:没有涉及到用户密钥等信息,更安全更灵活;开放:任何服务提供商都可以实现OAuth,任何软件开发商都可以使用OAuth;1.2 应用场景原生app授权:app登录请求后台接口,为了安全认证,所有请求都带token信息,如果登录验证、请求后台数据前后端分离单页面应用:前后端分离框架,前端请求后台数据,需要进行oauth2安全认证第三方应用授权登录:比如QQ,微博,微信的授权登录1.3 基本概念OAuth的作用就是让"客户端"安全可控地获取"用户"的授权,与"服务提供商"进行交互Resource owner(资源拥有者):拥有该资源的最终用户,他有访问资源的账号密码;Resource server(资源服务器):受保护资源所在的服务器,如果请求包含正确的访问令牌,就可以访问受保护的资源;Client(客户端):请求访问资源的客户端,可以是浏览器、移动设备或者服务器,客户端会携带访问令牌访问资源服务器上的资源;Authorization server(认证服务器):负责认证客户端身份的服务器,如果客户端认证通过,会给客户端发放访问资源服务器的令牌。1.4 优缺点优点更安全,客户端不接触用户密码,服务器端更易集中保护广泛传播并被持续采用短寿命和封装的token资源服务器和授权服务器解耦集中式授权,简化客户端HTTP/JSON友好,易于请求和传递token考虑多种客户端架构场景客户可以具有不同的信任级别缺点协议框架太宽泛,造成各种实现的兼容性和互操作性差不是一个认证协议,本身并不能告诉你任何用户信息2、OAuth授权模式2.1 四种授权模式不管哪一种授权方式,第三方应用申请令牌之前,都必须先到系统备案,说明自己的身份,然后会拿到两个身份识别码:客户端 ID(client ID)和客户端密钥(client secret)。这是为了防止令牌被滥用,没有备案过的第三方应用,是不会拿到令牌的Authorization Code(授权码模式):正宗的OAuth2的授权模式,客户端先将用户导向认证服务器,认证用户成功后获取授权码,然后进行授权,最后根据授权码获取访问令牌;Implicit(隐藏式):和授权码模式相比,取消了获取授权码的过程,直接获取访问令牌;Password(密码模式):客户端直接向用户获取用户名和密码,之后向认证服务器获取访问令牌;Client Credentials(客户端凭证模式):客户端直接通过客户端认证(比如client_id和client_secret)从认证服务器获取访问令牌。一般来说,授权码模式和密码模式是两种常用的授权模式2.2 授权码模式指应用先申请一个授权码,然后再用这个授权码获取令牌流程客户端将用户导向认证服务器的授权页面;用户在认证服务器页面登录并授权;认证服务器返回授权码给客户端;客户端将授权码传递给客户端所在的后端服务(也可以是自己的认证服务器),由后端服务在后端请求认证服务器获取令牌,并返回给客户端。2.3 密码模式如果用户信任应用,应用可以直接携带用户的用户名和密码,直接申请令牌流程客户端要求用户提供用户名和密码;客户端携带用户名和密码,访问授权服务器;授权服务器验证用户身份之后,直接返回令牌。二、三方授权登录1、需求介绍自研应用需要扩展时,绕不开的就是集成其他社交软件的三方登录,比如微信/QQ/微博/Github等等,而这用到的模式属于OAuth的授权码方式授权,下面我就介绍几种三方授权登录教程,同时给予数据库扩展设计思路2、第三方授权登录数据库设计第三方授权登录的时候,第三方的用户信息是存数据库原有的 user 表还是新建一张表呢 ?答案得看具体项目。三方授权登录之后,第三方用户信息一般都会返回用户唯一的标志 openid 或者 unionid 或者 id ,具体是什么得看第三方,比如 github 的是 id2.1 直接通过注册的方式保存到数据库如果网站没有注册功能的,直接通过第三方授权登录,授权成功之后,可以直接把第三的用户信息注册保存到自己数据库的 user 表里面。典型的例子就是微信公众号的授权登录。如果网站有注册功能的,也可以通过第三方授权登录,授权成功之后,也可以直接把第三的用户信息注册保存到自己数据库的 user 表里面(但是密码是后端自动生成的,用户也不知道,只能用第三方授权登录),这样子的第三方的用户和原生注册的用户信息都在同一张表了,这种情况得看自己项目的具体情况。2.2 增加映射表现实中很多网站都有多种账户登录方式,比如可以用网站的注册 id 登录,还可以用手机号登录,可以用 QQ 登录等等。数据库中都是有映射关系,QQ、手机号等都是映射在网站的注册 id 上。保证不管用什么方式登录,只要去查映射关系,发现是映射在网站注册的哪个 id 上,就让哪个 id 登录成功。2.3 建立一个 oauth 表建立一个 oauth 表,一个 id 列,记录对应的用户注册表的 id,然后你有多少个第三方登陆功能,你就建立多少列,记录第三方登陆接口返回的 openid;第三方登陆的时候,通过这个表的记录的 openid 获取 id 信息,如果存在通过 id 读取注册表然后用 session 记录相关信息。不存在就转向用户登陆/注册界面要用户输入本站注册的账户进行 openid 绑定或者新注册账户信息进行绑定。3、数据库实战举例用户表分为用户基础信息表 + 用户授权信息表;所有和授权相关,都放在用户信息授权表,用户信息表和用户授权表是一对多的关系用户基础信息表用户授权信息表 三、GitHub 登录1、概述文档:https://docs.github.com/cn/developers/apps/building-oauth-apps/creating-an-oauth-appGithub 的 OAuth 授权原理大致如下A网站让用户跳转到 GitHubGitHub 要求用户登录,然后询问"A 网站要求获得 xx 权限,你是否同意"用户同意,GitHub 就会重定向回 A 网站,同时发回一个授权码A 网站使用授权码,向 GitHub 请求令牌GitHub 返回令牌A 网站使用令牌,向 GitHub 请求用户数据2、应用登记一个应用要求 OAuth 授权,必须先到对方网站登记,让对方知道是谁在请求,所以要先去 GitHub 登记一下(免费)。GitHub的文档首先访问Authorized OAuth App,填写登记表进行创建(进入 Github 的 Setting 页面,点击 Developer settings,选择OAuth Apps,选择new OAuth App)注意回调地址要与我们待会写的接口地址匹配,否则会报错,进入应用后就能看见我们应用了,secrets没有的话可以生成,注意保存Client IDClient secrets3、Github授权登录原理3.1 请求用户的 GitHub 身份它会提示用户使用他们可以用于登录和授权您的应用程序的特定帐户GET https://github.com/login/oauth/authorize3.2 用户被 GitHub 重定向回站点如果用户接受您的请求,GitHub 将重定向回您的站点,其中包含一个临时code的代码参数以及您在上一步中提供的state参数状态。临时代码将在 10 分钟后过期。如果状态不匹配,则第三方创建了请求,您应该中止该过程。也就是重回到我们的站点,也就是发送了http://localhost:8080/oauth/githubCallback(自定义),并且携带了code将此交换code为访问令牌OAUTH-TOKENPOST https://github.com/login/oauth/access_token3.3 使用访问令牌访问API访问令牌允许代表用户向 API 发出请求,获取用户的基本信息Authorization: token OAUTH-TOKEN GET https://api.github.com/user4、代码实战4.1 配置环境引入依赖<dependency> <groupId>com.alibaba</groupId> <artifactId>fastjson</artifactId> <version>2.0.7</version> </dependency> <dependency> <groupId>cn.hutool</groupId> <artifactId>hutool-all</artifactId> <version>5.8.4</version> </dependency>配置application.ymlgithub: clientId: ab3d67630b13025715cf clientSecret: 29f8c274c7634aa988f42c6507692da4fe118be8 directUrl: http://localhost:8080/oauth/githubCallback server: port: 80804.2 配置bean类@Data @Component @ConfigurationProperties(prefix = "github") public class GitHubOAuthInfo { private String clientId; private String clientSecret; private String directUrl; }4.3 配置state工具类@Service public class OauthService { private Set<String> stateSet = new HashSet<>(); /** * 生成随机state字符串,这里可以存入Redis或者Set,返回时进行校验,不过要注意失效时间 */ public String genState(){ String state = UUID.randomUUID().toString(); stateSet.add(state); return state; } /** * 校验state,防止CSRF * 校验成功后删除 */ public boolean checkState(String state){ if(stateSet.contains(state)){ stateSet.remove(state); return true; } return false; } }4.4 认证与授权@RestController @Slf4j @RequestMapping("/oauth") public class AuthController { @Autowired private GitHubOAuthInfo gitHubOAuthInfo; @Autowired private OauthService oauthService; /** * Github认证令牌服务器地址 */ private static final String ACCESS_TOKEN_URL = "https://github.com/login/oauth/access_token"; /** * Github认证服务器地址 */ private static final String AUTHORIZE_URL = "https://github.com/login/oauth/authorize"; /** * Github资源服务器地址 */ private static final String RESOURCE_URL = "https://api.github.com/user"; /** * 前端获取认证的URL,由后端拼接好返回前端进行请求 */ @GetMapping("/githubLogin") public void githubLogin(HttpServletResponse response) throws IOException { // 生成并保存state,忽略该参数有可能导致CSRF攻击 String state = oauthService.genState(); // 传递参数response_type、client_id、state、redirect_uri String param = "response_type=code&" + "client_id=" + gitHubOAuthInfo.getClientId() + "&state=" + state + "&redirect_uri=" + gitHubOAuthInfo.getDirectUrl(); // 1、请求Github认证服务器 response.sendRedirect(AUTHORIZE_URL + "?" + param); } /** * GitHub回调方法 * code 授权码 * state 应与发送时一致,防止CSRF攻击 */ @GetMapping("/githubCallback") public String githubCallback(String code, String state, HttpServletResponse response) throws Exception { // 验证state,如果不一致,可能被CSRF攻击 if(!oauthService.checkState(state)) { throw new Exception("State验证失败"); } // 设置JSONObject请求体 JSONObject jsonObject = new JSONObject(); jsonObject.put("client_id",gitHubOAuthInfo.getClientId()); jsonObject.put("client_secret",gitHubOAuthInfo.getClientSecret()); jsonObject.put("code",code); String accessTokenRequestJson = null; try{ long start = System.currentTimeMillis(); // 请求accessToken,成功获取到后进行下一步信息获取,这里第一次可能会超时 accessTokenRequestJson = HttpRequest.post(ACCESS_TOKEN_URL) .header("Accept"," application/json") .body(jsonObject.toJSONString()) .timeout(30000) .execute().body(); log.info("请求令牌耗时:{}",System.currentTimeMillis()-start); }catch (Exception e){ log.error("请求令牌API访问异常,异常原因:",e); throw new Exception(e); } log.info("获取到的accessToken为:{}",accessTokenRequestJson); JSONObject accessTokenObject = JSONObject.parseObject(accessTokenRequestJson); // 如果返回的数据包含error,表示失败,错误原因存储在error_description if(accessTokenObject.containsKey("error")) { log.error("错误,原因:{}",accessTokenRequestJson); throw new Exception("error_description,令牌获取错误"); } // 如果返回结果中包含access_token,表示成功 if(!accessTokenObject.containsKey("access_token")) { throw new Exception("获取token失败"); } // 得到token和token_type String accessToken = (String) accessTokenObject.get("access_token"); String tokenType = (String) accessTokenObject.get("token_type"); String userInfo = null; try{ long start = System.currentTimeMillis(); // 请求资源服务器获取个人信息 userInfo = HttpRequest.get(RESOURCE_URL) .header("Authorization", tokenType + " " + accessToken) .timeout(5000) .execute().body(); log.info("请求令牌耗时:{}",System.currentTimeMillis()-start); }catch (Exception e){ log.error("请求令牌API访问异常,异常原因:",e); throw new Exception(e); } JSONObject userInfoJson = JSONObject.parseObject(userInfo); return userInfoJson.toJSONString(); } }最后浏览器访问http://localhost:8080/oauth/githubLogin,即可进入用户授权状态,授权后会进行跳转,自动获取用户的基本信息,后面可以和数据库联动四、QQ登录1、概述官方参考文档:https://wiki.connect.qq.com/oauth2-0 简介大体和Github登录类似,QQ登录OAuth2.0总体处理流程如下申请接入,获取appid和apikey;开发应用,并设置协作者帐号进行测试联调;放置QQ登录按钮;通过用户登录验证和授权,获取Access Token;通过Access Token获取用户的OpenID;调用OpenAPI,来请求访问或修改用户授权的资源。2、应用创建首先没有注册的开发者需要先注册并实名,去开发者平台注册并实名,认证通过后进入QQ 互联管理中心,创建一个网站应用新应用(需要先审核个人身份),然后注册应用信息,和 GitHub 的步骤类似注册后,可以看到应用的 APP ID、APP Key,以及被允许的接口,当然只有一个获取用户信息3、QQ授权登录原理参考:https://wiki.connect.qq.com/准备工作_oauth2-03.1 获取Authorization Code打开浏览器,访问如下地址(请将client_id,redirect_uri,scope等参数值替换为你自己的)GET https://graph.qq.com/oauth2.0/authorize?response_type=code&client_id=[YOUR_APPID]&redirect_uri=[YOUR_REDIRECT_URI]&scope=[THE_SCOPE]如果用户点击 “授权并登录”,则成功跳转到指定的redirect_uri,并跟上Authorization Code(注意此code会在10分钟内过期)3.2 通过Authorization Code获取Access Token获取到的access token具有30天有效期,用户再次登录时自动刷新,第三方网站可存储access token信息,以便后续调用OpenAPI访问和修改用户信息时使用GET https://graph.qq.com/oauth2.0/token?grant_type=authorization_code&client_id=[YOUR_APP_ID]&client_secret=[YOUR_APP_Key]&code=[The_AUTHORIZATION_CODE]&redirect_uri=[YOUR_REDIRECT_URI]3.3 使用Access Token获取用户信息发送请求到如下地址,获取用户的OpenIDGET https://graph.qq.com/oauth2.0/me?access_token=YOUR_ACCESS_TOKEN使用Access Token以及OpenID来访问和修改用户数据,建议网站在用户登录后,即调用get_user_info接口,获得该用户的头像、昵称并显示在网站上,使用户体验统一。GET https://graph.qq.com/user/get_user_info?access_token=YOUR_ACCESS_TOKEN&oauth_consumer_key=YOUR_APP_ID&openid=YOUR_OPENID4、代码实战4.1 配置环境依赖和上面一样,主要配置yml配置文件qq: qqAppId: 101474821 qqAppKey: 00d91cc7f636d71faac8629d559f9fee directUrl: http://localhost:8080/oauth/qqCallback4.2 配置bean类与工具类state工具类和上文一样,bean类如下@Data @Component @ConfigurationProperties(prefix = "qq") public class QqOAuthInfo { private String qqAppId; private String qqAppKey; private String directUrl; }4.3 认证与授权qq的比较麻烦,需要实名认证,创建应用也需要备案域名等@RestController @Slf4j @RequestMapping("/oauth") public class QqAuthController { @Autowired private QqOAuthInfo qqOAuthInfo; @Autowired private OauthService oauthService; /** * QQ认证服务器地址 */ private static final String AUTHORIZE_URL = "https://graph.qq.com/oauth2.0/authorize"; /** * QQ认证令牌服务器地址 */ private static final String ACCESS_TOKEN_URL = "https://graph.qq.com/oauth2.0/token"; /** * QQ的openId Url */ private static final String OPEN_ID_URL = "https://graph.qq.com/oauth2.0/me"; /** * QQ的用户数据URL */ private static final String USER_INFO_URL = "https://graph.qq.com/user/get_user_info"; /** * 前端获取认证的URL,由后端拼接好返回前端进行请求 */ @GetMapping("/qqLogin") public void githubLogin(HttpServletResponse response) throws IOException { // 生成并保存state,忽略该参数有可能导致CSRF攻击 String state = oauthService.genState(); // 传递参数response_type、client_id、state、redirect_uri String param = "response_type=code&" + "client_id=" + qqOAuthInfo.getQqAppId() + "&state=" + state + "&redirect_uri=" + qqOAuthInfo.getDirectUrl(); System.out.println(AUTHORIZE_URL + "?" + param); // 请求QQ认证服务器 response.sendRedirect(AUTHORIZE_URL + "?" + param); } /** * QQ回调方法 * code 授权码 * state 应与发送时一致 */ @GetMapping("/qqCallback") public String githubCallback(String code, String state, HttpServletResponse response) throws Exception { // 验证state,如果不一致,可能被CSRF攻击 if(!oauthService.checkState(state)) { throw new Exception("State验证失败"); } // 设置请求参数,fmt参数因历史原因,默认是x-www-form-urlencoded格式,如果填写json,则返回json格式 String param = "grant_type=authorization_code&code=" + code + "&redirect_uri=" + qqOAuthInfo.getDirectUrl() + "&client_id=" + qqOAuthInfo.getQqAppId() + "&client_secret=" + qqOAuthInfo.getQqAppKey() + "&fmt=json"; String accessTokenRequestJson = null; try{ long start = System.currentTimeMillis(); // 请求accessToken,成功获取到后进行下一步信息获取,这里第一次可能会超时 accessTokenRequestJson = HttpRequest.get(ACCESS_TOKEN_URL) .body(param) .timeout(30000) .execute().body(); log.info("请求令牌耗时:{}",System.currentTimeMillis()-start); }catch (Exception e){ log.error("请求令牌API访问异常,异常原因:",e); throw new Exception(e); } /** * result示例: * 成功:access_token=A24B37194E89A0DDF8DDFA7EF8D3E4F8&expires_in=7776000&refresh_token=BD36DADB0FE7B910B4C8BBE1A41F6783 */ log.info("获取到的accessToken为:{}",accessTokenRequestJson); JSONObject accessTokenObject = JSONObject.parseObject(accessTokenRequestJson); // 如果返回的数据包含error,表示失败,错误原因存储在error_description if(accessTokenObject.containsKey("error")) { log.error("错误,原因:{}",accessTokenRequestJson); throw new Exception("error_description,令牌获取错误"); } // 如果返回结果中包含access_token,表示成功 if(!accessTokenObject.containsKey("access_token")) { throw new Exception("获取token失败"); } // 得到token和token_type String accessToken = (String) accessTokenObject.get("access_token"); String meParams = "access_token=" + accessToken; String meBody = null; try{ long start = System.currentTimeMillis(); // 请求accessToken,成功获取到后进行下一步信息获取,这里第一次可能会超时 meBody = HttpRequest.get(OPEN_ID_URL) .body(meParams) .execute().body(); log.info("请求令牌耗时:{}",System.currentTimeMillis()-start); }catch (Exception e){ log.error("openId访问异常,异常原因:",e); throw new Exception(e); } // 成功返回如下:callback( {"client_id":"YOUR_APPID","openid":"YOUR_OPENID"} ); JSONObject meJsonObject = JSONObject.parseObject(meBody); // 取出openid String openid = meJsonObject.getString("openid"); // 使用Access Token以及OpenID来访问和修改用户数据 String userInfoParam = "access_token=" + accessToken + "&oauth_consumer_key=" + qqOAuthInfo.getQqAppId() + "&openid=" + openid; String userInfo = null; try{ long start = System.currentTimeMillis(); // 请求accessToken,成功获取到后进行下一步信息获取,这里第一次可能会超时 userInfo = HttpRequest.get(USER_INFO_URL) .body(userInfoParam) .timeout(5000) .execute().body(); log.info("请求令牌耗时:{}",System.currentTimeMillis()-start); }catch (Exception e){ log.error("用户数据访问异常,异常原因:",e); throw new Exception(e); } JSONObject userInfoJson = JSONObject.parseObject(userInfo); return userInfoJson.toJSONString(); } }五、微信登录官方文档:https://developers.weixin.qq.com/doc/oplatform/Website_App/WeChat_Login/Wechat_Login.html
-
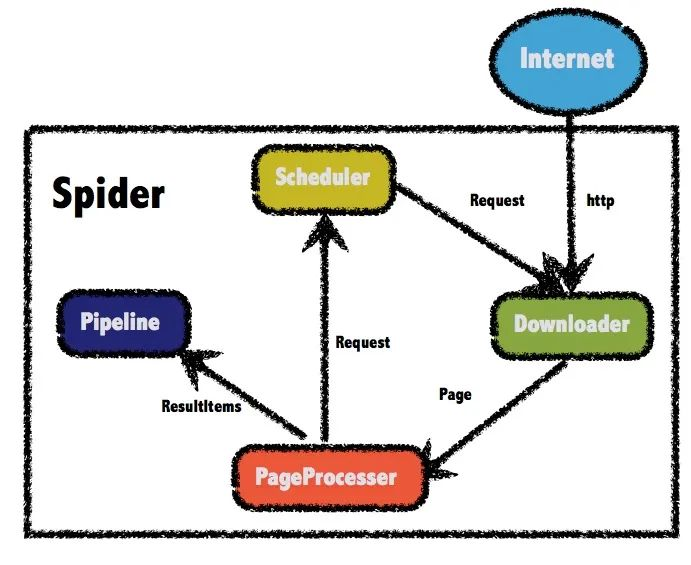
用 Java 写爬虫 前两天,百度紧随 GPT-4 发布了自己的语言模型文心一言。讲道理,对于国内能够发布这样一个敢于对标CHAT GPT的高质量语言模型,大家应该更多感受到的是赛博朋克与现实生活贴近的真实感,对这个模型应该有着更多的鼓励或赞美。可不知是因为整个发布会搞的过于像没有好好准备的学生毕业答辩PPT,还是它的实际表现并没有那么如人意,大家貌似对文心一言并不那么买账。于是我决定看一下知乎大神们对文心一言的评价,哪想到随便打开一个问题,居然有600多条回答…要是我这一条一条翻完所有回答,估计就得拿出一天来全职摸鱼了,那么有没有什么办法能够最快的分析出对待这个问题大家的综合评价呢?那么今天就让我纱布擦屁股,给大家露一小手,写一个爬虫扒下来所有的回答,再对结果进行一下分析。WebMagic正式开始前,咱们得先搞定工具。虽然python写起爬虫来有天然的框架优势,不过鉴于大家都是搞java的,那么我们今天就用java框架来实现一个爬虫。咱们要使用的工具 WebMagic ,就是一款简单灵活的java爬虫框架,总体架构由下面这几部分构成:Downloader:负责从互联网上下载页面,以便后续处理。WebMagic默认使用了Apache HttpClient作为下载工具。PageProcessor:负责解析页面,抽取有用信息,以及发现新的链接。WebMagic使用Jsoup作为HTML解析工具,并基于其开发了解析XPath的工具Xsoup。Scheduler:负责管理待抓取的URL,以及一些去重的工作。WebMagic默认提供了JDK的内存队列来管理URL,并用集合来进行去重。也支持使用Redis进行分布式管理。Pipeline:负责抽取结果的处理,包括计算、持久化到文件、数据库等。WebMagic默认提供了输出到控制台和保存到文件两种结果处理方案。在4个主要组件中,除了 PageProcessor 之外,其他3个组件基本都可以复用。而我们实际爬虫中的重点,就是要针对不同网页进行页面元素的分析,进而定制化地开发不同的 PageProcessor 。下面我们开始准备实战,先引入 webmagic 的 core 和 extension 两个依赖,最新0.8.0版本搞里头:<dependency> <groupId>us.codecraft</groupId> <artifactId>webmagic-core</artifactId> <version>0.8.0</version> </dependency> <dependency> <groupId>us.codecraft</groupId> <artifactId>webmagic-extension</artifactId> <version>0.8.0</version> </dependency>PageProcessor 与 xpath 在正式开始抓取页面前,我们先看看知乎上一个问题的页面是怎么构成的,还是以上面图中那个问题为例,原问题的地址在这里:https://www.zhihu.com/question/589929380我们先做个简单的测试,来获取这个问题的标题,以及对这个问题的描述。通过浏览器的审查元素,可以看到标题是一个h1的标题元素,并且它的class属性是QuestionHeader-title,而问题的描述部分在一个div中,它的class中包含了QuestionRichText。简单分析完了,按照前面说的,我们要对这个页面定制一个 PageProcessor组件 抽取信息,直接上代码。新建一个类实现 PageProcessor接口 ,并实现接口中的 process() 这个方法即可。public class WenxinProcessor implements PageProcessor { private Site site = Site.me() .setRetryTimes(3).setSleepTime(1000); @Override public void process(Page page) { String title = page.getHtml() .xpath("//h1[@class='QuestionHeader-title']/text()").toString(); String question= page.getHtml() .xpath("//div[@class='QuestionRichText']//tidyText()").toString(); System.out.println(title); System.out.println(question); } public Site getSite() { return site; } public static void main(String[] args) { Spider.create(new WenxinProcessor()) .addUrl("https://www.zhihu.com/question/589929380") .thread(2) .run(); } }查看运行结果:可以看到,在代码中通过 xpath() 这样一个方法,成功拿到了我们要取的两个元素。其实说白了,这个 xpath 也不是爬虫框架中才有的新玩意,而是一种 XML 路径语言(XML Path Language),是一种用来确定XML文档中某部分位置的语言。它基于 XML 的树状结构,提供在数据结构树中找寻节点的能力。常用的路径表达式包括:表达式描述nodename选取此节点的所有子节点。/从根节点选取。//从匹配选择的当前节点选择文档中的节点,而不考虑它们的位置。.选取当前节点。..选取当前节点的父节点。@选取属性。在上面的代码中,//h1[@class='QuestionHeader-title']就表示选取一个类型为 h1 的节点,并且它有一个 class 为 QuestionHeader-title 的属性。至于后面的 text() 和 tidyText() 方法,则是用于提取元素中的文本,这些函数不是标准 xpath 中的,而是 webMagic 中特有的新方法,这些函数的使用可以参考文档:http://webmagic.io/docs/zh/posts/ch4-basic-page-processor/xsoup.html看到这,你可能还有个问题,这里对于问题的描述部分没有显示完全,你需要在页面上点一下这个显示全部它才会显示详细的信息。没关系,这里先留个坑,这个问题放在后面解决。获取提问的答案我们完善一下上面的代码,尝试获取问题的解答。按照老套路,还是先分析页面元素再用 xpath 写表达式获取。修改 process 方法:@Override public void process(Page page) { String contentPath= "div[@class='QuestionAnswers-answers']"+ "//div[@class='RichContent RichContent--unescapable']" + "//div[@class='RichContent-inner']"+ "/tidyText()"; List<String> answerList = page.getHtml().xpath(contentPath).all(); for (int i = 0; i < answerList.size(); i++) { System.out.println("第"+(i+1)+"条回答:"); System.out.println(answerList.get(i)+"\n======="); } }在上面的代码中,使用了 xpath 获取页面中具有相同属性的元素,并将它们存入了 List 列表中。看一下运行结果:纳尼?这个问题明明有着689条的回答,为什么我们只爬到了两条答案?如果你经常用知乎来学习摸鱼的话,其实就会知道对于这种有大量回答的问题,页面刚开始只会默认显示很少的几条的消息,随着你不断的下拉页面才会把新的回答显示出来。那么如果我想拿到所有的评论应该怎么做呢?这时候就要引出 webMagic 中另一个神奇的组件 Selenium 了。Selenium简单来说, selenium 是一个用于 Web应用程序 测试的工具, selenium 测试可以直接运行在浏览器中,就像真正的用户在操作一样,并且目前主流的大牌浏览器一般都支持这项技术。所以在爬虫中,我们可以通过编写模仿用户操作的 selenium脚本 ,模拟进行一部分用互操作,比如点击事件或屏幕滚动等等。WebMagic-Selenium 需要依赖于 WebDriver ,所以我们先进行本地 WebDriver 的安装操作。安装WebDriver 查看自己电脑上 Chrome 版本,可以点击 设置 -> 关于chrome 查看,也可以直接在地址栏输入 chrome://settings/help :可以看到版本号,然后需要下载对应版本的 WebDriver ,下载地址:http://chromedriver.storage.googleapis.com/index.html打开后,可以看到各个版本,选择与本地浏览器最接近的版本:点击进入后,根据我们的系统选择对应版本下载即可。下载完成后,解压到本地目录中,之后在使用 selenium模块 中会使用到。这个文件建议放在 chrome安装目录 下,否则之后在代码中可能会报一个 WebDriverException: unknown error: cannot find Chrome binary 找不到 chrome文件的错误 。修改Selenium源码webMagic 中已经封装了 selenium模块 的代码,但官方版本的代码有些地方需要修改,我们下载源码后要自己简单改动一下然后重新编译。我这下载了 0.8.1-SNAPSHOT 版本的代码,官方 git 地址:https://github.com/code4craft/webmagic修改配置文件地址,在 WebDriverPool 将 selenium配置文件 路径写死了,需要改变配置路径:// 修改前 // private static final String DEFAULT_CONFIG_FILE = "/data/webmagic/webmagic-selenium/config.ini"; // 修改后 private static final String DEFAULT_CONFIG_FILE = "selenium.properties";在 resources目录 下添加配置文件 selenium.properties :# What WebDriver to use for the tests driver=chrome # PhantomJS specific config (change according to your installation) chrome_driver_loglevel=DEBUGjs模拟页面操作修改 SeleniumDownloader 的 download()方法 ,在代码中的这个位置,作者很贴心的给我们留了一行注释:意思就是,你可以在这添加鼠标事件或者干点别的什么东西了。我们在这添加页面向下滚动这一模拟事件,每休眠 2s 就向下滚动一下页面,一共下拉 20 次://模拟下拉,刷新页面 for (int i=0; i < 20; i++){ System.out.println("休眠2s"); try { //滚动到最底部 ((JavascriptExecutor)webDriver) .executeScript("window.scrollTo(0,document.body.scrollHeight)"); //休眠,等待加载页面 Thread.sleep(2000); //往回滚一点,否则不加载 ((JavascriptExecutor)webDriver) .executeScript("window.scrollBy(0,-300)"); } catch (InterruptedException e) { e.printStackTrace(); } }修改完成后本地打个包,注意还要修改一下版本号,改成和发行版的不同即可,我这里改成了 0.8.1.1-SNAPSHOT 。mvn clean install调用回到之前的爬虫项目,引入我们自己打好的包:<dependency> <groupId>us.codecraft</groupId> <artifactId>webmagic-selenium</artifactId> <version>0.8.1.1-SNAPSHOT</version> </dependency>修改之前的主程序启动时的代码,添加 Downloader 组件, SeleniumDownloader 构造方法的参数中传入我们下好的 chrome 的 webDriver 的可执行文件的地址:public static void main(String[] args) { Spider.create(new WenxinProcessor()) .addUrl("https://www.zhihu.com/question/589929380") .thread(2) .setDownloader(new SeleniumDownloader("D:\\Program Files\\Google\\Chrome\\Application\\chromedriver.exe") .setSleepTime(1000)) .run(); }进行测试,可以看到在拉动了40秒窗口后,获取到的答案条数是100条:通过适当地添加下拉页面的循环的次数,我们就能够获取到当前问题下的全部回答了。另外,在启动爬虫后我们会看到 webDriver 弹出了一个 chrome 的窗口,在这个窗口中有一个提示: Chrome 正受到自动测试软件的控制,并且可以看到页面不断的自动下拉情况:如果不想要这个弹窗的话,可以修改 selenium模块 的代码进行隐藏。修改 WebDriverPool 的 configure()方法 ,找到这段代码:if (driver.equals(DRIVER_CHROME)) { mDriver = new ChromeDriver(sCaps); }添加一个隐藏显示的选项,并且在修改完成后,重新打包一下。if (driver.equals(DRIVER_CHROME)) { ChromeOptions options=new ChromeOptions(); options.setHeadless(true); mDriver = new ChromeDriver(options); }获取问题详细描述不知道大家还记不记得在前面还留了一个坑,我们现在获取到的对问题的描述是不全的,需要点一下这个按钮才能显示完全。同样,这个问题也可以用 selenium 来解决,在我们下拉页面前,加上这么一个模拟点击事件,就可以获得对问题的详细描述了:((JavascriptExecutor)webDriver) .executeScript("document.getElementsByClassName('Button QuestionRichText-more')[0].click()");看一下执行结果,已经可以拿到完整内容了:Pipeline到这里,虽然要爬的数据获取到了,但是要进行分析的话,还需要进行持久化操作。在前面的 webMagic 的架构图中,介绍过 Pipeline组件 主要负责结果的处理,所以我们再优化一下代码,添加一个 Pipeline 负责数据的持久化。由于数据量也不是非常大,这里我选择了直接存入 ElasticSearch 中,同时也方便我们进行后续的分析操作, ES组件 我使用的是 esclientrhl ,为了方便我还是把项目整个扔到了 spring 里面。定制一个 Pipeline 也很简单,实现 Pipeline接口 并实现里面的 process()接口 就可以了,通过构造方法传入 ES 持久化层组件:@Slf4j @AllArgsConstructor public class WenxinPipeline implements Pipeline { private final ZhihuRepository zhihuRepository; @Override public void process(ResultItems resultItems, Task task) { Map<String, Object> map = resultItems.getAll(); String title = map.get("title").toString(); String question = map.get("question").toString(); List<String> answer = (List<String>) map.get("answer"); ZhihuEntity zhihuEntity; for (String an : answer) { zhihuEntity = new ZhihuEntity(); zhihuEntity.setTitle(title); zhihuEntity.setQuestion(question); zhihuEntity.setAnswer(an); try { zhihuRepository.save(zhihuEntity); } catch (Exception e) { e.printStackTrace(); } } } }把 selenium 向下拉取页面的次数改成200后,通过接口启动程序:@GetMapping("wenxin") public void wenxin() { new Thread(() -> { Request request = new Request("https://www.zhihu.com/question/589929380"); WenxinProcessor4 wenxinProcessor = new WenxinProcessor4(); Spider.create(wenxinProcessor) .addRequest(request) .addPipeline(new WenxinPipeline(zhihuRepository)) .setDownloader(new SeleniumDownloader("D:\\Program Files\\Google\\Chrome\\Application\\chromedriver.exe") .setSleepTime(1000)) .run(); }).start(); }运行完成后,查询一下 ES 中的数据,可以看到,实际爬取到了673条回答。另外,我们可以在一个爬虫程序中传入多个页面地址,只要页面元素具有相同的规则,那么它们就能用相同的爬虫逻辑处理,在下面的代码中,我们一次性传入多个页面:Spider.create(new WenxinProcessor4()) .addUrl(new String[]{"https://www.zhihu.com/question/589941496", "https://www.zhihu.com/question/589904230","https://www.zhihu.com/question/589938328"}) .addPipeline(new WenxinPipeline(zhihuRepository)) .setDownloader(new SeleniumDownloader("D:\\Program Files\\Google\\Chrome\\Application\\chromedriver.exe") .setSleepTime(1000)) .run();一顿忙活下来,最终扒下来1300多条数据。分析数据落到了 ES 里后,那我们就可以根据关键字进行分析了,我们先选择10个负面方向的词语进行查询,可以看到查到了403条数据,将近占到了总量的三分之一。再从各种回答中选择10个正向词语查询,结果大概只有负面方向的一半左右:不得不说,这届网友真的是很严厉…Proxy代理说到爬虫,其实还有一个绕不过去的东西,那就是代理。像咱们这样的小打小闹,爬个百八十条数据虽然没啥问题,但是如果要去爬取大量数据或是用于商业,还是建议使用一下代理,一方面能够隐藏我们的IP地址起到保护自己的作用,另一方面动态IP也能有效的应对一些反爬策略。个人在使用中,比较推荐的是隧道代理。简单的来说,如果你购买了IP服务的话,用普通代理方式的话需要你去手动请求接口获取IP地址,再到代码中动态修改。而使用隧道代理的话,就不需要自己提取代理IP了,每条隧道自动提取并使用代理IP转发用户请求,这样我们就可以专注于业务了。虽然网上也有免费的代理能够能用,但要不然就是失效的太快,要不就是很容易被网站加入黑名单,所以如果追求性能的话还是买个专业点的代理比较好,虽然可能价格不那么便宜就是了。最后附上源码下载地址源码地址:https://github.com/trunks2008/zhihu-spider
-
-
Spring Boot + Redis 解决重复提交问题,一定用的到 前言在实际的开发项目中,一个对外暴露的接口往往会面临很多次请求,我们来解释一下幂等的概念:任意多次执行所产生的影响均与一次执行的影响相同。按照这个含义,最终的含义就是 对数据库的影响只能是一次性的,不能重复处理。如何保证其幂等性,通常有以下手段:数据库建立唯一性索引,可以保证最终插入数据库的只有一条数据token机制,每次接口请求前先获取一个token,然后再下次请求的时候在请求的header体中加上这个token,后台进行验证,如果验证通过删除token,下次请求再次判断token悲观锁或者乐观锁,悲观锁可以保证每次for update的时候其他sql无法update数据(在数据库引擎是innodb的时候,select的条件必须是唯一索引,防止锁全表)先查询后判断,首先通过查询数据库是否存在数据,如果存在证明已经请求过了,直接拒绝该请求,如果没有存在,就证明是第一次进来,直接放行。Redis实现自动幂等的原理图:搭建Redis的服务Api1、首先是搭建 Redis 服务器。2、引入 springboot 中到的 redis 的 stater ,或者 Spring 封装的 jedis 也可以,后面主要用到的 api 就是它的 set 方法和 exists 方法,这里我们使用 springboot 的封装好的 redisTemplate/** * redis工具类 */ @Component public class RedisService { @Autowired private RedisTemplate redisTemplate; /** * 写入缓存 * @param key * @param value * @return */ public boolean set(final String key, Object value) { boolean result = false; try { ValueOperations<Serializable, Object> operations = redisTemplate.opsForValue(); operations.set(key, value); result = true; } catch (Exception e) { e.printStackTrace(); } return result; } /** * 写入缓存设置时效时间 * @param key * @param value * @return */ public boolean setEx(final String key, Object value, Long expireTime) { boolean result = false; try { ValueOperations<Serializable, Object> operations = redisTemplate.opsForValue(); operations.set(key, value); redisTemplate.expire(key, expireTime, TimeUnit.SECONDS); result = true; } catch (Exception e) { e.printStackTrace(); } return result; } /** * 判断缓存中是否有对应的value * @param key * @return */ public boolean exists(final String key) { return redisTemplate.hasKey(key); } /** * 读取缓存 * @param key * @return */ public Object get(final String key) { Object result = null; ValueOperations<Serializable, Object> operations = redisTemplate.opsForValue(); result = operations.get(key); return result; } /** * 删除对应的value * @param key */ public boolean remove(final String key) { if (exists(key)) { Boolean delete = redisTemplate.delete(key); return delete; } return false; } }自定义注解AutoIdempotent自定义一个注解,定义此注解的主要目的是把它添加在需要实现幂等的方法上,凡是某个方法注解了它,都会实现自动幂等。后台利用反射如果扫描到这个注解,就会处理这个方法实现自动幂等,使用元注解 ElementType.METHOD 表示它只能放在方法上, etentionPolicy.RUNTIME 表示它在运行时@Target({ElementType.METHOD}) @Retention(RetentionPolicy.RUNTIME) public @interface AutoIdempotent { }Token创建和检验1、Token服务接口 我们新建一个接口,创建 token 服务,里面主要是两个方法,一个用来创建 token ,一个用来验证 token 。创建 token 主要产生的是一个字符串,检验 token 的话主要是传达 request 对象,为什么要传 request 对象呢?主要作用就是获取 header 里面的 token ,然后检验,通过抛出的 Exception 来获取具体的报错信息返回给前端public interface TokenService { /** * 创建token * @return */ public String createToken(); /** * 检验token * @param request * @return */ public boolean checkToken(HttpServletRequest request) throws Exception; }2、Token的服务实现类 token 引用了 redis 服务,创建 token 采用随机算法工具类生成随机 uuid 字符串,然后放入到 redis 中(为了防止数据的冗余保留,这里设置过期时间为10000秒,具体可视业务而定),如果放入成功,最后返回这个 token 值。 checkToken 方法就是从 header 中获取 token 到值(如果 header 中拿不到,就从 paramter 中获取),如若不存在,直接抛出异常。这个异常信息可以被拦截器捕捉到,然后返回给前端。@Service public class TokenServiceImpl implements TokenService { @Autowired private RedisService redisService; /** * 创建token * * @return */ @Override public String createToken() { String str = RandomUtil.randomUUID(); StrBuilder token = new StrBuilder(); try { token.append(Constant.Redis.TOKEN_PREFIX).append(str); redisService.setEx(token.toString(), token.toString(),10000L); boolean notEmpty = StrUtil.isNotEmpty(token.toString()); if (notEmpty) { return token.toString(); } }catch (Exception ex){ ex.printStackTrace(); } return null; } /** * 检验token * * @param request * @return */ @Override public boolean checkToken(HttpServletRequest request) throws Exception { String token = request.getHeader(Constant.TOKEN_NAME); if (StrUtil.isBlank(token)) {// header中不存在token token = request.getParameter(Constant.TOKEN_NAME); if (StrUtil.isBlank(token)) {// parameter中也不存在token throw new ServiceException(Constant.ResponseCode.ILLEGAL_ARGUMENT, 100); } } if (!redisService.exists(token)) { throw new ServiceException(Constant.ResponseCode.REPETITIVE_OPERATION, 200); } boolean remove = redisService.remove(token); if (!remove) { throw new ServiceException(Constant.ResponseCode.REPETITIVE_OPERATION, 200); } return true; } }拦截器的配置1、Web配置类 实现WebMvcConfigurerAdapter,主要作用就是添加autoIdempotentInterceptor到配置类中,这样我们到拦截器才能生效,注意使用@Configuration注解,这样在容器启动是时候就可以添加进入context中@Configuration public class WebConfiguration extends WebMvcConfigurerAdapter { @Resource private AutoIdempotentInterceptor autoIdempotentInterceptor; /** * 添加拦截器 * @param registry */ @Override public void addInterceptors(InterceptorRegistry registry) { registry.addInterceptor(autoIdempotentInterceptor); super.addInterceptors(registry); } }2、拦截处理器 主要的功能是拦截扫描到 AutoIdempotent 到注解到方法,然后调用 tokenService 的 checkToken() 方法校验token是否正确,如果捕捉到异常就将异常信息渲染成json返回给前端/** * 拦截器 */ @Component public class AutoIdempotentInterceptor implements HandlerInterceptor { @Autowired private TokenService tokenService; /** * 预处理 * * @param request * @param response * @param handler * @return * @throws Exception */ @Override public boolean preHandle(HttpServletRequest request, HttpServletResponse response, Object handler) throws Exception { if (!(handler instanceof HandlerMethod)) { return true; } HandlerMethod handlerMethod = (HandlerMethod) handler; Method method = handlerMethod.getMethod(); //被ApiIdempotment标记的扫描 AutoIdempotent methodAnnotation = method.getAnnotation(AutoIdempotent.class); if (methodAnnotation != null) { try { return tokenService.checkToken(request);// 幂等性校验, 校验通过则放行, 校验失败则抛出异常, 并通过统一异常处理返回友好提示 }catch (Exception ex){ ResultVo failedResult = ResultVo.getFailedResult(101, ex.getMessage()); writeReturnJson(response, JSONUtil.toJsonStr(failedResult)); throw ex; } } //必须返回true,否则会被拦截一切请求 return true; } @Override public void postHandle(HttpServletRequest request, HttpServletResponse response, Object handler, ModelAndView modelAndView) throws Exception { } @Override public void afterCompletion(HttpServletRequest request, HttpServletResponse response, Object handler, Exception ex) throws Exception { } /** * 返回的json值 * @param response * @param json * @throws Exception */ private void writeReturnJson(HttpServletResponse response, String json) throws Exception{ PrintWriter writer = null; response.setCharacterEncoding("UTF-8"); response.setContentType("text/html; charset=utf-8"); try { writer = response.getWriter(); writer.print(json); } catch (IOException e) { } finally { if (writer != null) writer.close(); } } }测试用例1、模拟业务请求类 首先我们需要通过 /get/token 路径通过 getToken() 方法去获取具体的 token ,然后我们调用 testIdempotence 方法,这个方法上面注解了 @AutoIdempotent ,拦截器会拦截所有的请求,当判断到处理的方法上面有该注解的时候,就会调用 TokenService 中的 checkToken() 方法,如果捕获到异常会将异常抛出调用者,下面我们来模拟请求一下:@RestController public class BusinessController { @Resource private TokenService tokenService; @Resource private TestService testService; @PostMapping("/get/token") public String getToken(){ String token = tokenService.createToken(); if (StrUtil.isNotEmpty(token)) { ResultVo resultVo = new ResultVo(); resultVo.setCode(Constant.code_success); resultVo.setMessage(Constant.SUCCESS); resultVo.setData(token); return JSONUtil.toJsonStr(resultVo); } return StrUtil.EMPTY; } @AutoIdempotent @PostMapping("/test/Idempotence") public String testIdempotence() { String businessResult = testService.testIdempotence(); if (StrUtil.isNotEmpty(businessResult)) { ResultVo successResult = ResultVo.getSuccessResult(businessResult); return JSONUtil.toJsonStr(successResult); } return StrUtil.EMPTY; } }2、使用postman请求 首先访问get/token路径获取到具体到token:利用获取到到token,然后放到具体请求到header中,可以看到第一次请求成功,接着我们请求第二次:第二次请求,返回到是重复性操作,可见重复性验证通过,再多次请求到时候我们只让其第一次成功,第二次就是失败:总结本文介绍了使用 springboot 和 拦截器 、 redis 来优雅的实现接口幂等,对于幂等在实际的开发过程中是十分重要的,因为一个接口可能会被无数的客户端调用,如何保证其不影响后台的业务处理,如何保证其只影响数据一次是非常重要的,它可以防止产生脏数据或者乱数据,也可以减少并发量,实乃十分有益的一件事。而传统的做法是每次判断数据,这种做法不够智能化和自动化,比较麻烦。而今天的这种自动化处理也可以提升程序的伸缩性。