
搜索到
266
篇与
的结果
-
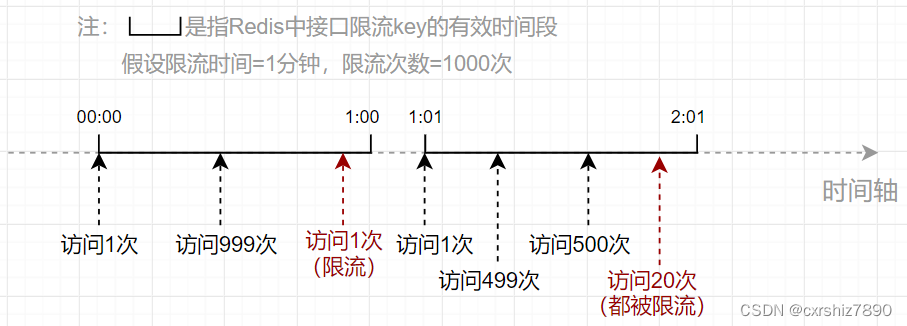
 SpringBoot 项目使用 Redis 对用户 IP 进行接口限流 一、思路使用接口限流的主要目的在于提高系统的稳定性,防止接口被恶意打击(短时间内大量请求)。比如要求某接口在1分钟内请求次数不超过1000次,那么应该如何设计代码呢?下面讲两种思路,如果想看代码可直接翻到后面的代码部分。1.1 固定时间段(旧思路)1.1.1 思路描述 该方案的思路是:使用Redis记录固定时间段内某用户IP访问某接口的次数,其中:Redis的key:用户IP + 接口方法名Redis的value:当前接口访问次数。当用户在近期内第一次访问该接口时,向Redis中设置一个包含了用户IP和接口方法名的key,value的值初始化为1(表示第一次访问当前接口)。同时,设置该key的过期时间(比如为60秒)。之后,只要这个key还未过期,用户每次访问该接口都会导致value自增1次。用户每次访问接口前,先从Redis中拿到当前接口访问次数,如果发现访问次数大于规定的次数(如超过1000次),则向用户返回接口访问失败的标识。1.1.2 思路缺陷 该方案的缺点在于,限流时间段是固定的。比如要求某接口在1分钟内请求次数不超过1000次,观察以下流程:可以发现,00:59和01:01之间仅仅间隔了2秒,但接口却被访问了1000+999=1999次,是限流次数(1000次)的2倍!所以在该方案中,限流次数的设置可能不起作用,仍然可能在短时间内造成大量访问。1.2 滑动窗口(新思路)1.2.1 思路描述 为了避免出现方案1中由于键过期导致的短期访问量增大的情况,我们可以改变一下思路,也就是把固定的时间段改成动态的:假设某个接口在10秒内只允许访问5次。用户每次访问接口时,记录当前用户访问的时间点(时间戳),并计算前10秒内用户访问该接口的总次数。如果总次数大于限流次数,则不允许用户访问该接口。这样就能保证在任意时刻用户的访问次数不会超过1000次。如下图,假设用户在0:19时间点访问接口,经检查其前10秒内访问次数为5次,则允许本次访问。假设用户0:20时间点访问接口,经检查其前10秒内访问次数为6次(超出限流次数5次),则不允许本次访问。1.2.2 Redis部分的实现1)选用何种 Redis 数据结构首先是需要确定使用哪个Redis数据结构。用户每次访问时,需要用一个key记录用户访问的时间点,而且还需要利用这些时间点进行范围检查。为何选择 zSet 数据结构为了能够实现范围检查,可以考虑使用Redis中的zSet有序集合。添加一个zSet元素的命令如下:ZADD [key] [score] [member]它有一个关键的属性score,通过它可以记录当前member的优先级。于是我们可以把score设置成用户访问接口的时间戳,以便于通过score进行范围检查。key则记录用户IP和接口方法名,至于member设置成什么没有影响,一个member记录了用户访问接口的时间点。因此member也可以设置成时间戳。3)zSet 如何进行范围检查(检查前几秒的访问次数)思路是,把特定时间间隔之前的member都删掉,留下的member就是时间间隔之内的总访问次数。然后统计当前key中的member有多少个即可。① 把特定时间间隔之前的member都删掉。zSet有如下命令,用于删除score范围在[min~max]之间的member:Zremrangebyscore [key] [min] [max]假设限流时间设置为5秒,当前用户访问接口时,获取当前系统时间戳为currentTimeMill,那么删除的score范围可以设置为:min = 0 max = currentTimeMill - 5 * 1000相当于把5秒之前的所有member都删除了,只留下前5秒内的key。② 统计特定key中已存在的member有多少个。zSet有如下命令,用于统计某个key的member总数: ZCARD [key]统计的key的member总数,就是当前接口已经访问的次数。如果该数目大于限流次数,则说明当前的访问应被限流。二、代码实现主要是使用注解 + AOP的形式实现。2.1 固定时间段思路使用了lua脚本。参考:https://blog.csdn.net/qq_43641418/article/details/1277644622.1.1 限流注解@Retention(RetentionPolicy.RUNTIME) @Target(ElementType.METHOD) public @interface RateLimiter { /** * 限流时间,单位秒 */ int time() default 5; /** * 限流次数 */ int count() default 10; }2.1.2 定义lua脚本 在 resources/lua 下新建 limit.lua :-- 获取redis键 local key = KEYS[1] -- 获取第一个参数(次数) local count = tonumber(ARGV[1]) -- 获取第二个参数(时间) local time = tonumber(ARGV[2]) -- 获取当前流量 local current = redis.call('get', key); -- 如果current值存在,且值大于规定的次数,则拒绝放行(直接返回当前流量) if current and tonumber(current) > count then return tonumber(current) end -- 如果值小于规定次数,或值不存在,则允许放行,当前流量数+1 (值不存在情况下,可以自增变为1) current = redis.call('incr', key); -- 如果是第一次进来,那么开始设置键的过期时间。 if tonumber(current) == 1 then redis.call('expire', key, time); end -- 返回当前流量 return tonumber(current)2.1.3 注入Lua执行脚本 关键代码是 limitScript() 方法@Configuration public class RedisConfig { @Bean public RedisTemplate<Object, Object> redisTemplate(RedisConnectionFactory connectionFactory) { RedisTemplate<Object, Object> redisTemplate = new RedisTemplate<>(); redisTemplate.setConnectionFactory(connectionFactory); // 使用Jackson2JsonRedisSerialize 替换默认序列化(默认采用的是JDK序列化) Jackson2JsonRedisSerializer<Object> jackson2JsonRedisSerializer = new Jackson2JsonRedisSerializer<>(Object.class); ObjectMapper om = new ObjectMapper(); om.setVisibility(PropertyAccessor.ALL, JsonAutoDetect.Visibility.ANY); om.enableDefaultTyping(ObjectMapper.DefaultTyping.NON_FINAL); jackson2JsonRedisSerializer.setObjectMapper(om); redisTemplate.setKeySerializer(jackson2JsonRedisSerializer); redisTemplate.setValueSerializer(jackson2JsonRedisSerializer); redisTemplate.setHashKeySerializer(jackson2JsonRedisSerializer); redisTemplate.setHashValueSerializer(jackson2JsonRedisSerializer); return redisTemplate; } /** * 解析lua脚本的bean */ @Bean("limitScript") public DefaultRedisScript<Long> limitScript() { DefaultRedisScript<Long> redisScript = new DefaultRedisScript<>(); redisScript.setScriptSource(new ResourceScriptSource(new ClassPathResource("lua/limit.lua"))); redisScript.setResultType(Long.class); return redisScript; } }2.1.3 定义Aop切面类@Slf4j @Aspect @Component public class RateLimiterAspect { @Autowired private RedisTemplate redisTemplate; @Autowired private RedisScript<Long> limitScript; @Before("@annotation(rateLimiter)") public void doBefore(JoinPoint point, RateLimiter rateLimiter) throws Throwable { int time = rateLimiter.time(); int count = rateLimiter.count(); String combineKey = getCombineKey(rateLimiter.type(), point); List<String> keys = Collections.singletonList(combineKey); try { Long number = (Long) redisTemplate.execute(limitScript, keys, count, time); // 当前流量number已超过限制,则抛出异常 if (number == null || number.intValue() > count) { throw new RuntimeException("访问过于频繁,请稍后再试"); } log.info("[limit] 限制请求数'{}',当前请求数'{}',缓存key'{}'", count, number.intValue(), combineKey); } catch (Exception ex) { ex.printStackTrace(); throw new RuntimeException("服务器限流异常,请稍候再试"); } } /** * 把用户IP和接口方法名拼接成 redis 的 key * @param point 切入点 * @return 组合key */ private String getCombineKey(JoinPoint point) { StringBuilder sb = new StringBuilder("rate_limit:"); ServletRequestAttributes attributes = (ServletRequestAttributes) RequestContextHolder.getRequestAttributes(); HttpServletRequest request = attributes.getRequest(); sb.append( Utils.getIpAddress(request) ); MethodSignature signature = (MethodSignature) point.getSignature(); Method method = signature.getMethod(); Class<?> targetClass = method.getDeclaringClass(); // keyPrefix + "-" + class + "-" + method return sb.append("-").append( targetClass.getName() ) .append("-").append(method.getName()).toString(); } }2.2 滑动窗口思路2.2.1 限流注解@Retention(RetentionPolicy.RUNTIME) @Target(ElementType.METHOD) public @interface RateLimiter { /** * 限流时间,单位秒 */ int time() default 5; /** * 限流次数 */ int count() default 10; }2.2.2 定义Aop切面类@Slf4j @Aspect @Component public class RateLimiterAspect { @Autowired private RedisTemplate redisTemplate; /** * 实现限流(新思路) * @param point * @param rateLimiter * @throws Throwable */ @SuppressWarnings("unchecked") @Before("@annotation(rateLimiter)") public void doBefore(JoinPoint point, RateLimiter rateLimiter) throws Throwable { // 在 {time} 秒内仅允许访问 {count} 次。 int time = rateLimiter.time(); int count = rateLimiter.count(); // 根据用户IP(可选)和接口方法,构造key String combineKey = getCombineKey(rateLimiter.type(), point); // 限流逻辑实现 ZSetOperations zSetOperations = redisTemplate.opsForZSet(); // 记录本次访问的时间结点 long currentMs = System.currentTimeMillis(); zSetOperations.add(combineKey, currentMs, currentMs); // 这一步是为了防止member一直存在于内存中 redisTemplate.expire(combineKey, time, TimeUnit.SECONDS); // 移除{time}秒之前的访问记录(滑动窗口思想) zSetOperations.removeRangeByScore(combineKey, 0, currentMs - time * 1000); // 获得当前窗口内的访问记录数 Long currCount = zSetOperations.zCard(combineKey); // 限流判断 if (currCount > count) { log.error("[limit] 限制请求数'{}',当前请求数'{}',缓存key'{}'", count, currCount, combineKey); throw new RuntimeException("访问过于频繁,请稍后再试!"); } } /** * 把用户IP和接口方法名拼接成 redis 的 key * @param point 切入点 * @return 组合key */ private String getCombineKey(JoinPoint point) { StringBuilder sb = new StringBuilder("rate_limit:"); ServletRequestAttributes attributes = (ServletRequestAttributes) RequestContextHolder.getRequestAttributes(); HttpServletRequest request = attributes.getRequest(); sb.append( Utils.getIpAddress(request) ); MethodSignature signature = (MethodSignature) point.getSignature(); Method method = signature.getMethod(); Class<?> targetClass = method.getDeclaringClass(); // keyPrefix + "-" + class + "-" + method return sb.append("-").append( targetClass.getName() ) .append("-").append(method.getName()).toString(); } }
 -
Flex 布局教程:语法篇 Flex 布局教程:语法篇作者: 阮一峰日期: 2015年7月10日网页布局(layout)是 CSS 的一个重点应用。布局的传统解决方案,基于盒状模型,依赖 display 属性 + position属性 + float属性。它对于那些特殊布局非常不方便,比如,垂直居中就不容易实现。2009年,W3C 提出了一种新的方案----Flex 布局,可以简便、完整、响应式地实现各种页面布局。目前,它已经得到了所有浏览器的支持,这意味着,现在就能很安全地使用这项功能。Flex 布局将成为未来布局的首选方案。本文介绍它的语法,下一篇文章给出常见布局的 Flex 写法。网友 JailBreak 为本文的所有示例制作了 Demo,也可以参考。以下内容主要参考了下面两篇文章:A Complete Guide to Flexbox 和 A Visual Guide to CSS3 Flexbox Properties。一、Flex 布局是什么?Flex 是 Flexible Box 的缩写,意为"弹性布局",用来为盒状模型提供最大的灵活性。任何一个容器都可以指定为 Flex 布局。 .box{ display: flex; } 行内元素也可以使用 Flex 布局。 .box{ display: inline-flex; } Webkit 内核的浏览器,必须加上-webkit前缀。 .box{ display: -webkit-flex; /* Safari */ display: flex; } 注意,设为 Flex 布局以后,子元素的float、clear和vertical-align属性将失效。二、基本概念采用 Flex 布局的元素,称为 Flex 容器(flex container),简称"容器"。它的所有子元素自动成为容器成员,称为 Flex 项目(flex item),简称"项目"。容器默认存在两根轴:水平的主轴(main axis)和垂直的交叉轴(cross axis)。主轴的开始位置(与边框的交叉点)叫做main start,结束位置叫做main end;交叉轴的开始位置叫做cross start,结束位置叫做cross end。项目默认沿主轴排列。单个项目占据的主轴空间叫做main size,占据的交叉轴空间叫做cross size。三、容器的属性以下6个属性设置在容器上。flex-directionflex-wrapflex-flowjustify-contentalign-itemsalign-content3.1 flex-direction属性flex-direction属性决定主轴的方向(即项目的排列方向)。 .box { flex-direction: row | row-reverse | column | column-reverse; } 它可能有4个值。row(默认值):主轴为水平方向,起点在左端。row-reverse:主轴为水平方向,起点在右端。column:主轴为垂直方向,起点在上沿。column-reverse:主轴为垂直方向,起点在下沿。3.2 flex-wrap属性默认情况下,项目都排在一条线(又称"轴线")上。flex-wrap属性定义,如果一条轴线排不下,如何换行。 .box{ flex-wrap: nowrap | wrap | wrap-reverse; } 它可能取三个值。(1)nowrap(默认):不换行。(2)wrap:换行,第一行在上方。(3)wrap-reverse:换行,第一行在下方。3.3 flex-flowflex-flow属性是flex-direction属性和flex-wrap属性的简写形式,默认值为row nowrap。 .box { flex-flow: <flex-direction> || <flex-wrap>; } 3.4 justify-content属性justify-content属性定义了项目在主轴上的对齐方式。 .box { justify-content: flex-start | flex-end | center | space-between | space-around; } 它可能取5个值,具体对齐方式与轴的方向有关。下面假设主轴为从左到右。flex-start(默认值):左对齐flex-end:右对齐center: 居中space-between:两端对齐,项目之间的间隔都相等。space-around:每个项目两侧的间隔相等。所以,项目之间的间隔比项目与边框的间隔大一倍。3.5 align-items属性align-items属性定义项目在交叉轴上如何对齐。 .box { align-items: flex-start | flex-end | center | baseline | stretch; } 它可能取5个值。具体的对齐方式与交叉轴的方向有关,下面假设交叉轴从上到下。flex-start:交叉轴的起点对齐。flex-end:交叉轴的终点对齐。center:交叉轴的中点对齐。baseline: 项目的第一行文字的基线对齐。stretch(默认值):如果项目未设置高度或设为auto,将占满整个容器的高度。3.6 align-content属性align-content属性定义了多根轴线的对齐方式。如果项目只有一根轴线,该属性不起作用。 .box { align-content: flex-start | flex-end | center | space-between | space-around | stretch; } 该属性可能取6个值。flex-start:与交叉轴的起点对齐。flex-end:与交叉轴的终点对齐。center:与交叉轴的中点对齐。space-between:与交叉轴两端对齐,轴线之间的间隔平均分布。space-around:每根轴线两侧的间隔都相等。所以,轴线之间的间隔比轴线与边框的间隔大一倍。stretch(默认值):轴线占满整个交叉轴。四、项目的属性以下6个属性设置在项目上。orderflex-growflex-shrinkflex-basisflexalign-self4.1 order属性order属性定义项目的排列顺序。数值越小,排列越靠前,默认为0。 .item { order: <integer>; } 4.2 flex-grow属性flex-grow属性定义项目的放大比例,默认为0,即如果存在剩余空间,也不放大。 .item { flex-grow: <number>; /* default 0 */ } 如果所有项目的flex-grow属性都为1,则它们将等分剩余空间(如果有的话)。如果一个项目的flex-grow属性为2,其他项目都为1,则前者占据的剩余空间将比其他项多一倍。4.3 flex-shrink属性flex-shrink属性定义了项目的缩小比例,默认为1,即如果空间不足,该项目将缩小。 .item { flex-shrink: <number>; /* default 1 */ } 如果所有项目的flex-shrink属性都为1,当空间不足时,都将等比例缩小。如果一个项目的flex-shrink属性为0,其他项目都为1,则空间不足时,前者不缩小。负值对该属性无效。4.4 flex-basis属性flex-basis属性定义了在分配多余空间之前,项目占据的主轴空间(main size)。浏览器根据这个属性,计算主轴是否有多余空间。它的默认值为auto,即项目的本来大小。 .item { flex-basis: <length> | auto; /* default auto */ } 它可以设为跟width或height属性一样的值(比如350px),则项目将占据固定空间。4.5 flex属性flex属性是flex-grow, flex-shrink 和 flex-basis的简写,默认值为0 1 auto。后两个属性可选。 .item { flex: none | [ <'flex-grow'> <'flex-shrink'>? || <'flex-basis'> ] } 该属性有两个快捷值:auto (1 1 auto) 和 none (0 0 auto)。建议优先使用这个属性,而不是单独写三个分离的属性,因为浏览器会推算相关值。4.6 align-self属性align-self属性允许单个项目有与其他项目不一样的对齐方式,可覆盖align-items属性。默认值为auto,表示继承父元素的align-items属性,如果没有父元素,则等同于stretch。 .item { align-self: auto | flex-start | flex-end | center | baseline | stretch; } 该属性可能取6个值,除了auto,其他都与align-items属性完全一致。(完)
-
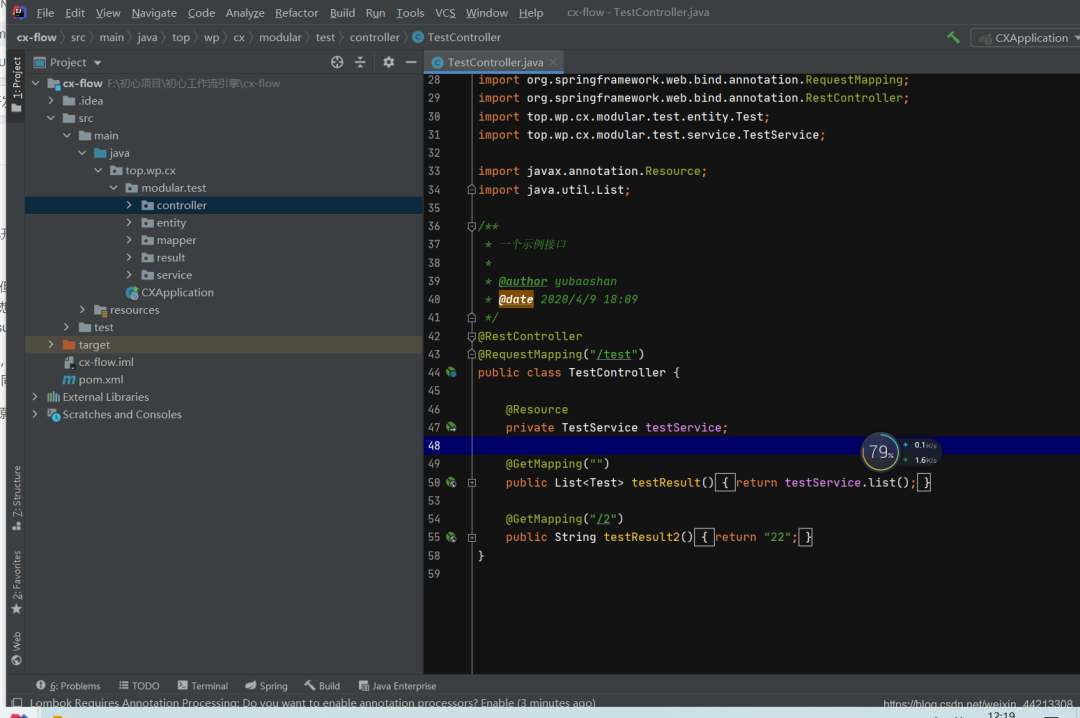
SpringBoot 业务组件化开发,维护起来很香~ 1、背景首先,谈一谈什么是“springBoot业务组件化开发”,最近一直在开发一直面临这一个问题,就是相同的业务场景场景在一个项目中使用了,又需要再另外一个项目中复用,一遍又一遍的复制代码,然后想将该业务的代码在不同的项目中维护起来真的很难。最开始想用微服务的方式来解决这个问题,但是觉得一套完整的微服务太重,而且目前微服务还处于振荡期(去年的微服务解决方案,今年国内直接都换成了阿里的技术解决方案),此外很多时候我们接私活,就是个单体的springboot项目,用不上微服务这种级别的项目,所以想来想去这条路不是很满足我的需求;再后来,想到单体的聚合架构,但是聚合架构的项目,个人觉得有时候也不是很好,一般的聚合项目就是基于某个具体实例架构下才能使用,换一个架构自己写的业务model就不能用了(比如你在suoyi框架下开发的模块业务包,在guns下可能就直接不能使用了)。最后,想了一下,能不能单独开发一个项目,这个项目可以自己独立运行(微服务架构下用),也可以在单体项目中直接通过pom引入的方式,然后简单的配置一下,然后直接使用多好;查了一下网上没有现成的技术解决方案,问了同事,他说我这种思想属于SOA的一种实现,同时有第三包和聚合项目的影子在里面。也许有什么更好的技术解决方案,也希望各位能够不吝赐教。补充一句,之所以说“业务组件化”开发,来源于Vue的思想,希望Java后端开发的业务也可像vue的组件一样去使用,这样多好2、DEMO2-1 项目准备建一个Java项目项目,结构如下图:pom文件如下:<?xml version="1.0" encoding="UTF-8"?> <project xmlns="http://maven.apache.org/POM/4.0.0" xmlns:xsi="http://www.w3.org/2001/XMLSchema-instance" xsi:schemaLocation="http://maven.apache.org/POM/4.0.0 http://maven.apache.org/xsd/maven-4.0.0.xsd"> <modelVersion>4.0.0</modelVersion> <parent> <groupId>org.springframework.boot</groupId> <artifactId>spring-boot-starter-parent</artifactId> <version>2.3.1.RELEASE</version> </parent> <groupId>top.wp</groupId> <artifactId>cx-flow</artifactId> <version>1.0-SNAPSHOT</version> <properties> <project.build.sourceEncoding>UTF-8</project.build.sourceEncoding> <project.reporting.outputEncoding>UTF-8</project.reporting.outputEncoding> <mysql-connector-java.version>8.0.17</mysql-connector-java.version> <druid.version>1.1.21</druid.version> <mp.version>3.3.2</mp.version> <fastjson.version>1.2.70</fastjson.version> <jwt.version>0.9.1</jwt.version> <hutool.version>5.3.7</hutool.version> <lombok.versin>1.18.12</lombok.versin> <swagger.version>2.9.2</swagger.version> <swagger.bootstrap.ui.version>1.9.6</swagger.bootstrap.ui.version> <easypoi.version>4.2.0</easypoi.version> <jodconverter.version>4.2.0</jodconverter.version> <libreoffice.version>6.4.3</libreoffice.version> <justauth.version>1.15.6</justauth.version> <aliyun.oss.version>3.8.0</aliyun.oss.version> <qcloud.oss.version>5.6.23</qcloud.oss.version> <aliyun.sms.sdk.version>4.4.6</aliyun.sms.sdk.version> <aliyun.sms.esc.version>4.17.6</aliyun.sms.esc.version> <qcloud.sms.sdk.version>3.1.57</qcloud.sms.sdk.version> </properties> <dependencies> <!-- web --> <dependency> <groupId>org.springframework.boot</groupId> <artifactId>spring-boot-starter-web</artifactId> </dependency> <!--mybatis-plus--> <dependency> <groupId>com.baomidou</groupId> <artifactId>mybatis-plus-boot-starter</artifactId> <version>${mp.version}</version> </dependency> <!--数据库驱动--> <dependency> <groupId>mysql</groupId> <artifactId>mysql-connector-java</artifactId> <version>${mysql-connector-java.version}</version> </dependency> <!--数据库连接池--> <dependency> <groupId>com.alibaba</groupId> <artifactId>druid</artifactId> <version>${druid.version}</version> </dependency> <!--hutool--> <dependency> <groupId>cn.hutool</groupId> <artifactId>hutool-all</artifactId> <version>${hutool.version}</version> </dependency> <!--lombok--> <dependency> <groupId>org.projectlombok</groupId> <artifactId>lombok</artifactId> <version>${lombok.versin}</version> </dependency> </dependencies> <build> <resources> <resource> <directory>src/main/resources</directory> <!-- <excludes> <exclude>**/*.properties</exclude> <exclude>**/*.xml</exclude> </excludes> --> <includes> <include>**/*.properties</include> <include>**/*.xml</include> <include>**/*.yml</include> </includes> <filtering>false</filtering> </resource> <resource> <directory>src/main/java</directory> <includes> <include>**/*.xml</include> </includes> <filtering>false</filtering> </resource> </resources> </build> </project>配置文件如下:主要是数据库和mybaits-plus的配置(其实可以不用这个配置文件,在这只是为了项目能够独立运行起来)#服务配置 server: port: 8080 #spring相关配置 spring: datasource: driver-class-name: com.mysql.cj.jdbc.Driver url: jdbc:mysql://localhost:3306/cx-xn?autoReconnect=true&useUnicode=true&characterEncoding=utf8&zeroDateTimeBehavior=CONVERT_TO_NULL&useSSL=false&serverTimezone=CTT&nullCatalogMeansCurrent=true username: 数据库账户 password: 数据库密码 servlet: multipart: max-request-size: 100MB max-file-size: 100MB jackson: time-zone: GMT+8 date-format: yyyy-MM-dd HH:mm:ss.SSS locale: zh_CN serialization: # 格式化输出 indent_output: false #mybaits相关配置 mybatis-plus: mapper-locations: classpath*:top/wp/cx/**/mapping/*.xml, classpath:/META-INF/modeler-mybatis-mappings/*.xml configuration: map-underscore-to-camel-case: true cache-enabled: true lazy-loading-enabled: true multiple-result-sets-enabled: true log-impl: org.apache.ibatis.logging.stdout.StdOutImpl global-config: banner: false db-config: id-type: assign_id table-underline: true enable-sql-runner: true configuration-properties: prefix: blobType: BLOB boolValue: TRUE启动入口(可以不用写,启动入口存在目的是让项目可以自己跑起来)package top.wp.cx; import cn.hutool.log.StaticLog; import org.springframework.boot.SpringApplication; import org.springframework.boot.autoconfigure.SpringBootApplication; @SpringBootApplication public class CXApplication { public static void main(String[] args) { SpringApplication.run(CXApplication.class, args); StaticLog.info(">>> " + CXApplication.class.getSimpleName() + " 启动成功!"); } }测试:entity、resultpackage top.wp.cx.modular.test.entity; import com.baomidou.mybatisplus.annotation.IdType; import com.baomidou.mybatisplus.annotation.TableId; import com.baomidou.mybatisplus.annotation.TableName; import lombok.Data; @Data @TableName("test") public class Test { /** * 主键 */ @TableId(type = IdType.ASSIGN_ID) private Integer id; /** * 账号 */ private String name; } package top.wp.cx.modular.test.result; import lombok.Data; @Data public class TestResult { private Integer id; private String name; }测试mapper、xml、service和controllerpackage top.wp.cx.modular.test.mapper; import com.baomidou.mybatisplus.core.mapper.BaseMapper; import top.wp.cx.modular.test.entity.Test; /** * 系统用户数据范围mapper接口 * * @author xuyuxiang * @date 2020/3/13 15:46 */ //@Mapper public interface TestMapper extends BaseMapper<Test> { } <?xml version="1.0" encoding="UTF-8"?> <!DOCTYPE mapper PUBLIC "-//mybatis.org//DTD Mapper 3.0//EN" "http://mybatis.org/dtd/mybatis-3-mapper.dtd"> <mapper namespace="top.wp.cx.modular.test.mapper.TestMapper"> </mapper> package top.wp.cx.modular.test.service; import com.baomidou.mybatisplus.extension.service.impl.ServiceImpl; import org.springframework.stereotype.Service; import top.wp.cx.modular.test.entity.Test; import top.wp.cx.modular.test.mapper.TestMapper; /** * 一个service实现 * * @author yubaoshan * @date 2020/4/9 18:11 */ @Service public class TestService extends ServiceImpl<TestMapper, Test> { } package top.wp.cx.modular.test.controller; import org.springframework.web.bind.annotation.GetMapping; import org.springframework.web.bind.annotation.RequestMapping; import org.springframework.web.bind.annotation.RestController; import top.wp.cx.modular.test.entity.Test; import top.wp.cx.modular.test.service.TestService; import javax.annotation.Resource; import java.util.List; /** * 一个示例接口 * * @author yubaoshan * @date 2020/4/9 18:09 */ @RestController @RequestMapping("/test") public class TestController { @Resource private TestService testService; @GetMapping("") public List<Test> testResult(){ return testService.list(); } @GetMapping("/2") public String testResult2(){ return "22"; } }至此项目准备完成,其实就是简单见了一个测试项目,此时如果你按照上面的步骤,写了启动类和配置项信息,项目是可以独立运行的。2-2 项目打包、引入、运行将2-1中的测试项目进行打包:install右键第一个选项此时你的本地maven仓库会出现刚才的项目(当然前提是你的idea配置过本地的maven)新建另外一个项目cx-mainpom文件如下:注意将你刚才的准备测试的项目引入进来<?xml version="1.0" encoding="UTF-8"?> <project xmlns="http://maven.apache.org/POM/4.0.0" xmlns:xsi="http://www.w3.org/2001/XMLSchema-instance" xsi:schemaLocation="http://maven.apache.org/POM/4.0.0 http://maven.apache.org/xsd/maven-4.0.0.xsd"> <modelVersion>4.0.0</modelVersion> <parent> <groupId>org.springframework.boot</groupId> <artifactId>spring-boot-starter-parent</artifactId> <version>2.3.1.RELEASE</version> </parent> <groupId>top.wp.cx</groupId> <artifactId>cx-main</artifactId> <version>1.0-SNAPSHOT</version> <properties> <project.build.sourceEncoding>UTF-8</project.build.sourceEncoding> <project.reporting.outputEncoding>UTF-8</project.reporting.outputEncoding> <mysql-connector-java.version>8.0.17</mysql-connector-java.version> <druid.version>1.1.21</druid.version> <mp.version>3.3.2</mp.version> <fastjson.version>1.2.70</fastjson.version> <jwt.version>0.9.1</jwt.version> <hutool.version>5.3.7</hutool.version> <lombok.versin>1.18.12</lombok.versin> <swagger.version>2.9.2</swagger.version> <swagger.bootstrap.ui.version>1.9.6</swagger.bootstrap.ui.version> <easypoi.version>4.2.0</easypoi.version> <jodconverter.version>4.2.0</jodconverter.version> <libreoffice.version>6.4.3</libreoffice.version> <justauth.version>1.15.6</justauth.version> <aliyun.oss.version>3.8.0</aliyun.oss.version> <qcloud.oss.version>5.6.23</qcloud.oss.version> <aliyun.sms.sdk.version>4.4.6</aliyun.sms.sdk.version> <aliyun.sms.esc.version>4.17.6</aliyun.sms.esc.version> <qcloud.sms.sdk.version>3.1.57</qcloud.sms.sdk.version> </properties> <dependencies> <dependency> <groupId>top.wp</groupId> <artifactId>cx-flow</artifactId> <version>1.0-SNAPSHOT</version> </dependency> <!-- web --> <dependency> <groupId>org.springframework.boot</groupId> <artifactId>spring-boot-starter-web</artifactId> </dependency> <!--mybatis-plus--> <dependency> <groupId>com.baomidou</groupId> <artifactId>mybatis-plus-boot-starter</artifactId> <version>${mp.version}</version> </dependency> <!--数据库驱动--> <dependency> <groupId>mysql</groupId> <artifactId>mysql-connector-java</artifactId> <version>${mysql-connector-java.version}</version> </dependency> <!--数据库连接池--> <dependency> <groupId>com.alibaba</groupId> <artifactId>druid</artifactId> <version>${druid.version}</version> </dependency> <!--hutool--> <dependency> <groupId>cn.hutool</groupId> <artifactId>hutool-all</artifactId> <version>${hutool.version}</version> </dependency> <!--lombok--> <dependency> <groupId>org.projectlombok</groupId> <artifactId>lombok</artifactId> <version>${lombok.versin}</version> </dependency> </dependencies> <!--xml打包排除--> <build> <resources> <resource> <directory>src/main/resources</directory> <!-- <excludes> <exclude>**/*.properties</exclude> <exclude>**/*.xml</exclude> </excludes> --> <includes> <include>**/*.properties</include> <include>**/*.xml</include> <include>**/*.yml</include> </includes> <filtering>false</filtering> </resource> <resource> <directory>src/main/java</directory> <includes> <include>**/*.xml</include> </includes> <filtering>false</filtering> </resource> </resources> </build> </project>application.yml配置文件 注意xml的扫描#服务配置 server: port: 8081 #spring相关配置 spring: datasource: driver-class-name: com.mysql.cj.jdbc.Driver url: jdbc:mysql://localhost:3306/cx-xn?autoReconnect=true&useUnicode=true&characterEncoding=utf8&zeroDateTimeBehavior=CONVERT_TO_NULL&useSSL=false&serverTimezone=CTT&nullCatalogMeansCurrent=true username: root password: root servlet: multipart: max-request-size: 100MB max-file-size: 100MB jackson: time-zone: GMT+8 date-format: yyyy-MM-dd HH:mm:ss.SSS locale: zh_CN serialization: # 格式化输出 indent_output: false #mybaits相关配置 mybatis-plus: #xml文件扫描 mapper-locations: classpath*:top/wp/cx/**/mapping/*.xml, classpath:/META-INF/modeler-mybatis-mappings/*.xml configuration: map-underscore-to-camel-case: true cache-enabled: true lazy-loading-enabled: true multiple-result-sets-enabled: true log-impl: org.apache.ibatis.logging.stdout.StdOutImpl global-config: banner: false db-config: id-type: assign_id table-underline: true enable-sql-runner: true configuration-properties: prefix: blobType: BLOB boolValue: TRUE启动入口,注意spring和mapper扫描package top.wp.cx.main; import cn.hutool.log.StaticLog; import org.mybatis.spring.annotation.MapperScan; import org.springframework.boot.SpringApplication; import org.springframework.boot.autoconfigure.SpringBootApplication; import org.springframework.context.annotation.ComponentScan; @SpringBootApplication @ComponentScan(basePackages = {"top.wp.cx.modular.test"}) // spring扫描 @MapperScan(basePackages = {"top.wp.cx.modular.test.**.mapper"}) // mybatis扫描mapper public class CXApplication { public static void main(String[] args) { SpringApplication.run(CXApplication.class, args); StaticLog.info(">>> " + CXApplication.class.getSimpleName() + " 启动成功!"); } }此时启动cx-main的项目,访问2-1的测试controller能访问成功证明配置正确。
-
18个常用 Shell 脚本, 太好用啦~ 1、检测两台服务器指定目录下的文件一致性#!/bin/bash ###################################### 检测两台服务器指定目录下的文件一致性 ##################################### #通过对比两台服务器上文件的md5值,达到检测一致性的目的 dir=/data/web b_ip=192.168.88.10 #将指定目录下的文件全部遍历出来并作为md5sum命令的参数,进而得到所有文件的md5值,并写入到指定文件中 find $dir -type f|xargs md5sum > /tmp/md5_a.txt ssh $b_ip "find $dir -type f|xargs md5sum > /tmp/md5_b.txt" scp $b_ip:/tmp/md5_b.txt /tmp #将文件名作为遍历对象进行一一比对 for f in `awk '{print 2} /tmp/md5_a.txt'`do #以a机器为标准,当b机器不存在遍历对象中的文件时直接输出不存在的结果 if grep -qw "$f" /tmp/md5_b.txt then md5_a=`grep -w "$f" /tmp/md5_a.txt|awk '{print 1}'` md5_b=`grep -w "$f" /tmp/md5_b.txt|awk '{print 1}'` #当文件存在时,如果md5值不一致则输出文件改变的结果 if [ $md5_a != $md5_b ]then echo "$f changed." fi else echo "$f deleted." fi done 2、定时清空文件内容,定时记录文件大小#!/bin/bash ################################################################# 每小时执行一次脚本(任务计划),当时间为0点或12点时,将目标目录下的所有文件内#容清空,但不删除文件,其他时间则只统计各个文件的大小,一个文件一行,输出到以时#间和日期命名的文件中,需要考虑目标目录下二级、三级等子目录的文件 ################################################################ logfile=/tmp/`date +%H-%F`.log n=`date +%H` if [ $n -eq 00 ] || [ $n -eq 12 ] then #通过for循环,以find命令作为遍历条件,将目标目录下的所有文件进行遍历并做相应操作 for i in `find /data/log/ -type f` do true > $i done else for i in `find /data/log/ -type f` do du -sh $i >> $logfile done fi 3、检测网卡流量,并按规定格式记录在日志中#!/bin/bash ####################################################### #检测网卡流量,并按规定格式记录在日志中#规定一分钟记录一次 #日志格式如下所示: #2019-08-12 20:40 #ens33 input: 1234bps #ens33 output: 1235bps ######################################################3 while : do #设置语言为英文,保障输出结果是英文,否则会出现bug LANG=en logfile=/tmp/`date +%d`.log #将下面执行的命令结果输出重定向到logfile日志中 exec >> $logfile date +"%F %H:%M" #sar命令统计的流量单位为kb/s,日志格式为bps,因此要*1000*8 sar -n DEV 1 59|grep Average|grep ens33|awk '{print $2,"\t","input:","\t",$5*1000*8,"bps","\n",$2,"\t","output:","\t",$6*1000*8,"bps"}' echo "####################" #因为执行sar命令需要59秒,因此不需要sleep done 4、计算文档每行出现的数字个数,并计算整个文档的数字总数#!/bin/bash ######################################################### #计算文档每行出现的数字个数,并计算整个文档的数字总数 ######################################################## #使用awk只输出文档行数(截取第一段) n=`wc -l a.txt|awk '{print $1}'` sum=0 #文档中每一行可能存在空格,因此不能直接用文档内容进行遍历 for i in `seq 1 $n`do #输出的行用变量表示时,需要用双引号 line=`sed -n "$i"p a.txt`#wc -L选项,统计最长行的长度 n_n=`echo $line|sed s'/[^0-9]//'g|wc -L` echo $n_nsum=$[$sum+$n_n] done echo "sum:$sum" 杀死所有脚本#!/bin/bash ################################################################ #有一些脚本加入到了cron之中,存在脚本尚未运行完毕又有新任务需要执行的情况, #导致系统负载升高,因此可通过编写脚本,筛选出影响负载的进程一次性全部杀死。 ################################################################ ps aux|grep 指定进程名|grep -v grep|awk '{print $2}'|xargs kill -9 5、从 FTP 服务器下载文件#!/bin/bash if [ $# -ne 1 ]; then echo "Usage: $0 filename" fi dir=$(dirname $1) file=$(basename $1) ftp -n -v << EOF # -n 自动登录 open 192.168.1.10 # ftp服务器 user admin password binary # 设置ftp传输模式为二进制,避免MD5值不同或.tar.gz压缩包格式错误 cd $dir get "$file" EOF 6、连续输入5个100以内的数字,统计和、最小和最大#!/bin/bash COUNT=1 SUM=0 MIN=0 MAX=100 while [ $COUNT -le 5 ]; do read -p "请输入1-10个整数:" INT if [[ ! $INT =~ ^[0-9]+$ ]]; then echo "输入必须是整数!" exit 1 elif [[ $INT -gt 100 ]]; then echo "输入必须是100以内!" exit 1 fi SUM=$(($SUM+$INT)) [ $MIN -lt $INT ] && MIN=$INT [ $MAX -gt $INT ] && MAX=$INT let COUNT++ done echo "SUM: $SUM" echo "MIN: $MIN" echo "MAX: $MAX 用户猜数字#!/bin/bash # 脚本生成一个 100 以内的随机数,提示用户猜数字,根据用户的输入,提示用户猜对了, # 猜小了或猜大了,直至用户猜对脚本结束。 # RANDOM 为系统自带的系统变量,值为 0‐32767的随机数 # 使用取余算法将随机数变为 1‐100 的随机数num=$[RANDOM%100+1]echo "$num" # 使用 read 提示用户猜数字 # 使用 if 判断用户猜数字的大小关系:‐eq(等于),‐ne(不等于),‐gt(大于),‐ge(大于等于), # ‐lt(小于),‐le(小于等于) while : do read -p "计算机生成了一个 1‐100 的随机数,你猜: " cai if [ $cai -eq $num ] then echo "恭喜,猜对了" exit elif [ $cai -gt $num ] then echo "Oops,猜大了" else echo "Oops,猜小了" fi done 7、监测 Nginx 访问日志 502 情况,并做相应动作假设服务器环境为 lnmp,近期访问经常出现 502 现象,且 502 错误在重启 php-fpm 服务后消失,因此需要编写监控脚本,一旦出现 502,则自动重启 php-fpm 服务。#场景: #1.访问日志文件的路径:/data/log/access.log #2.脚本死循环,每10秒检测一次,10秒的日志条数为300条,出现502的比例不低于10%(30条)则需要重启php-fpm服务 #3.重启命令为:/etc/init.d/php-fpm restart #!/bin/bash ########################################################### #监测Nginx访问日志502情况,并做相应动作 ########################################################### log=/data/log/access.log N=30 #设定阈值 while :do #查看访问日志的最新300条,并统计502的次数 err=`tail -n 300 $log |grep -c '502" '` if [ $err -ge $N ] then /etc/init.d/php-fpm restart 2> /dev/null #设定60s延迟防止脚本bug导致无限重启php-fpm服务 sleep 60 fi sleep 10 done 8、将结果分别赋值给变量应用场景:希望将执行结果或者位置参数赋值给变量,以便后续使用。方法1:for i in $(echo "4 5 6"); do eval a$i=$idone echo $a4 $a5 $a6 方法2:将位置参数192.168.1.1{1,2}拆分为到每个变量num=0 for i in $(eval echo $*);do #eval将{1,2}分解为1 2 let num+=1 eval node${num}="$i" done echo $node1 $node2 $node3 # bash a.sh 192.168.1.1{1,2} 192.168.1.11 192.168.1.12 方法3:arr=(4 5 6) INDEX1=$(echo ${arr[0]}) INDEX2=$(echo ${arr[1]}) INDEX3=$(echo ${arr[2]}) 9、批量修改文件名示例:# touch article_{1..3}.html # lsarticle_1.html article_2.html article_3.html 目的:把article改为bbs 方法1:for file in $(ls *html); do mv $file bbs_${file#*_} # mv $file $(echo $file |sed -r 's/.*(_.*)/bbs\1/') # mv $file $(echo $file |echo bbs_$(cut -d_ -f2) 方法2:for file in $(find . -maxdepth 1 -name "*html"); do mv $file bbs_${file#*_}done 方法3:# rename article bbs *.html 把一个文档前五行中包含字母的行删掉,同时删除6到10行包含的所有字母 1)准备测试文件,文件名为2.txt 第1行1234567不包含字母 第2行56789BBBBBB 第3行67890CCCCCCCC 第4行78asdfDDDDDDDDD 第5行123456EEEEEEEE 第6行1234567ASDF 第7行56789ASDF 第8行67890ASDF 第9行78asdfADSF 第10行123456AAAA 第11行67890ASDF 第12行78asdfADSF 第13行123456AAAA 2)脚本如下:#!/bin/bash ############################################################### 把一个文档前五行中包含字母的行删掉,同时删除6到10行包含的所有字母 ############################################################## sed -n '1,5'p 2.txt |sed '/[a-zA-Z]/'d sed -n '6,10'p 2.txt |sed s'/[a-zA-Z]//'g sed -n '11,$'p 2.txt #最终结果只是在屏幕上打印结果,如果想直接更改文件,可将输出结果写入临时文件中,再替换2.txt或者使用-i选项 10、统计当前目录中以.html结尾的文件总大for size in $(ls -l *.html |awk '{print $5}'); do sum=$(($sum+$size)) done echo $sum 11、扫描主机端口状态#!/bin/bash HOST=$1 PORT="22 25 80 8080" for PORT in $PORT; do if echo &>/dev/null > /dev/tcp/$HOST/$PORT; then echo "$PORT open" else echo "$PORT close" fi done 用 shell 打印示例语句中字母数小于6的单词 #示例语句: #Bash also interprets a number of multi-character options. #!/bin/bash ############################################################## #shell打印示例语句中字母数小于6的单词 ############################################################## for s in Bash also interprets a number of multi-character options. do n=`echo $s|wc -c` if [ $n -lt 6 ] then echo $s fi done 12、输入数字运行相应命令#!/bin/bash ############################################################## #输入数字运行相应命令 ############################################################## echo "*cmd menu* 1-date 2-ls 3-who 4-pwd 0-exit " while : do #捕获用户键入值 read -p "please input number :" n n1=`echo $n|sed s'/[0-9]//'g` #空输入检测 if [ -z "$n" ] then continue fi #非数字输入检测 if [ -n "$n1" ] then exit 0 fi break done case $n in 1) date ;; 2) ls ;; 3) who ;; 4) pwd ;; 0) break ;; #输入数字非1-4的提示 *) echo "please input number is [1-4]" esac 13、Expect 实现 SSH 免交互执行命令Expect是一个自动交互式应用程序的工具,如telnet,ftp,passwd等。需先安装expect软件包。方法1:EOF标准输出作为expect标准输入#!/bin/bash USER=root PASS=123.com IP=192.168.1.120 expect << EOFset timeout 30spawn ssh $USER@$IP expect { "(yes/no)" {send "yes\r"; exp_continue} "password:" {send "$PASS\r"} } expect "$USER@*" {send "$1\r"} expect "$USER@*" {send "exit\r"} expect eof EOF 方法2:#!/bin/bash USER=root PASS=123.com IP=192.168.1.120 expect -c " spawn ssh $USER@$IP expect { \"(yes/no)\" {send \"yes\r\"; exp_continue} \"password:\" {send \"$PASS\r\"; exp_continue} \"$USER@*\" {send \"df -h\r exit\r\"; exp_continue} }" 方法3:将expect脚本独立出来登录脚本: # cat login.exp #!/usr/bin/expect set ip [lindex $argv 0] set user [lindex $argv 1] set passwd [lindex $argv 2] set cmd [lindex $argv 3] if { $argc != 4 } { puts "Usage: expect login.exp ip user passwd" exit 1 } set timeout 30 spawn ssh $user@$ip expect { "(yes/no)" {send "yes\r"; exp_continue} "password:" {send "$passwd\r"} } expect "$user@*" {send "$cmd\r"} expect "$user@*" {send "exit\r"} expect eof 执行命令脚本:写个循环可以批量操作多台服务器#!/bin/bash HOST_INFO=user_info.txt for ip in $(awk '{print $1}' $HOST_INFO) do user=$(awk -v I="$ip" 'I==$1{print $2}' $HOST_INFO) pass=$(awk -v I="$ip" 'I==$1{print $3}' $HOST_INFO) expect login.exp $ip $user $pass $1 done Linux主机SSH连接信息: # cat user_info.txt 192.168.1.120 root 123456 创建10个用户,并分别设置密码,密码要求10位且包含大小写字母以及数字,最后需要把每个用户的密码存在指定文件中 #!/bin/bash ############################################################## #创建10个用户,并分别设置密码,密码要求10位且包含大小写字母以及数字 #最后需要把每个用户的密码存在指定文件中#前提条件:安装mkpasswd命令 ############################################################## #生成10个用户的序列(00-09) for u in `seq -w 0 09`do #创建用户 useradd user_$u #生成密码 p=`mkpasswd -s 0 -l 10` #从标准输入中读取密码进行修改(不安全) echo $p|passwd --stdin user_$u #常规修改密码 echo -e "$p\n$p"|passwd user_$u #将创建的用户及对应的密码记录到日志文件中 echo "user_$u $p" >> /tmp/userpassworddone 14、监控 httpd 的进程数,根据监控情况做相应处理#!/bin/bash ############################################################################################################################### #需求: #1.每隔10s监控httpd的进程数,若进程数大于等于500,则自动重启Apache服务,并检测服务是否重启成功 #2.若未成功则需要再次启动,若重启5次依旧没有成功,则向管理员发送告警邮件,并退出检测 #3.如果启动成功,则等待1分钟后再次检测httpd进程数,若进程数正常,则恢复正常检测(10s一次),否则放弃重启并向管理员发送告警邮件,并退出检测 ############################################################################################################################### #计数器函数 check_service() { j=0 for i in `seq 1 5` do #重启Apache的命令 /usr/local/apache2/bin/apachectl restart 2> /var/log/httpderr.log #判断服务是否重启成功 if [ $? -eq 0 ] then break else j=$[$j+1] fi #判断服务是否已尝试重启5次 if [ $j -eq 5 ] then mail.py exit fi done }while :do n=`pgrep -l httpd|wc -l` #判断httpd服务进程数是否超过500 if [ $n -gt 500 ] then /usr/local/apache2/bin/apachectl restart if [ $? -ne 0 ] then check_service else sleep 60 n2=`pgrep -l httpd|wc -l` #判断重启后是否依旧超过500 if [ $n2 -gt 500 ] then mail.py exit fi fi fi #每隔10s检测一次 sleep 10 done 15、批量修改服务器用户密码Linux主机SSH连接信息:旧密码# cat old_pass.txt 192.168.18.217 root 123456 22 192.168.18.218 root 123456 22 内容格式:IP User Password Port SSH远程修改密码脚本:新密码随机生成 https://www.linuxprobe.com/books #!/bin/bash OLD_INFO=old_pass.txt NEW_INFO=new_pass.txt for IP in $(awk '/^[^#]/{print $1}' $OLD_INFO); do USER=$(awk -v I=$IP 'I==$1{print $2}' $OLD_INFO) PASS=$(awk -v I=$IP 'I==$1{print $3}' $OLD_INFO) PORT=$(awk -v I=$IP 'I==$1{print $4}' $OLD_INFO) NEW_PASS=$(mkpasswd -l 8) # 随机密码 echo "$IP $USER $NEW_PASS $PORT" >> $NEW_INFO expect -c " spawn ssh -p$PORT $USER@$IP set timeout 2 expect { \"(yes/no)\" {send \"yes\r\";exp_continue} \"password:\" {send \"$PASS\r\";exp_continue} \"$USER@*\" {send \"echo \'$NEW_PASS\' |passwd --stdin $USER\r exit\r\";exp_continue} }" done 生成新密码文件: # cat new_pass.txt 192.168.18.217 root n8wX3mU% 22 192.168.18.218 root c87;ZnnL 22 16、iptables 自动屏蔽访问网站频繁的IP场景:恶意访问,安全防范1)屏蔽每分钟访问超过200的IP方法1:根据访问日志(Nginx为例)#!/bin/bash DATE=$(date +%d/%b/%Y:%H:%M) ABNORMAL_IP=$(tail -n5000 access.log |grep $DATE |awk '{a[$1]++}END{for(i in a)if(a[i]>100)print i}') #先tail防止文件过大,读取慢,数字可调整每分钟最大的访问量。awk不能直接过滤日志,因为包含特殊字符。 for IP in $ABNORMAL_IP; do if [ $(iptables -vnL |grep -c "$IP") -eq 0 ]; then iptables -I INPUT -s $IP -j DROP fi done 方法2:通过TCP建立的连接#!/bin/bash ABNORMAL_IP=$(netstat -an |awk '$4~/:80$/ && $6~/ESTABLISHED/{gsub(/:[0-9]+/,"",$5);{a[$5]++}}END{for(i in a)if(a[i]>100)print i}') #gsub是将第五列(客户端IP)的冒号和端口去掉 for IP in $ABNORMAL_IP; do if [ $(iptables -vnL |grep -c "$IP") -eq 0 ]; then iptables -I INPUT -s $IP -j DROP fi done 2)屏蔽每分钟SSH尝试登录超过10次的IP方法1:通过lastb获取登录状态:#!/bin/bash DATE=$(date +"%a %b %e %H:%M") #星期月天时分 %e单数字时显示7,而%d显示07 ABNORMAL_IP=$(lastb |grep "$DATE" |awk '{a[$3]++}END{for(i in a)if(a[i]>10)print i}')for IP in $ABNORMAL_IP; do if [ $(iptables -vnL |grep -c "$IP") -eq 0 ]; then iptables -I INPUT -s $IP -j DROP fi done 方法2:通过日志获取登录状态#!/bin/bash DATE=$(date +"%b %d %H") ABNORMAL_IP="$(tail -n10000 /var/log/auth.log |grep "$DATE" |awk '/Failed/{a[$(NF-3)]++}END{for(i in a)if(a[i]>5)print i}')" for IP in $ABNORMAL_IP; do if [ $(iptables -vnL |grep -c "$IP") -eq 0 ]; then iptables -A INPUT -s $IP -j DROP echo "$(date +"%F %T") - iptables -A INPUT -s $IP -j DROP" >>~/ssh-login-limit.log fi done 17、根据web访问日志,封禁请求量异常的IP,如IP在半小时后恢复正常,则解除封禁#!/bin/bash #################################################################################### #根据web访问日志,封禁请求量异常的IP,如IP在半小时后恢复正常,则解除封禁 #################################################################################### logfile=/data/log/access.log #显示一分钟前的小时和分钟 d1=`date -d "-1 minute" +%H%M` d2=`date +%M` ipt=/sbin/iptables ips=/tmp/ips.txt block() { #将一分钟前的日志全部过滤出来并提取IP以及统计访问次数 grep '$d1:' $logfile|awk '{print $1}'|sort -n|uniq -c|sort -n > $ips #利用for循环将次数超过100的IP依次遍历出来并予以封禁 for i in `awk '$1>100 {print $2}' $ips` do $ipt -I INPUT -p tcp --dport 80 -s $i -j REJECT echo "`date +%F-%T` $i" >> /tmp/badip.log done } unblock() { #将封禁后所产生的pkts数量小于10的IP依次遍历予以解封 for a in `$ipt -nvL INPUT --line-numbers |grep '0.0.0.0/0'|awk '$2<10 {print $1}'|sort -nr` do $ipt -D INPUT $a done $ipt -Z } #当时间在00分以及30分时执行解封函数 if [ $d2 -eq "00" ] || [ $d2 -eq "30" ] then #要先解再封,因为刚刚封禁时产生的pkts数量很少 unblock block else block fi 18、判断用户输入的是否为IP地址方法1:#!/bin/bash function check_ip(){ IP=$1 VALID_CHECK=$(echo $IP|awk -F. '$1< =255&&$2<=255&&$3<=255&&$4<=255{print "yes"}') if echo $IP|grep -E "^[0-9]{1,3}\.[0-9]{1,3}\.[0-9]{1,3}\.[0-9]{1,3}$">/dev/null; then if [ $VALID_CHECK == "yes" ]; then echo "$IP available." else echo "$IP not available!" fi else echo "Format error!" fi } check_ip 192.168.1.1 check_ip 256.1.1.1 方法2:#!/bin/bash function check_ip(){ IP=$1 if [[ $IP =~ ^[0-9]{1,3}\.[0-9]{1,3}\.[0-9]{1,3}\.[0-9]{1,3}$ ]]; then FIELD1=$(echo $IP|cut -d. -f1) FIELD2=$(echo $IP|cut -d. -f2) FIELD3=$(echo $IP|cut -d. -f3) FIELD4=$(echo $IP|cut -d. -f4) if [ $FIELD1 -le 255 -a $FIELD2 -le 255 -a $FIELD3 -le 255 -a $FIELD4 -le 255 ]; then echo "$IP available." else echo "$IP not available!" fi else echo "Format error!" fi } check_ip 192.168.1.1 check_ip 256.1.1.1 增加版:加个死循环,如果IP可用就退出,不可用提示继续输入,并使用awk判断。#!/bin/bash function check_ip(){ local IP=$1 VALID_CHECK=$(echo $IP|awk -F. '$1< =255&&$2<=255&&$3<=255&&$4<=255{print "yes"}') if echo $IP|grep -E "^[0-9]{1,3}\.[0-9]{1,3}\.[0-9]{1,3}\.[0-9]{1,3}$" >/dev/null; then if [ $VALID_CHECK == "yes" ]; then return 0 else echo "$IP not available!" return 1 fi else echo "Format error! Please input again." return 1 fi } while true; do read -p "Please enter IP: " IP check_ip $IP [ $? -eq 0 ] && break || continue done 到此结束,谢谢阅读!
-
苹果虚拟定位 欺骗iOS设备位置,无需越狱或在设备上安装应用程序 前言LocationSimulator 是一款macOS应用程序(10.15.x及更高版本),允许欺骗iOS或iPhoneSimulator设备的位置。该项目的目标受众是想要测试其基于位置服务的应用程序的开发人员。我不鼓励使用此应用程序在iOS游戏中作弊,也不为这些游戏提供支持。如果您在预期目的之外使用此应用程序,则只能靠自己。特征欺骗iOS设备位置,而无需越狱或在设备上安装应用程序。欺骗 iPhoneSimulator 设备位置。自动尝试下载适用于您的iOS版本的DeveloperDiskImage文件。在地图上长按设置设备位置。支持自定义和预定义(步行/自行车/驾驶)移动速度。使用箭头键控制移动。从当前位置导航到新位置。支持网络设备。搜索位置。支持暗模式。安装从 github 下载最新版本版本以获取最新更改或通过在终端中输入以下命令来安装自制软件:/bin/bash -c "$(curl -fsSL https://raw.githubusercontent.com/Homebrew/install/master/install.sh)"使用自制软件安装位置模拟器:brew install locationsimulator官网地址https://github.com/Schlaubischlump/LocationSimulator
-
-
-
-
博客系统,简单易部署,精致主题贴心服务,专为程序员设计! 📚 项目介绍🔥本项目系统是一款基于 Java 的菠萝博客系统,简单易部署,精致主题,贴心服务,专为程序员设计。Bolo菠萝博客 专为程序员设计的精致Java博客系统 | 🎸基于Solo深度定制 | 本地登录 | 免登录评论 | 动态邮件提醒 | 自定义图床 | 一键隐藏交互式模块,备案必备 | ✨精致主题持续更新 | 备份一键导出导入 | 内置防火墙 | 评论过滤 | 独立分类 | 文章同步/备份到黑客派 | 离线博客 | ✅安装太轻松!WAR包、Tomcat、Docker、JAR部署支持 | 🚚支持从Solo轻松迁移。为什么选择 Bolo完整的教程文档,完善的交流答疑精美皮肤常更新支持将文章自动备份至 GitHub 仓库超酷的数据统计表本地登录、评论,支持备案模式(隐藏登录、评论及搜索入口)支持 Tomcat、Docker 快速部署邮件提醒功能,不怕错过博客中的新评论,回复他人评论也会发邮件提醒他人强大的 Vditor 编辑器,支持 所见即所得、即时渲染、分屏预览 三种模式,额外支持通过 Lute_HTTP 渲染支持自定义图床(阿里云、又拍云、七牛云、腾讯云)轻型防火墙功能,阻止恶意访问,保证博客正常运行强大的 Markdown 编辑器(使用 Vditor)支持大纲、数学公式、脑图、图表、流程图、甘特图、时序图、五线谱、多媒体、语音阅读、标题锚点、代码高亮及复制、graphviz 渲染支持黑暗模式,随系统设置自动切换,保护视力看板娘+,在线更新海量看板娘资源如果你是 Solo 用户,还可将 Solo 的数据一键迁移到 Bolo;如果你对 Bolo 不满意,还可以一键迁回至 SoloServer 酱推送功能,在微信上接收你的博客动态自动生成“我在 GitHub 上的开源项目”文章功能,让博客的访客更好地了解你的 GitHub 履历✨ 全新主题,支持黑暗模式📈 后台管理,酷炫统计表,完整黑暗模式支持🔍 搜索界面,一搜即达📸 登录界面,定期自动更新主题美图地址项目地址:https://gitee.com/AdlerED/bolo-solo安装教程:https://doc.stackoverflow.wiki/web/#/7?page_id=46
-
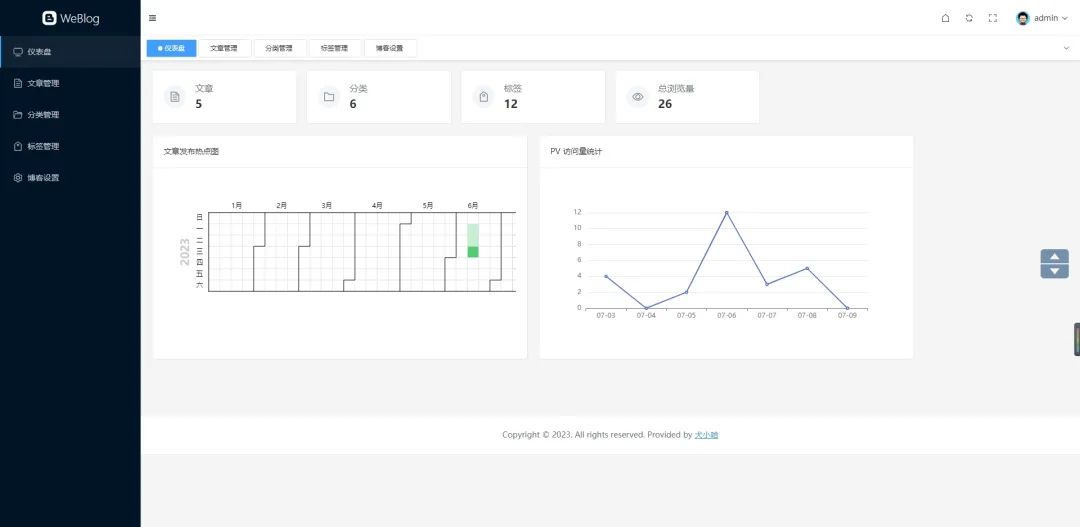
前后端分离,开源的 Spring Boot + Vue 3.2 的博客,泰裤辣! WeBlog简介一款由 Spring Boot + Vue 3.2 开发的前后端分离博客。{mtitle title="Weblog 后台仪"/}后端采用 Spring Boot 、Mybatis Plus 、MySQL 、Spring Sericuty、JWT、Minio、Guava 等;后台管理采用 Vue 3.2 + Element Plus 纯手写的管理后台,未采用任何 Admin 框架;支持博客 Markdown 格式发布与编辑、文章分类、文章标签的管理;支持博客基本信息的设置,以及社交主页的跳转;支持仪表盘数据统计,Echarts 文章发布热图统计、PV 访问量统计;相关地址GitHub 地址:https://github.com/weiwosuoai/WeBlogGitee 地址:https://gitee.com/AllenJiang/WeBlog演示地址:http://118.31.41.16:8081/游客账号:test游客密码:test演示截图登录页仪表盘文章管理写博客前台首页博客详情功能前台功能是否完成首页✅分类列表✅标签标签✅博客详情✅站内搜索TODO知识库 WikiTODO博客评论TODO后台功能是否完成后台登录页✅仪表盘✅文章管理✅分类管理✅标签管理✅博客设置✅评论管理TODO模块介绍{mtitle title="WeBlog 项目模块一览"/}项目名说明weblog-springboot后端项目weblog-vue3前端项目后端项目模块介绍模块名说明weblog-module-admin博客后台管理模块weblog-module-common通用模块weblog-module-jwtJWT 认证、授权模块weblog-web博客前台(启动入口)技术栈后端框架说明版本号备注JDKJava 开发工具包1.8它是目前企业项目比较主流的版本Spring BootWeb 应用开发框架2.6.3主流框架Maven项目构建工具3.6.3企业主流的构建工具MySQL数据库5.7 Mybatis PlusMybatis 增强版持久层框架3.5.2 HikariCP数据库连接池4.0.3Spring Boot 内置数据库连接池,号称性能最强Spring Security安全框架2.6.3 JWTWeb 应用令牌0.11.2 Lombok消除冗余的样板式代码1.8.22 JacksonJSON 工具库2.13.1 Hibernate Validator参数校验组件6.2.0.Final Logback日志组件1.2.10 GuavaGoogle 开源的工具库18.0 p6spy动态监测框架3.9.1 Minio对象存储8.2.1用于存储博客中相关图片flexmarkMarkdown 解析0.62.2 前端框架说明版本号Vue 3Javascript 渐进式框架3.2.47Vite前端项目构建工具4.3.9Element Plus饿了么基于 Vue 3 开源的组件框架2.3.3vue-routerVue 路由管理器4.1.6vuex状态存储组件4.0.2md-editor-v3Markdown 编辑器组件3.0.1windicssCSS 工具类框架3.5.6axios基于 Promise 的网络请求库1.3.5Echarts百度开源的数据可视化图表库5.4.2